In-Depth Look at Azure Bicep Syntax
Table of Contents
If you have not checked out my other series, “Getting Started with Bicep” then I would highly suggest starting there so you can familiarize yourself with Azure Bicep including some basic syntax and how to write your first template. This article will walk you through more advanced syntax topics including output variables, loops and more!
Comments
Comments in code help you or others figure out what something may do or why it’s there in the first place. While it does not replace full documentation, it is a great way to get a picture of what your code does.
Single Line Comment
You can comment a single line of bicep code by adding ‘//’ to it. In the example below you can see my comment added to the tagging resource that we will go over next!

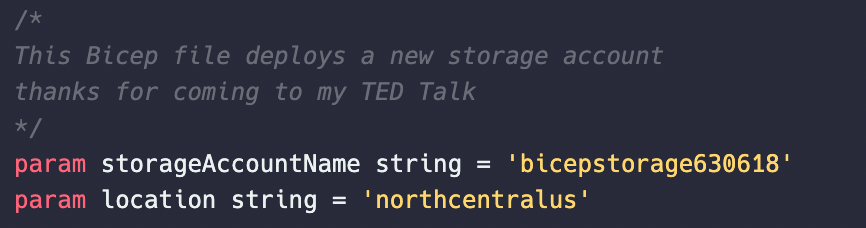
Multi-line Comments
Instead of adding ‘//’ to every line you want to comment on, you can span across multiple lines using ‘/*’ to the beginning of the multi-line comment, and ‘/*’ to the end of the multi-line comment.
dependsOn
With Bicep, you may find that one resource you are deploying must be deployed after another one. When you run into a situation like this you can use the dependsOn property so the resource is never created prior to the other. It’s important to remember that even if you declare a resource later on in your template, it may still be deployed prior to something declared earlier.
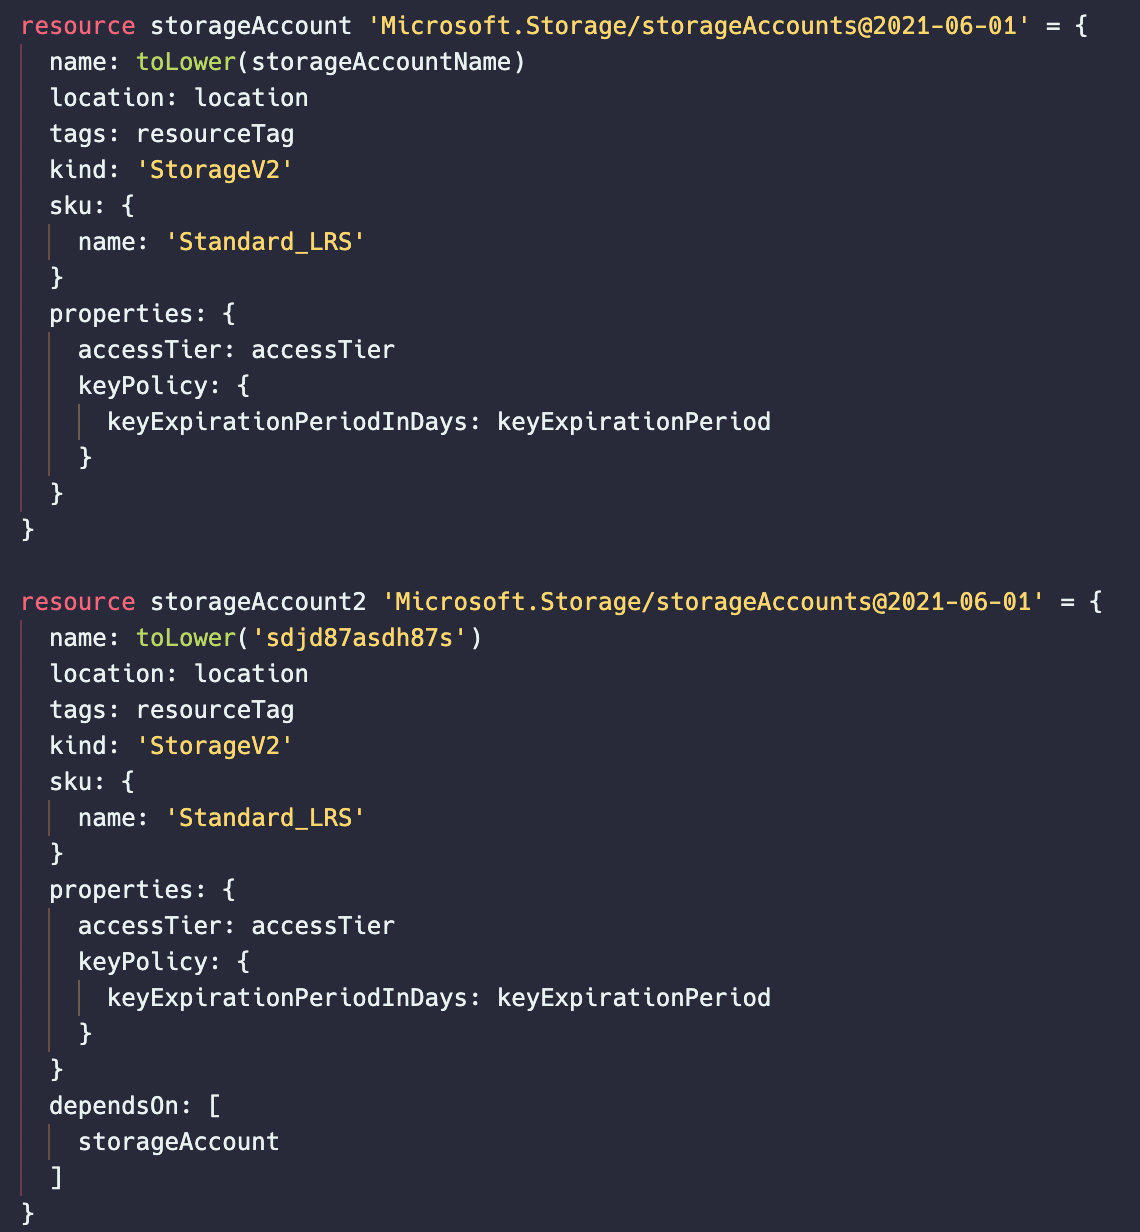
In the example below, I am creating another Storage Account below. I use dependsOn on the 2nd Storage Account by referencing the first Storage Account’s symbolic name, ‘storageaccount’.
Note: With some resources, Bicep is smart enough to know that child resources need to be deployed behind its parent. This occurs when it notices that a declaration contains a reference to a previously declared resource. (ie a storage account and a storage table, when creating the storage table you will need to reference the storage account in the tables name by calling the storage accounts symbolic name)
Output Variables
Output variables allow you to gather information from your deployment and output them so you can review them quickly and easily. Output variables should be at the end/bottom of your bicep deployment script. In my example below I am creating a new output variable named allowPublicAccess (make sure to pick a name that tells you what the value means from a quick glance) that will display a boolean value (true/false) on if my newly deployed storage account allows blob public access.
output allowPublicAccess bool = storageAccountName_resource.properties.allowBlobPublicAccess
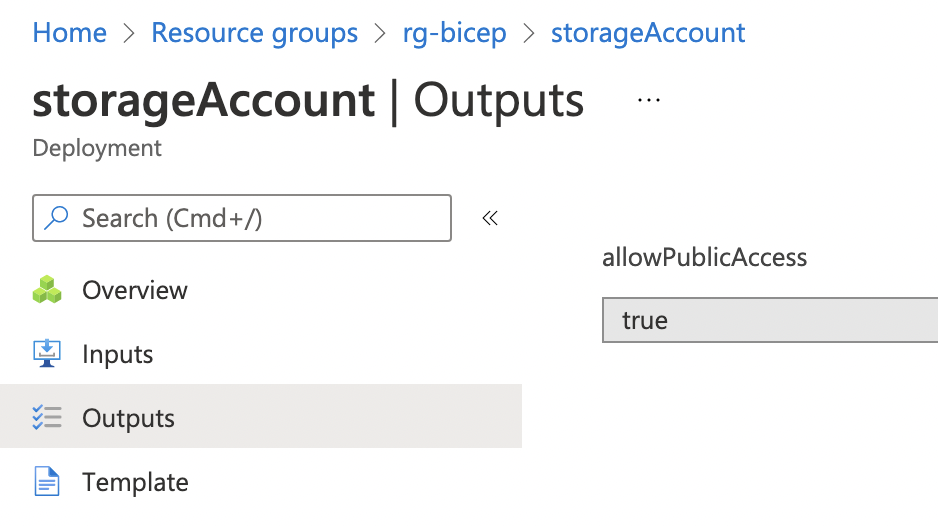
If I then go into the Azure Portal, select my Resource Group and click ‘Deployments’ I can review the output variables and values from my deployment.
Tags
Tags consist of a name and a value pair. Example: you can have a tag with a name Department and possible values of IT, Accounting, HelpDesk, and so on. Both the name and the value of tags are case sensitive.
There are some limitations on tags:
- Not every azure resource supports tags. most do, but you can verify what resources support tags here
- Tags per subscription1: 50
- Unique tag calculations per subscription1: 80,000
- Tag key length: 512 characters
- Tag value length: 256 characters
1You can apply up to 50 tags directly to a subscription. However, the subscription can contain an unlimited number of tags that are applied to resource groups and resources within the subscription. The number of tags per resource or resource group is limited to 50. Resource Manager returns a list of unique tag name and values in the subscription only when the number of tags is 80,000 or less. You still can find a resource by tag when the number exceeds 80,000.
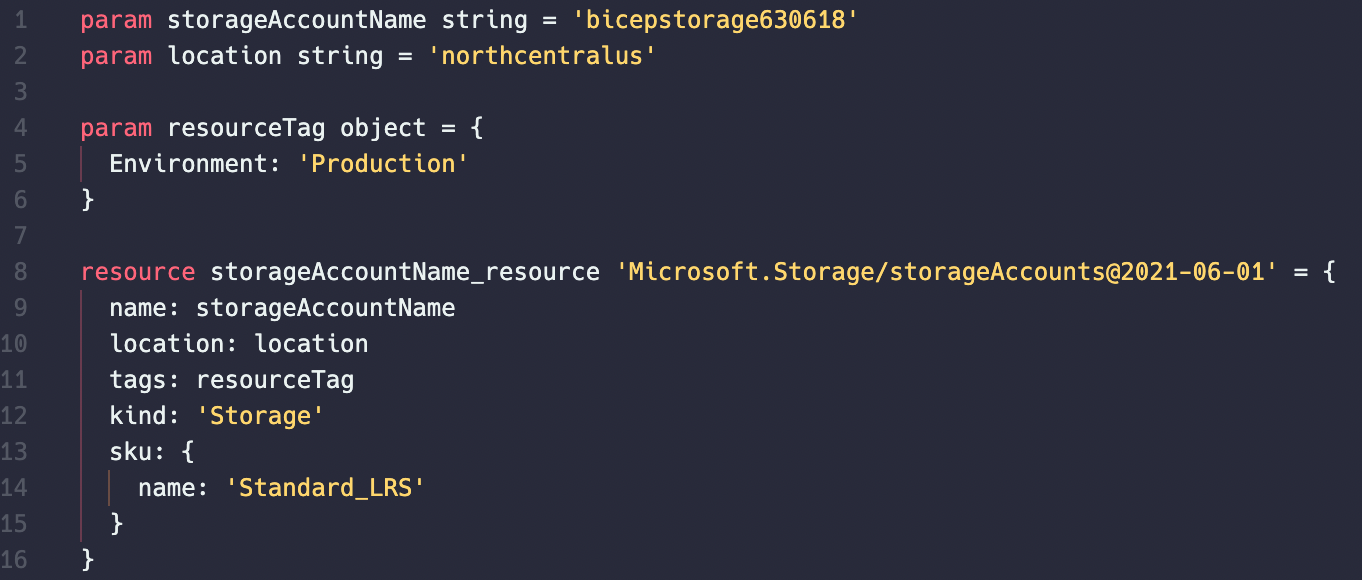
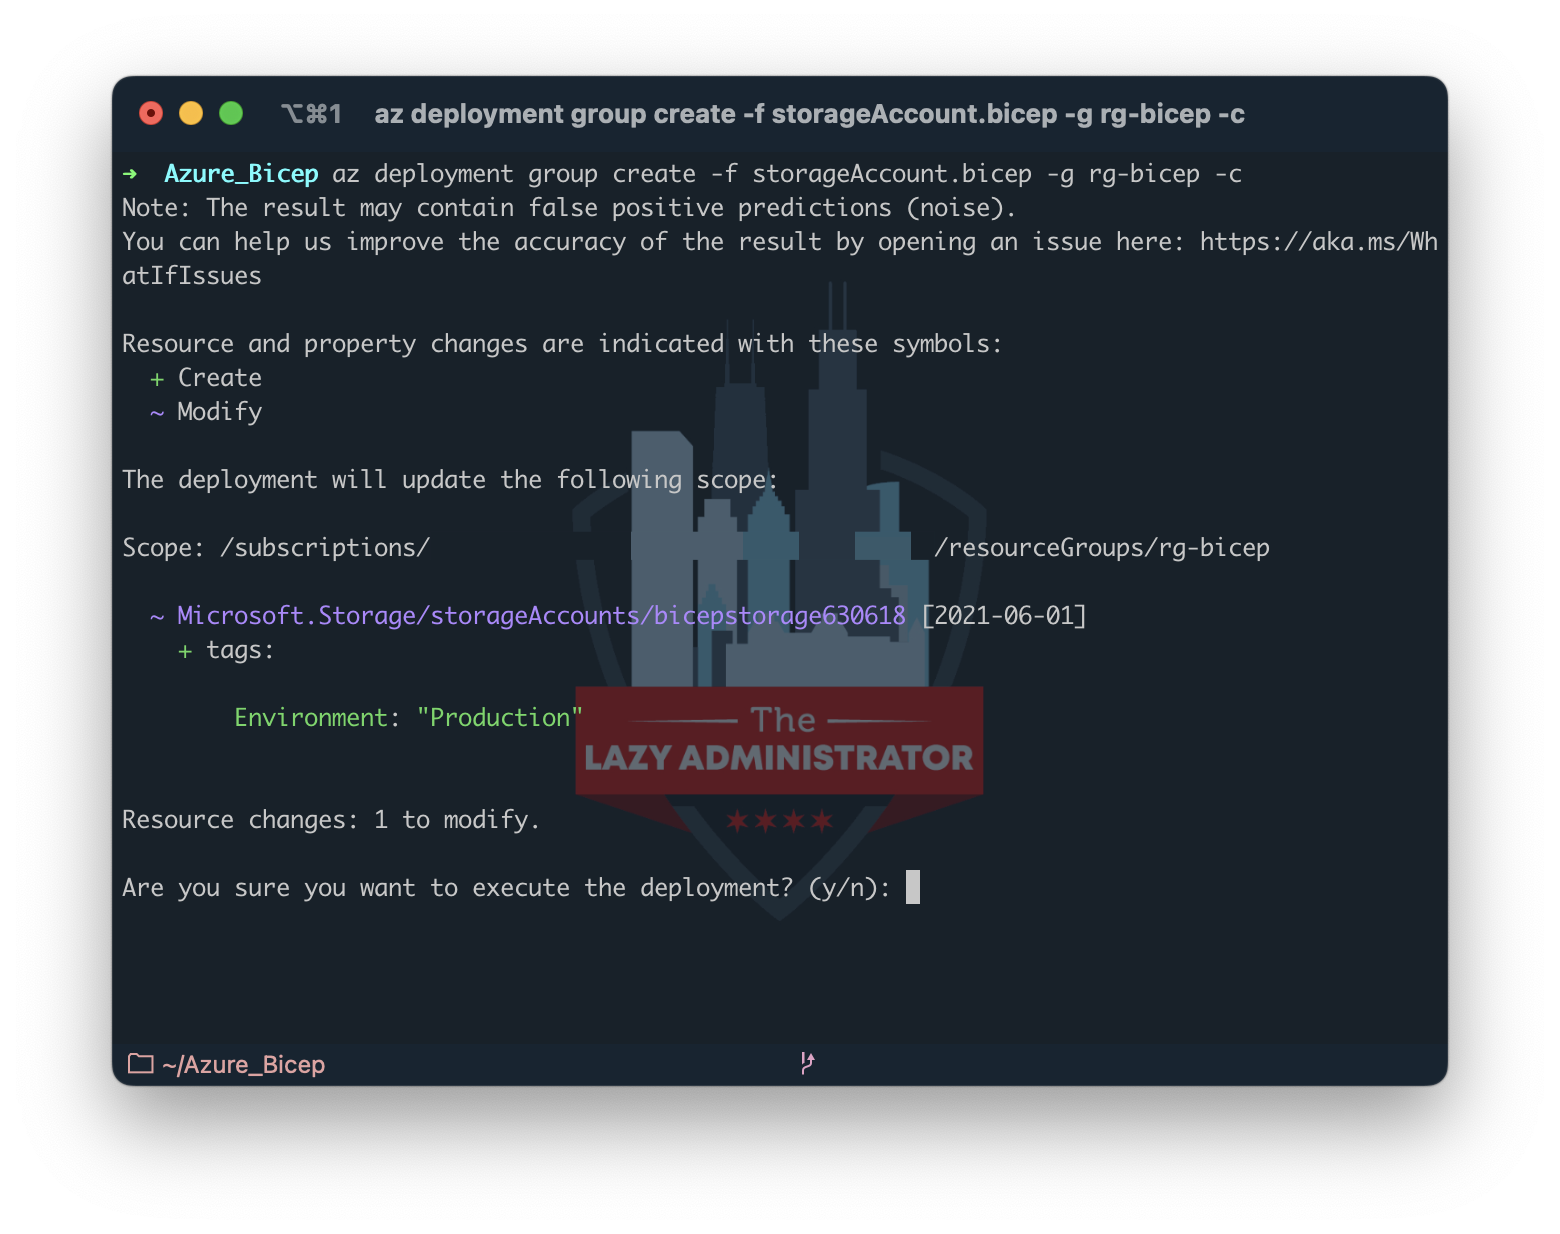
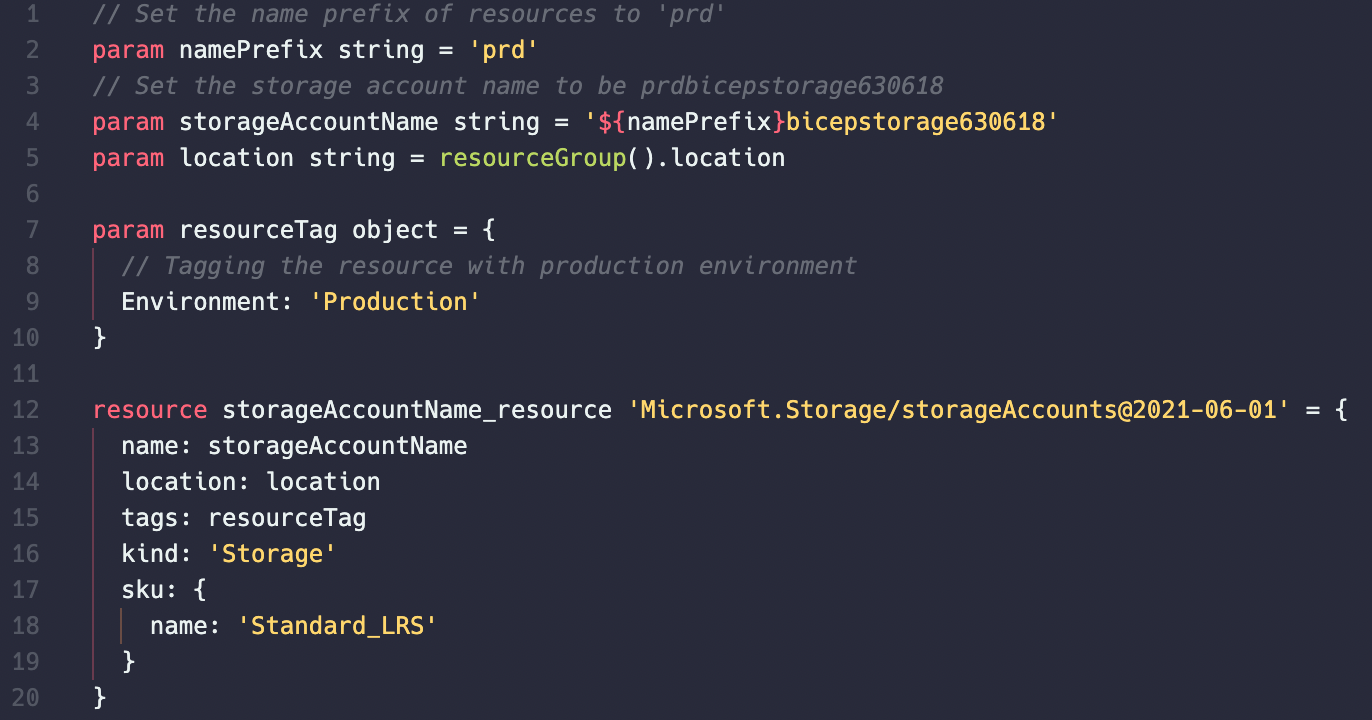
Using the same Bicep code example from the Getting Started series, you can see I added a new parameter object called resourceTag. Then in my storage account resource I added the object to the tags property.
And when I deploy it, it sees that I already have the storage account deployed in my Azure environment but it is missing the defined tag. So it will make a change to that resource and tag it.
Loops
Simple Loops
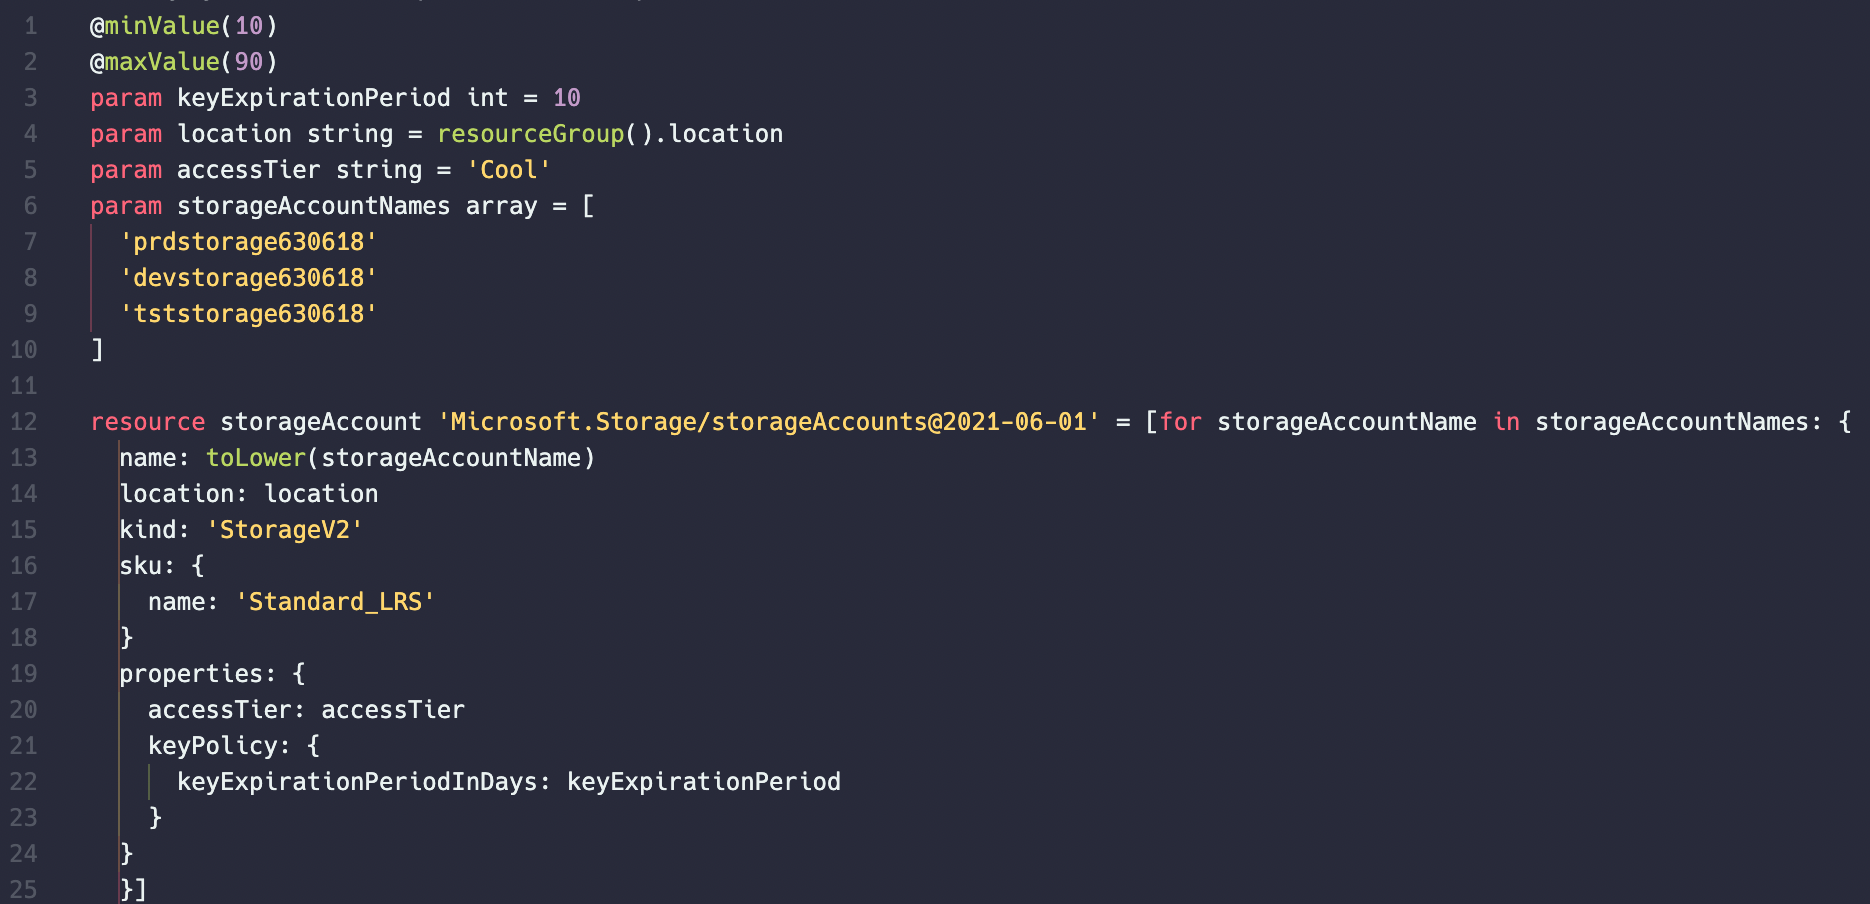
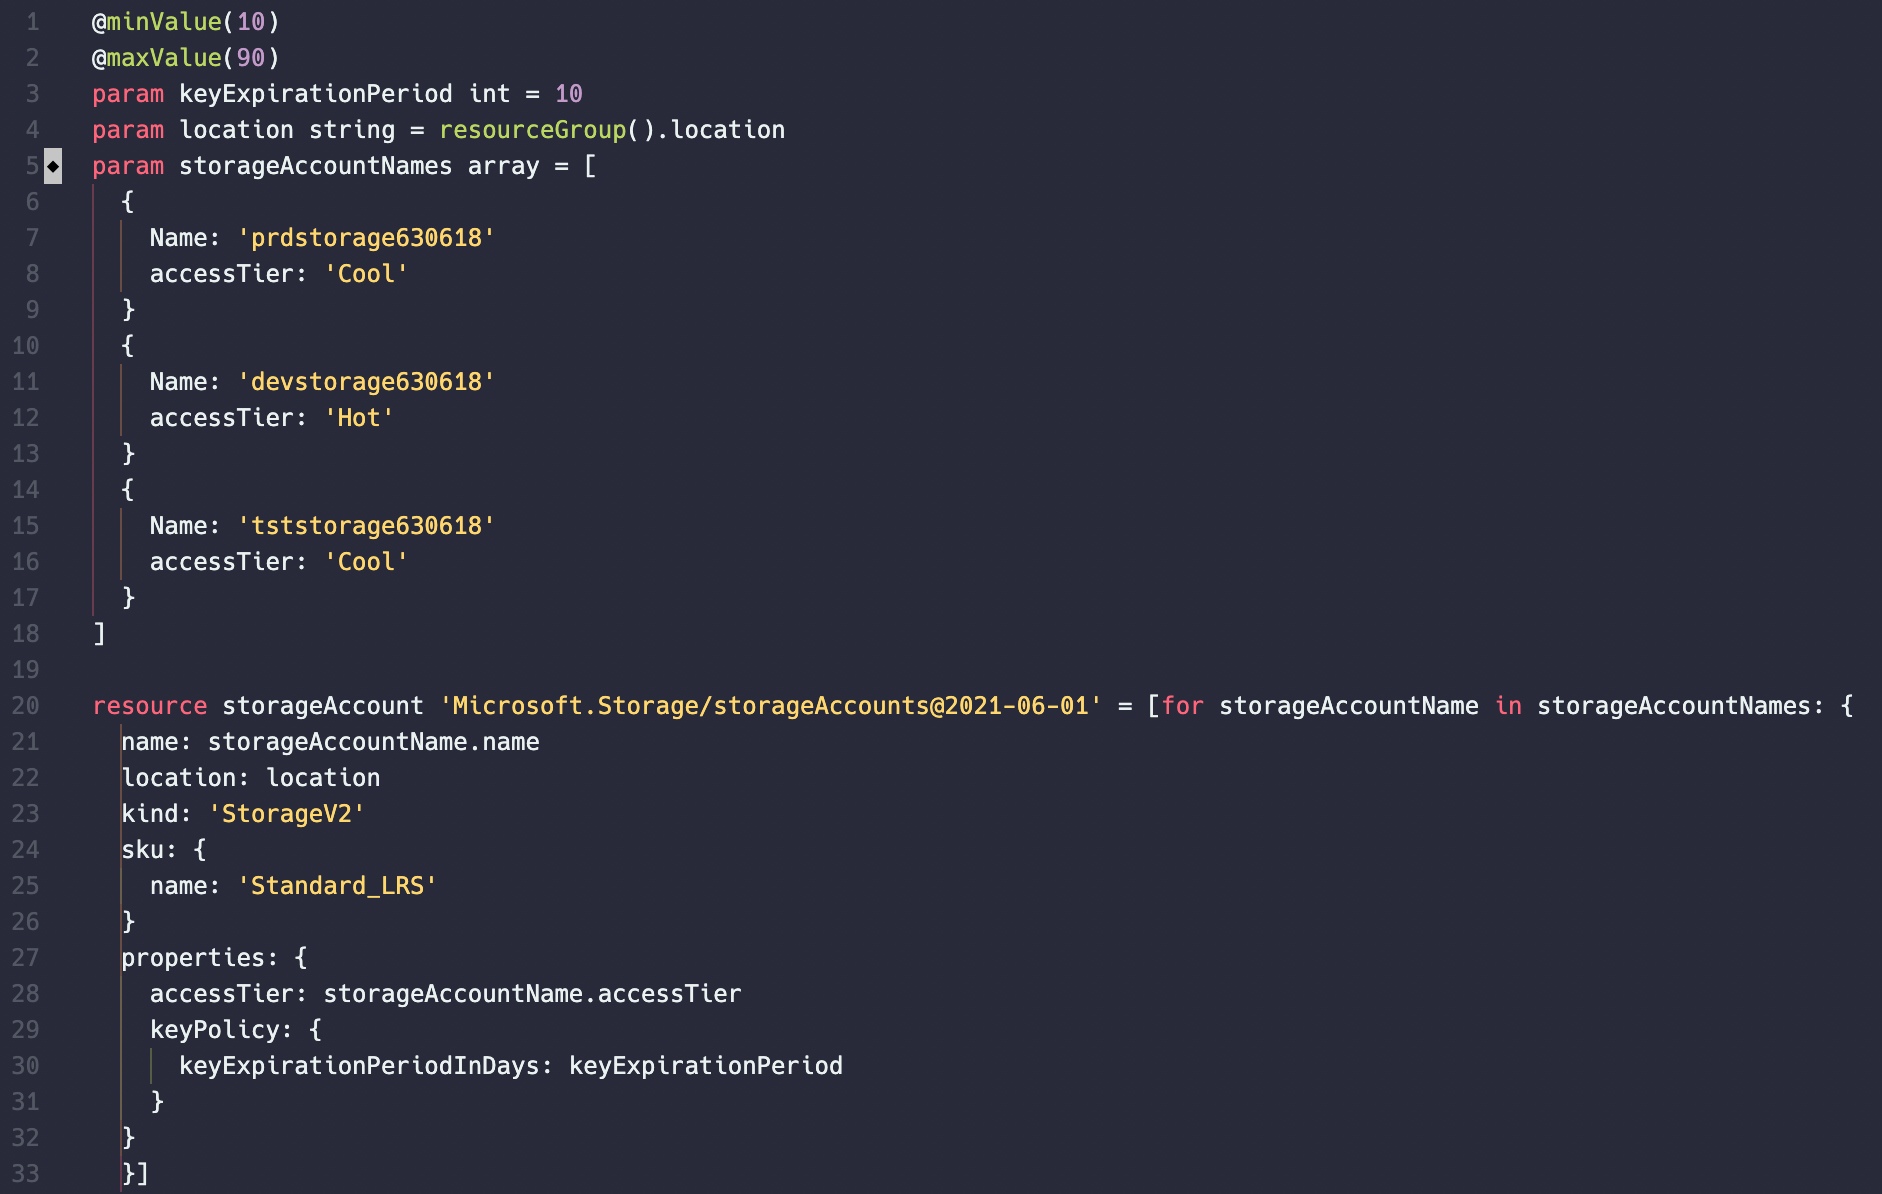
Loops are an important item with Bicep, they enable you to easily create same resources without having to copy and paste the declaration over and over. In my example below I created a new Bicep template to deploy 3 Storage Accounts. On line 6 I created an array of my Storage Account names and then line 12 I am iterating through that list in the For statement. ‘Think of it as foreach item in the array do the following’
The new symbolic name is created on the for line called “storageAccountName” which only exists within my loop. I use that symbolic name on line 13 which gives my new Storage Account its proper name.
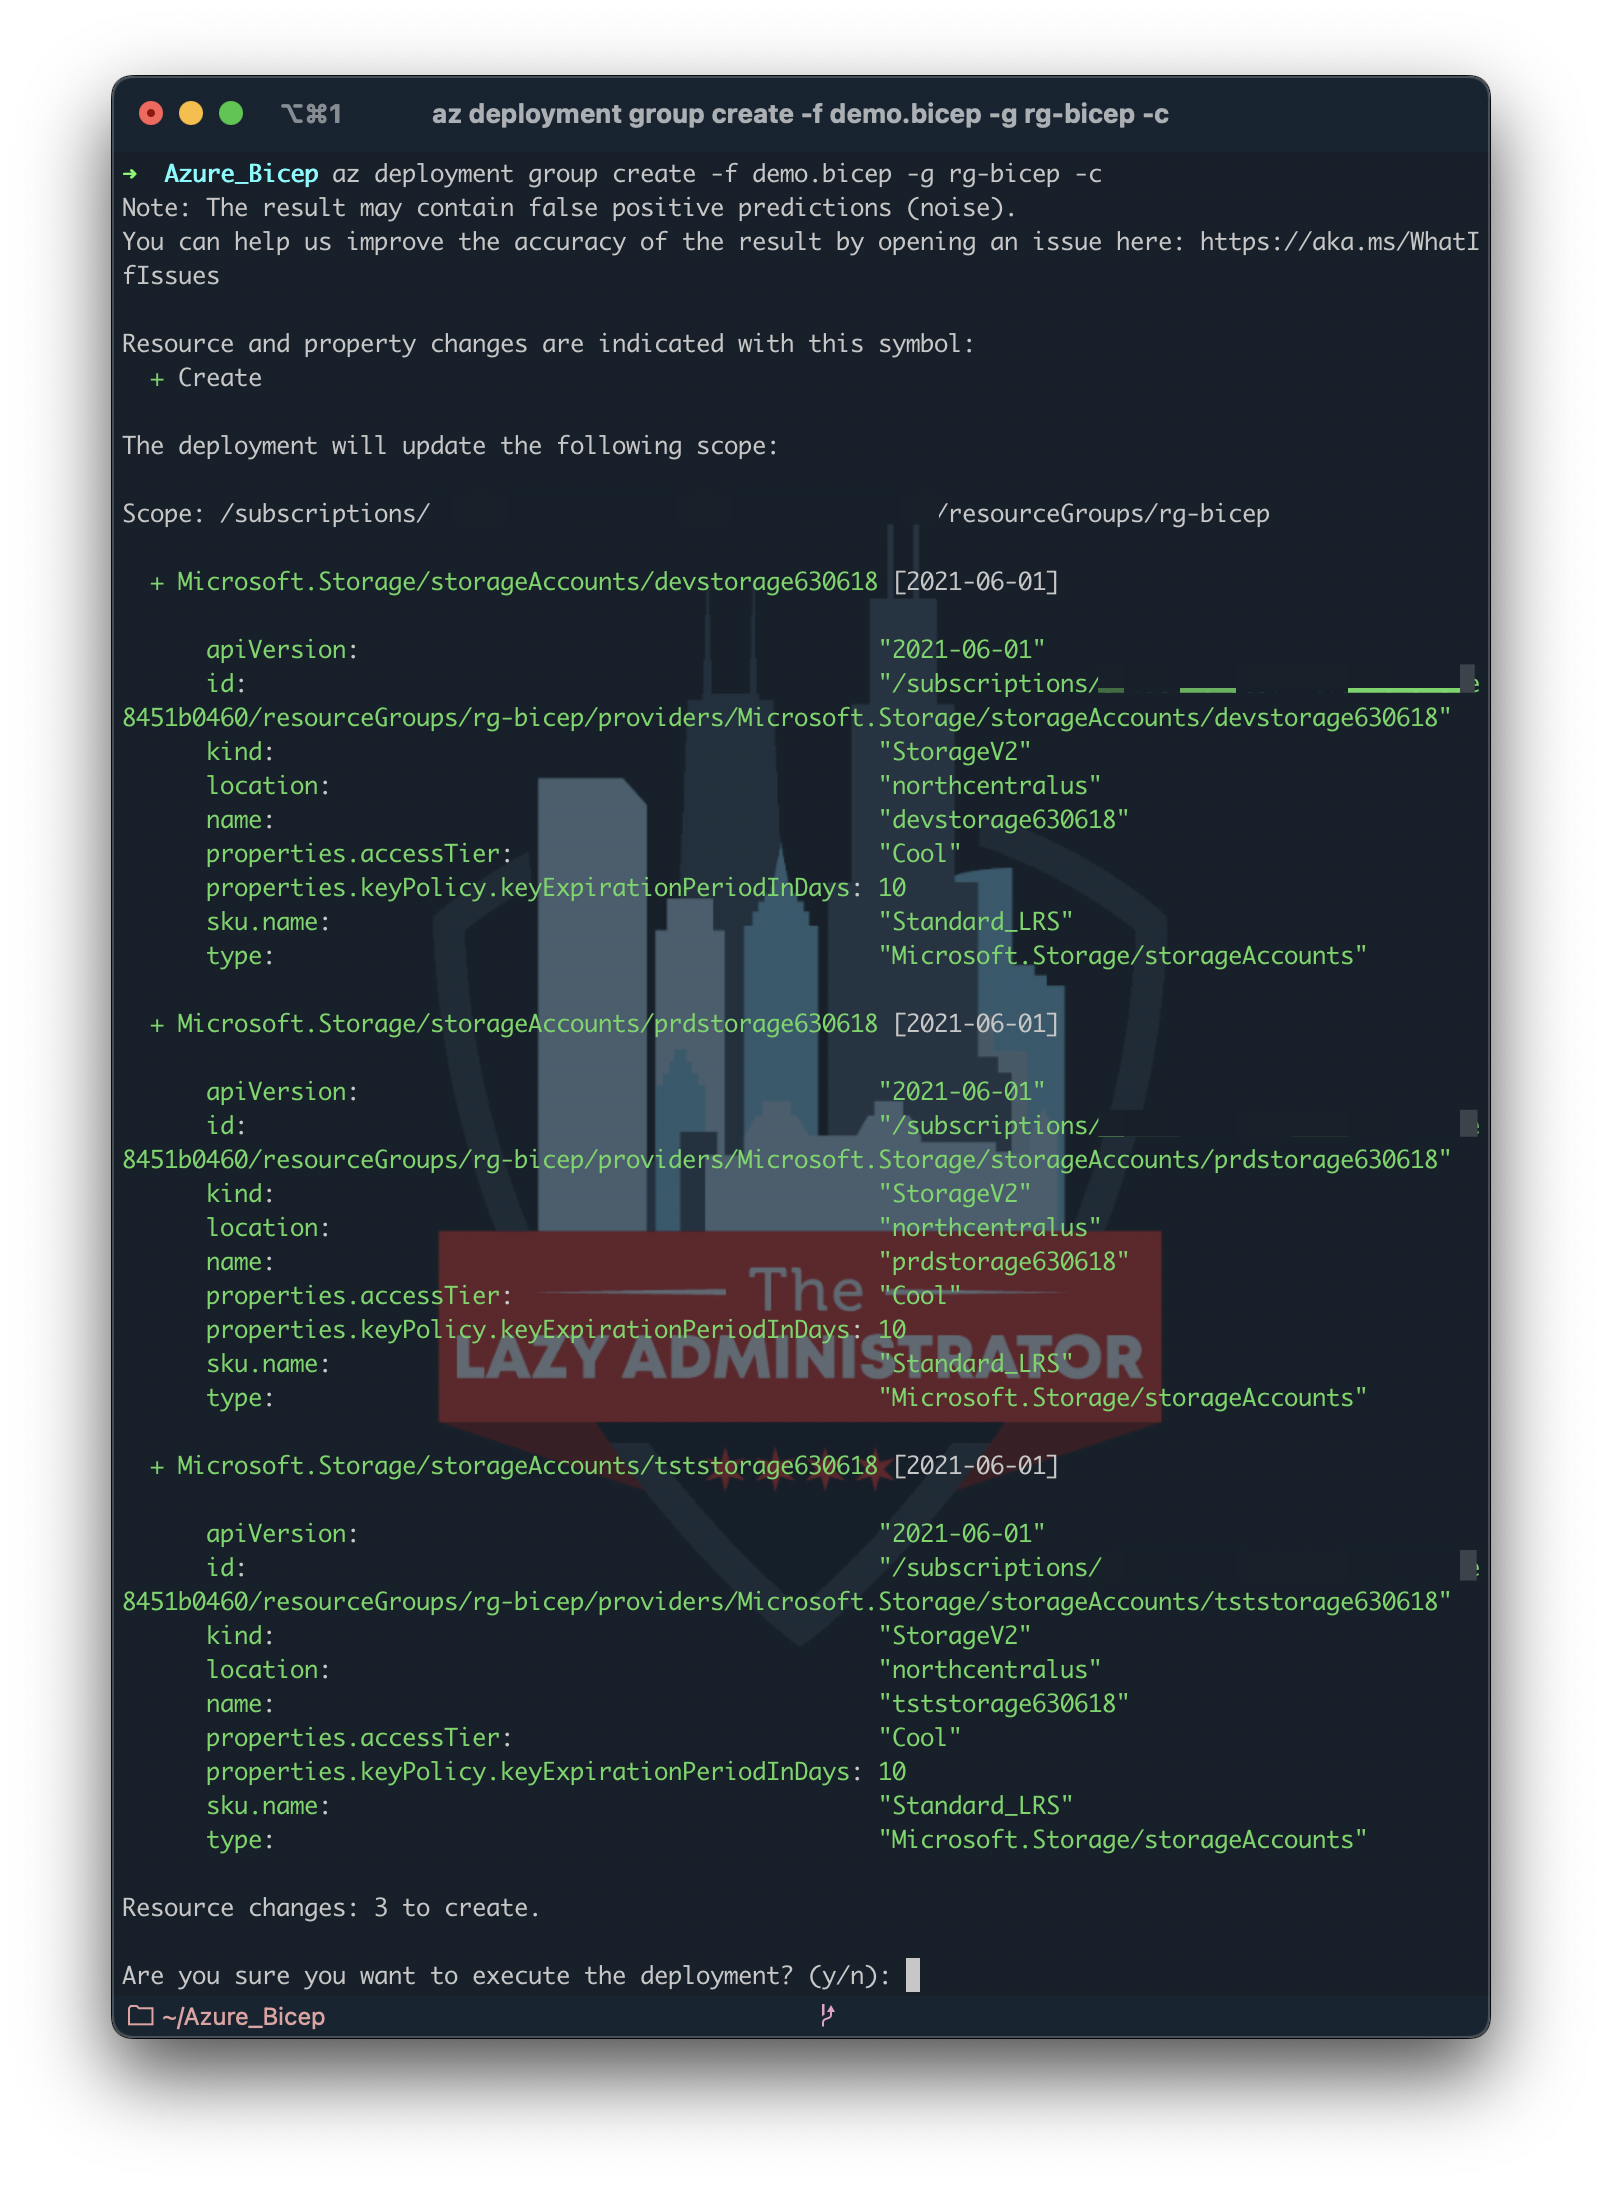
When I begin the deployment of this Bicep template I can see that it will correctly create my three new Storage Accounts.
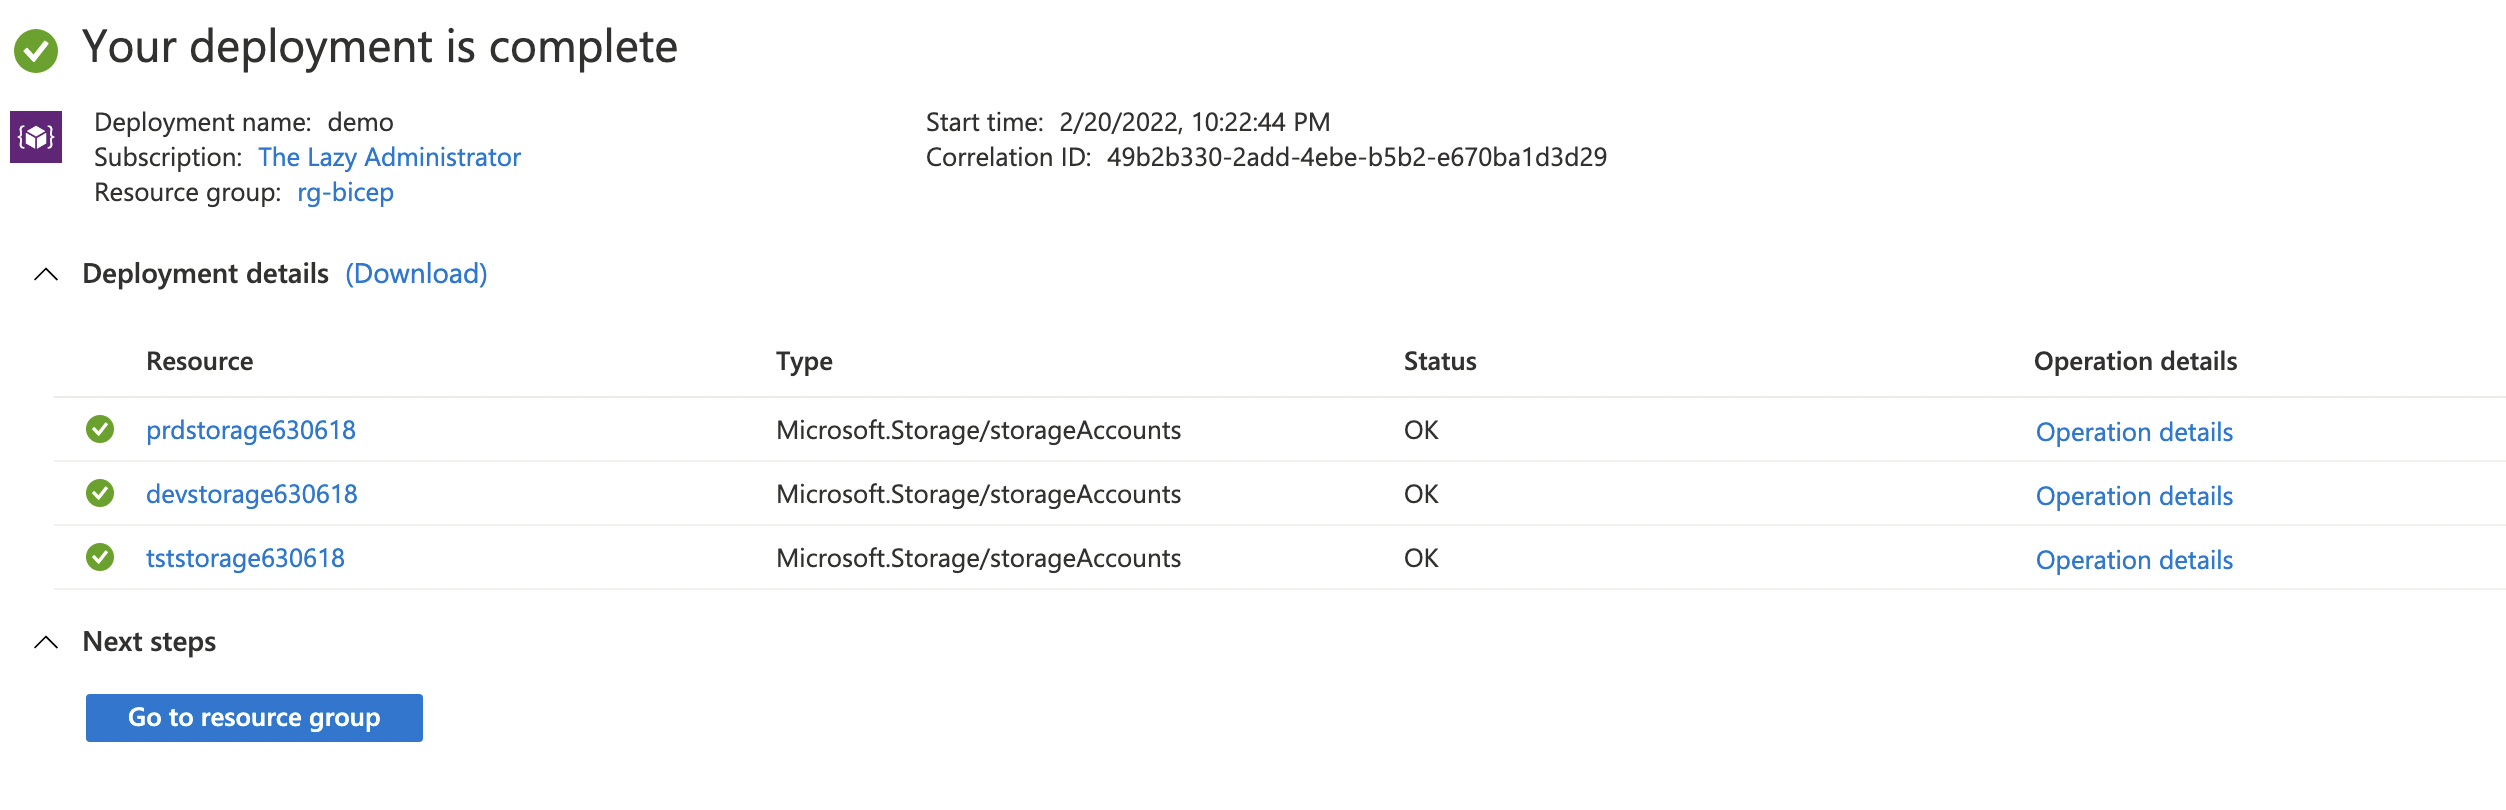
Viewing the deployment details, I can see my newly created Storage Accounts!
Multi-Property Loops
In the first example, we used an array to set a single property, ‘name’. What if we wanted to set not only name but also the access tier of each new Storage Account?
In the example below I removed the accessTier param and modified the storageAccountNames array to include a new property: accessTier. The on line 28, I change it to look at the symbolic name storageAccountName and the property ‘accessTier’.
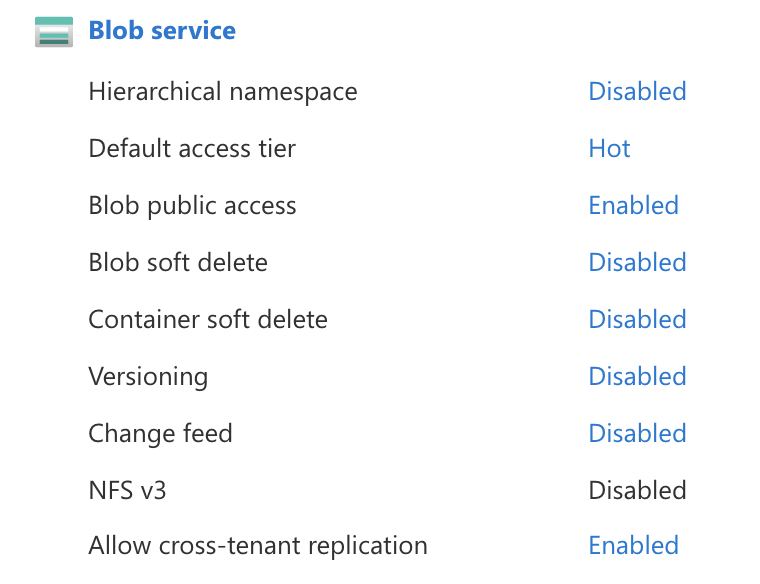
After deploying this to my test tenant, I can see that the dev Storage Account changed from cool storage to hot!
Bicep Functions
Azure Bicep supports a wide array of functions. You can review this list that will show you all the different functions that are available. We will go over some of the more common ones.
Any Function
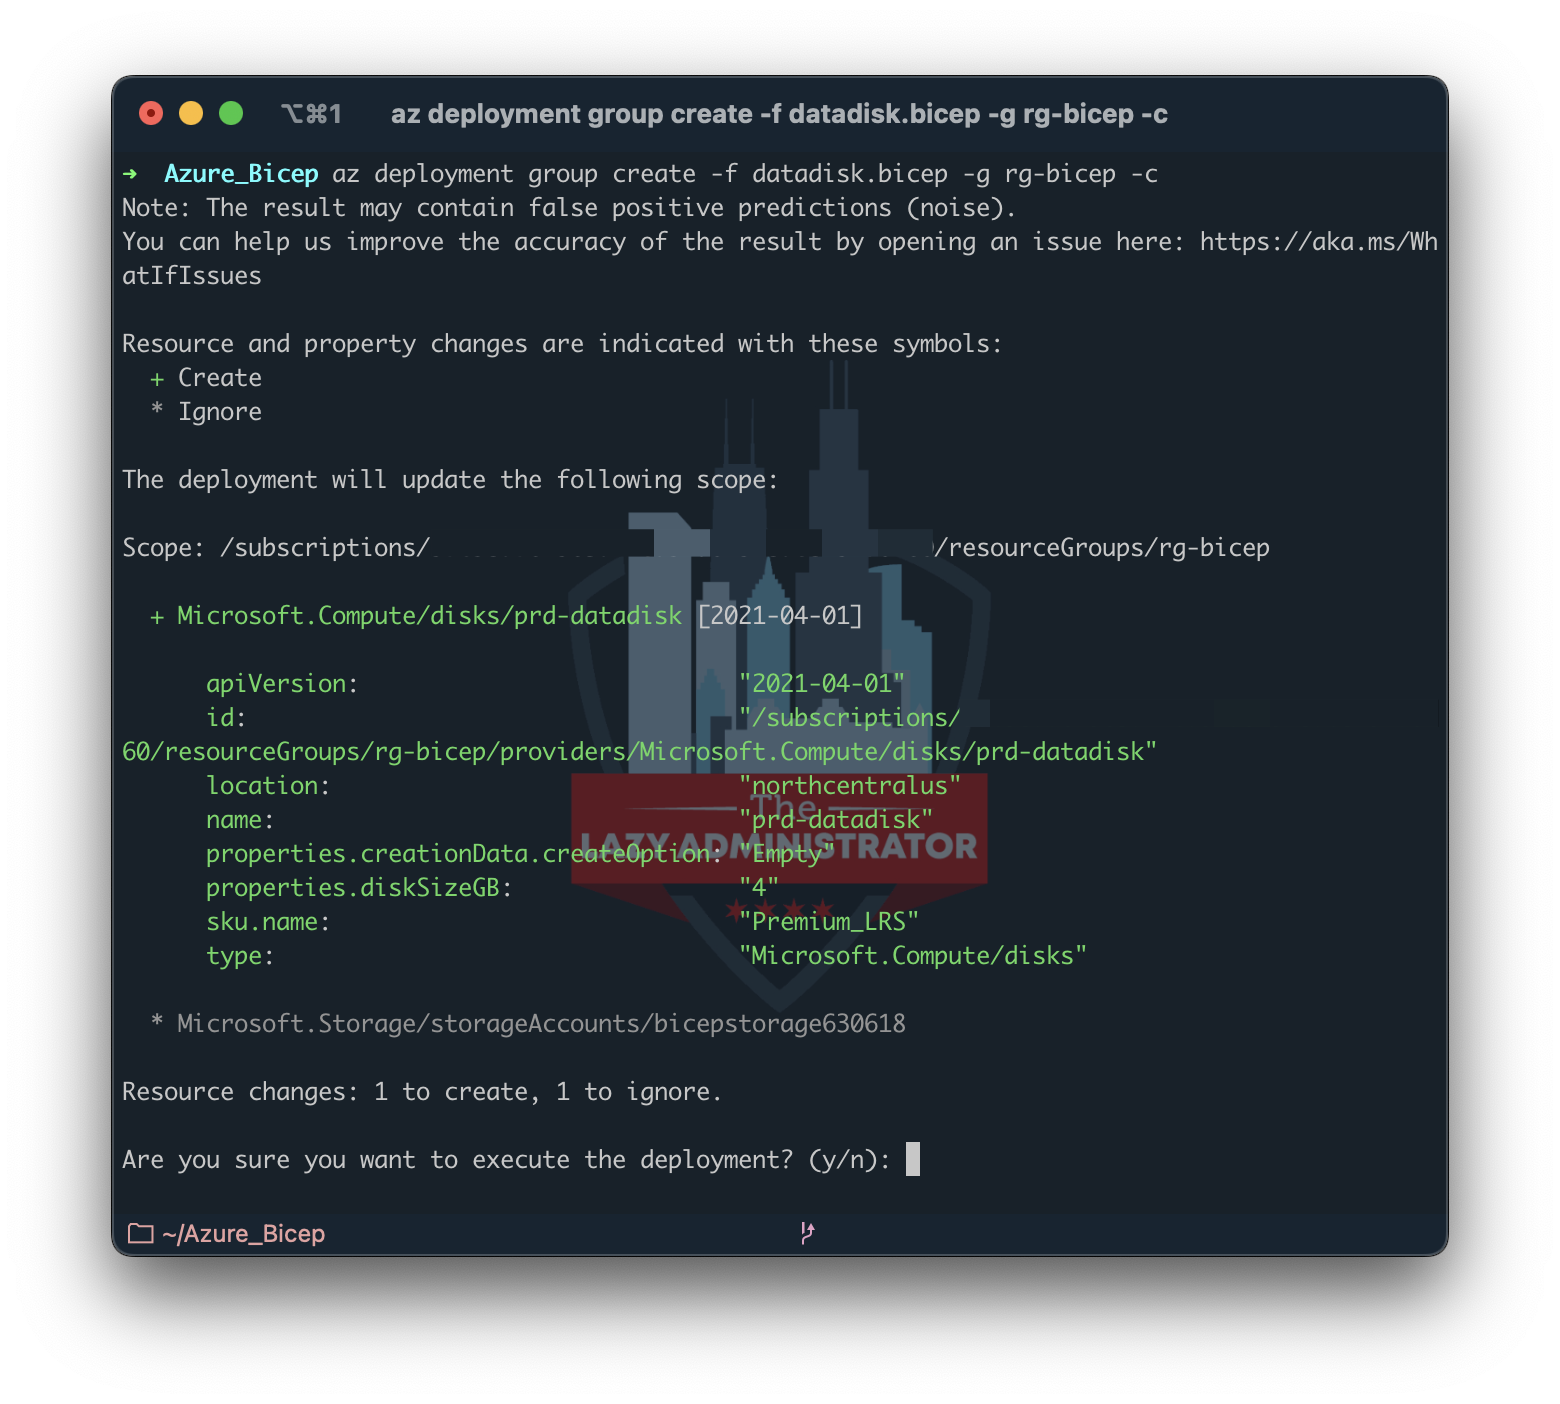
Bicep supports a function called any() to resolve type errors in the Bicep type system. You use this function when the format of the value you provide doesn’t match what the type system expects. For example, in the below snippet, on line 13, the diskSizeGB is expecting a int value but I gave it a string value (defined on line 4). By using the any() function it will ignore the error and simply convert the value type from string to int.
This function doesn’t exist in the Azure Resource Manager template runtime. It’s only used by Bicep and isn’t emitted in the JSON for the built template.

And during my deployment I can see that I was not presented with any errors or warnings and will create the resource in Azure.
Scope Functions
resourceGroup()
The resourceGroup() function gets the information of the Resource Group where you are deploying your resources too during runtime. If you wanted to change the location param to automatically deploy your resources to your Resource Group’s location, you can use resourceGroup().location
In the example below you can see I changed the param location (line 5) from ‘northcentralus’ to whatever location my Resource Group has.
String Functions
String Interpolation
String concatenation is the process of joining two or more strings into a single string. ARM used the concat() function to perform this, and in Bicep we use string interpolation. String interpolation string interpolation (or variable interpolation, variable substitution, or variable expansion) is the process of evaluating a string literal containing one or more placeholders, yielding a result in which the placeholders are replaced with their corresponding values.
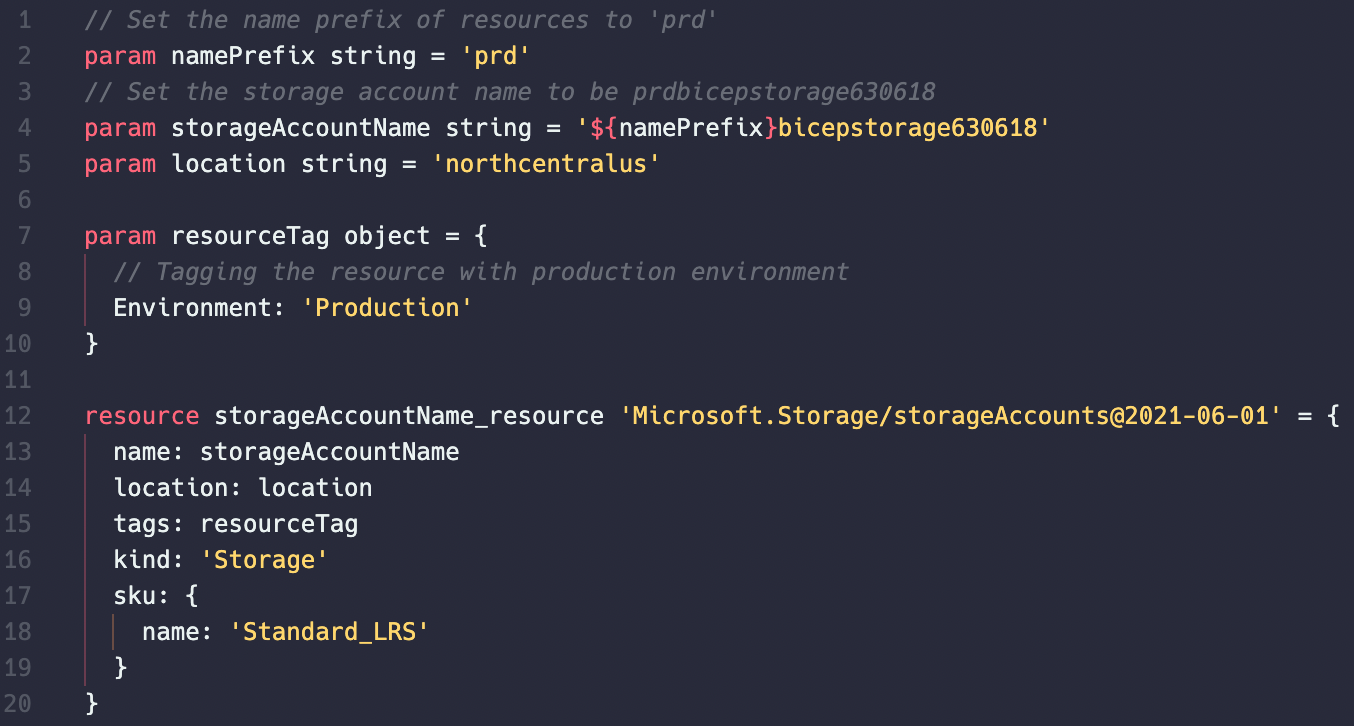
In the example below I declared a new parameter named ‘namePrefix’ that contains the value, ‘prd’ which is short for production. Usually I would create resources with a prefix followed by a hyphen but Azure Storage Accounts do not support this naming so I have to exclude the hyphen. I then modified line 4 so the storageAccountName param would include the value from the namePrefix param. During deployment it will name the Storage Account ‘prdbicepstorage630618’.
When doing string interpolation, you need to enclose it with {} brackets and add the dollar sign ($).
toLower()
toLower() converts the specified string to lower case. This can be handy if you are getting the value at runtime and you want to ensure whatever the individual puts is converted to all lowercase.
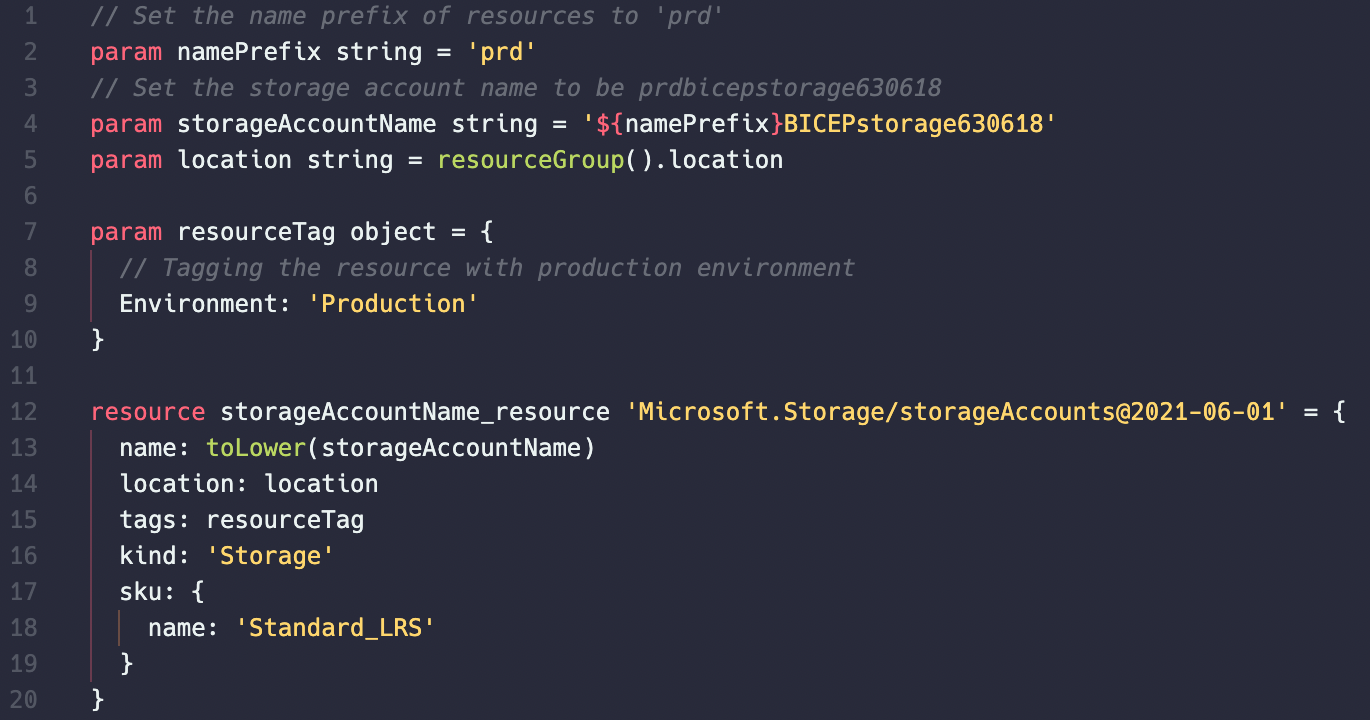
In the example below, I am creating the Storage Account name on line 4 and it contains some uppercase characters. Line 13 where I am declaring the name and value, I use toLower() to convert the entire string to all lowercase. The resulting name will be prdbicepstorage630618.
Note: Since Storage Accounts in Azure cannot have upper case characters in the name, it may be a good idea to use toLower() to ensure names remain valid.
toUpper()
toUpper() converts the specified string to upper case. This can be handy if you are getting the value at runtime and you want to ensure whatever the individual puts is converted to all uppercase.
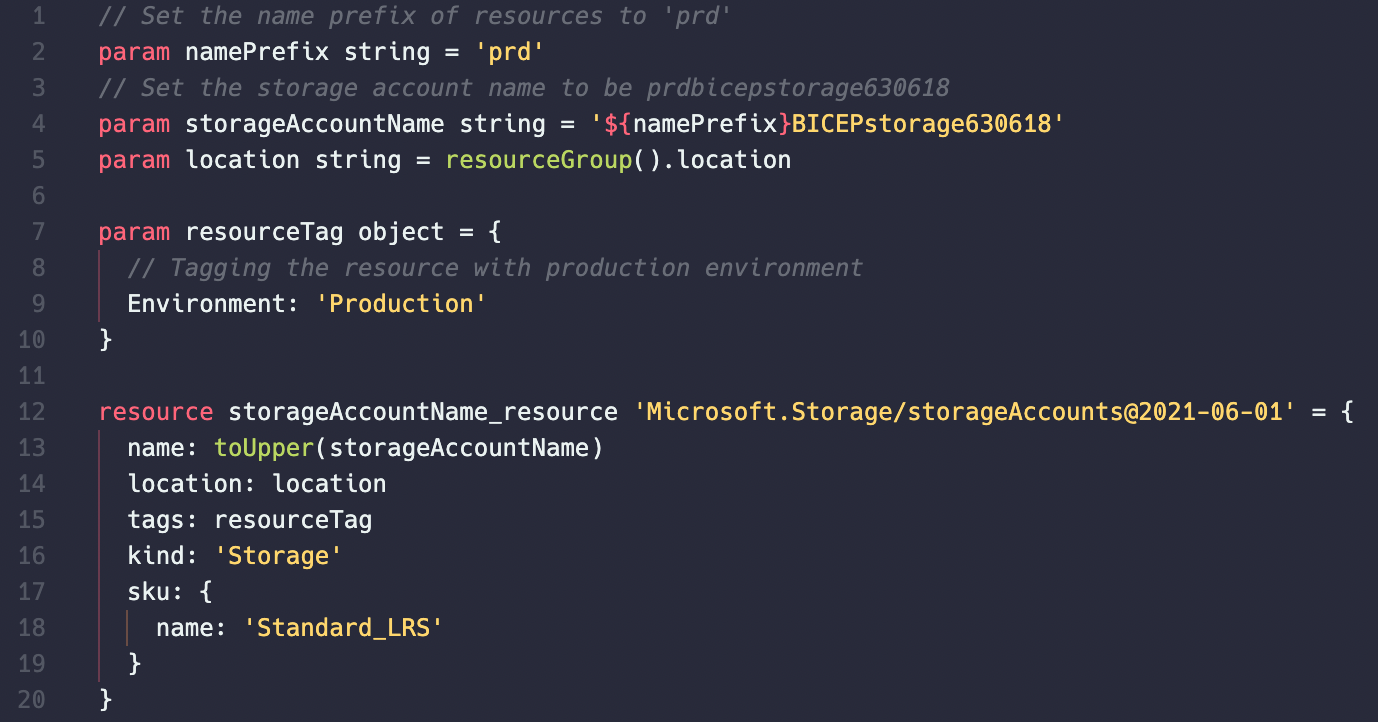
In the example below, I am creating the Storage Account name on line 4 and it contains some uppercase characters and lowercase characters. Line 13 where I am declaring the name and value, I use toUpper() to convert the entire string to all lowercase. The resulting name will be PRDBICEPSTORAGE630618.
Note: Storage Account name cannot contain uppercase characters so this will result in an error.
Logical Operators
The logical operators evaluate boolean values, return non-null values, or evaluate a conditional expression.
| Operator | Name |
|---|---|
&& |
And |
|| |
Or |
! |
Not |
?? |
Coalesce |
? : |
Conditional expression |
Conditional Expression
Evaluates a condition and returns a value whether the condition is true or false. Think of this as ‘if true do the first thing, if false do the 2nd thing’
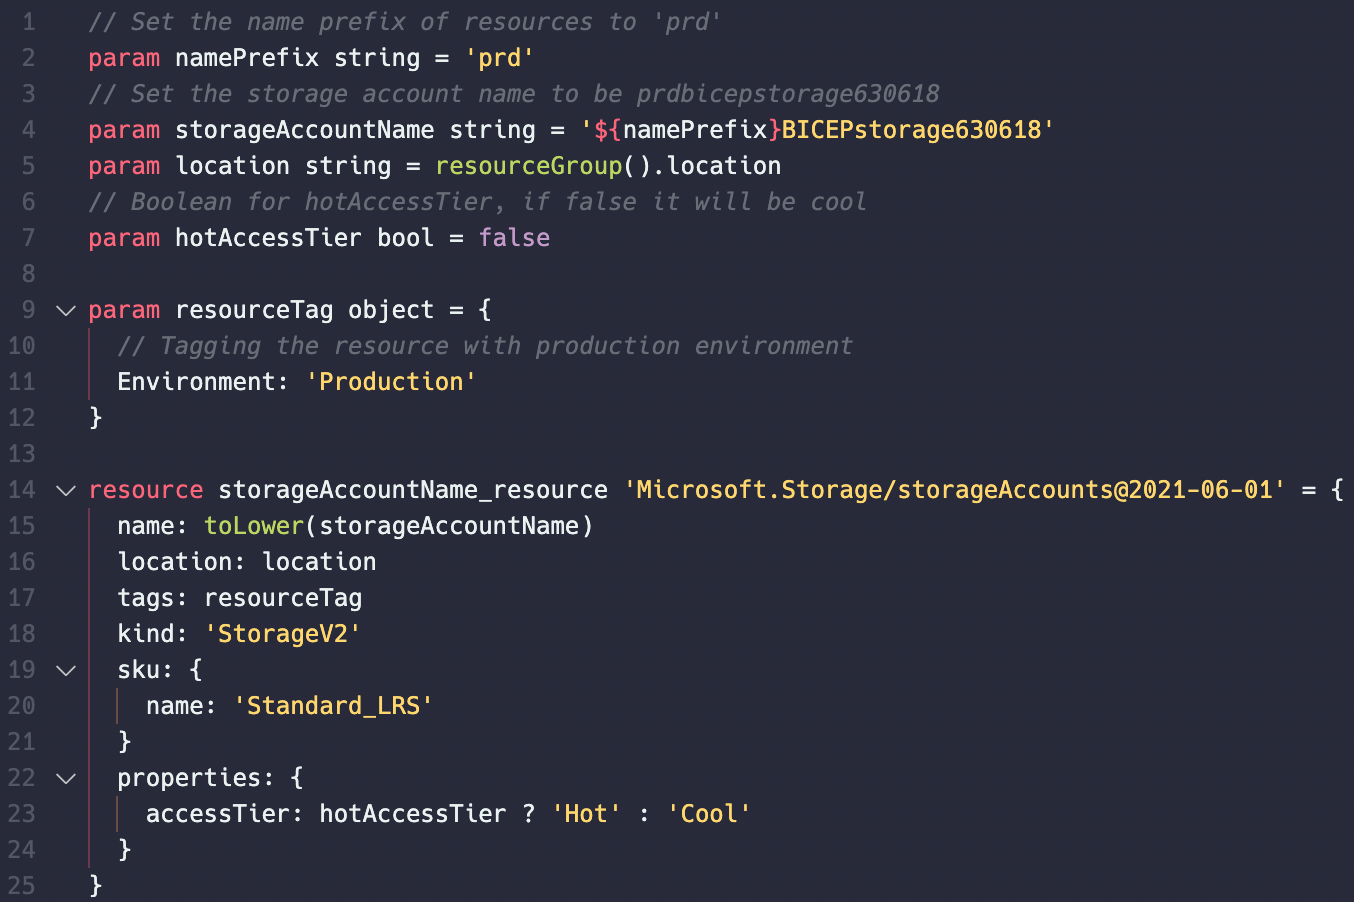
In the example below I added a new boolean (true/false) param called hotAccessTier. On line 23 in the new properties portion I am saying if the param hotAccessTier is true, then set the storage account’s access tier to ‘Hot’, otherwise it should be set to ‘Cold’.
Parameter Decorators
Parameter decorators are in the format @expression and are placed above the parameter’s declaration. You can mark a parameter as secure (@secure), specify allowed values (@allowed), set the minimum (@minLength) and maximum length (@maxLength) for a string, set the minimum (@minValue) and maximum value (@maxValue) for an integer, and provide a description (@description) of the parameter.
The following table describes the available decorators and how to use them.
| Decorator | Apply to | Argument | Description |
|---|---|---|---|
| allowed | all | array | Allowed values for the parameter. Use this decorator to make sure the user provides correct values. |
| description | all | string | Text that explains how to use the parameter. The description is displayed to users through the portal. |
| maxLength | array, string | int | The maximum length for string and array parameters. The value is inclusive. |
| maxValue | int | int | The maximum value for the integer parameter. This value is inclusive. |
| metadata | all | object | Custom properties to apply to the parameter. Can include a description property that is equivalent to the description decorator. |
| minLength | array, string | int | The minimum length for string and array parameters. The value is inclusive. |
| minValue | int | int | The minimum value for the integer parameter. This value is inclusive. |
| secure | string, object | none | Marks the parameter as secure. The value for a secure parameter isn’t saved to the deployment history and isn’t logged. For more information, see Secure strings and objects. |
Allowed
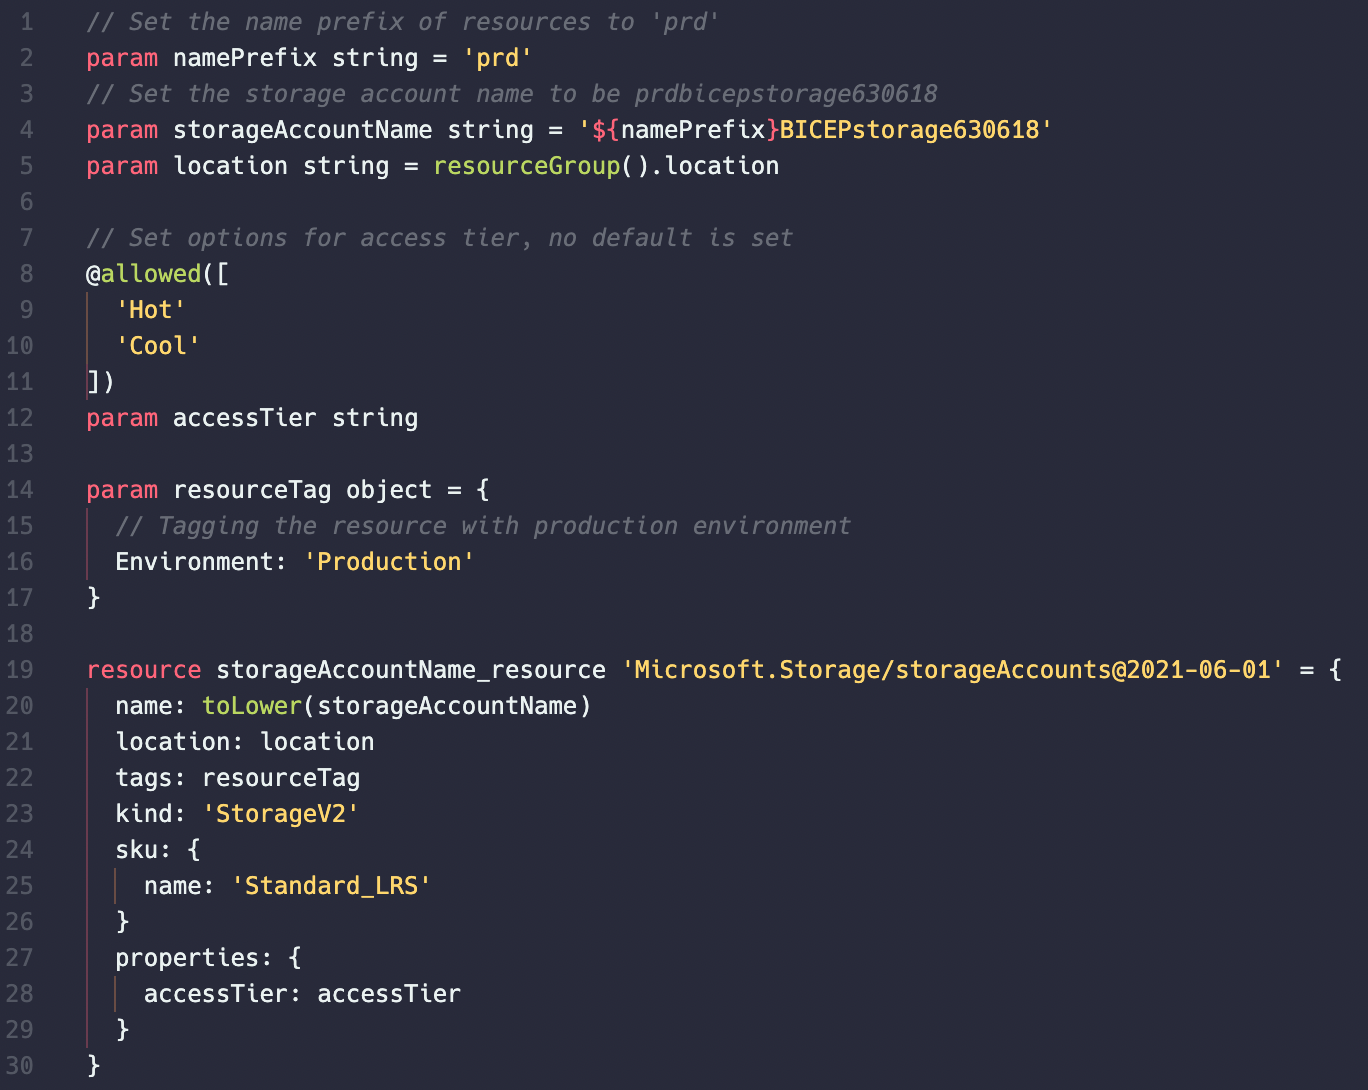
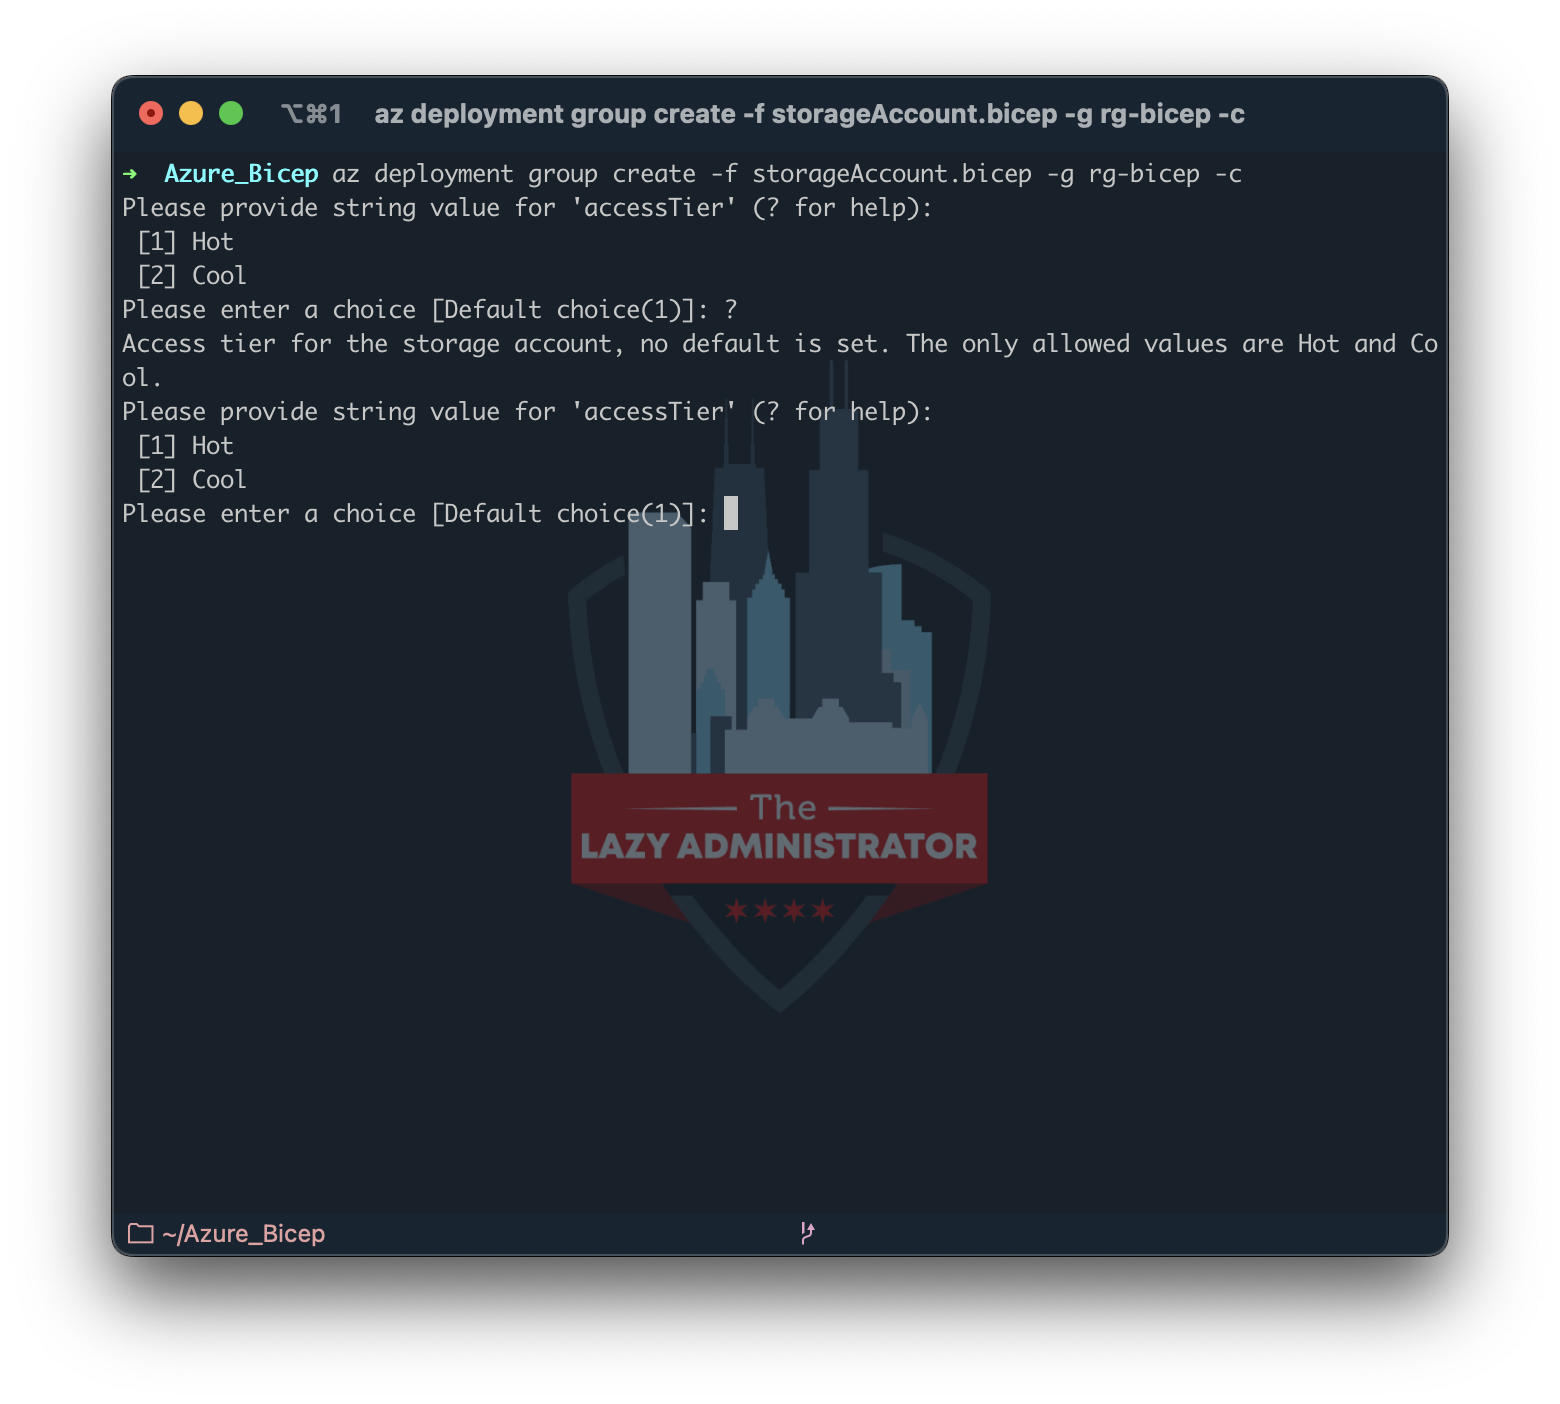
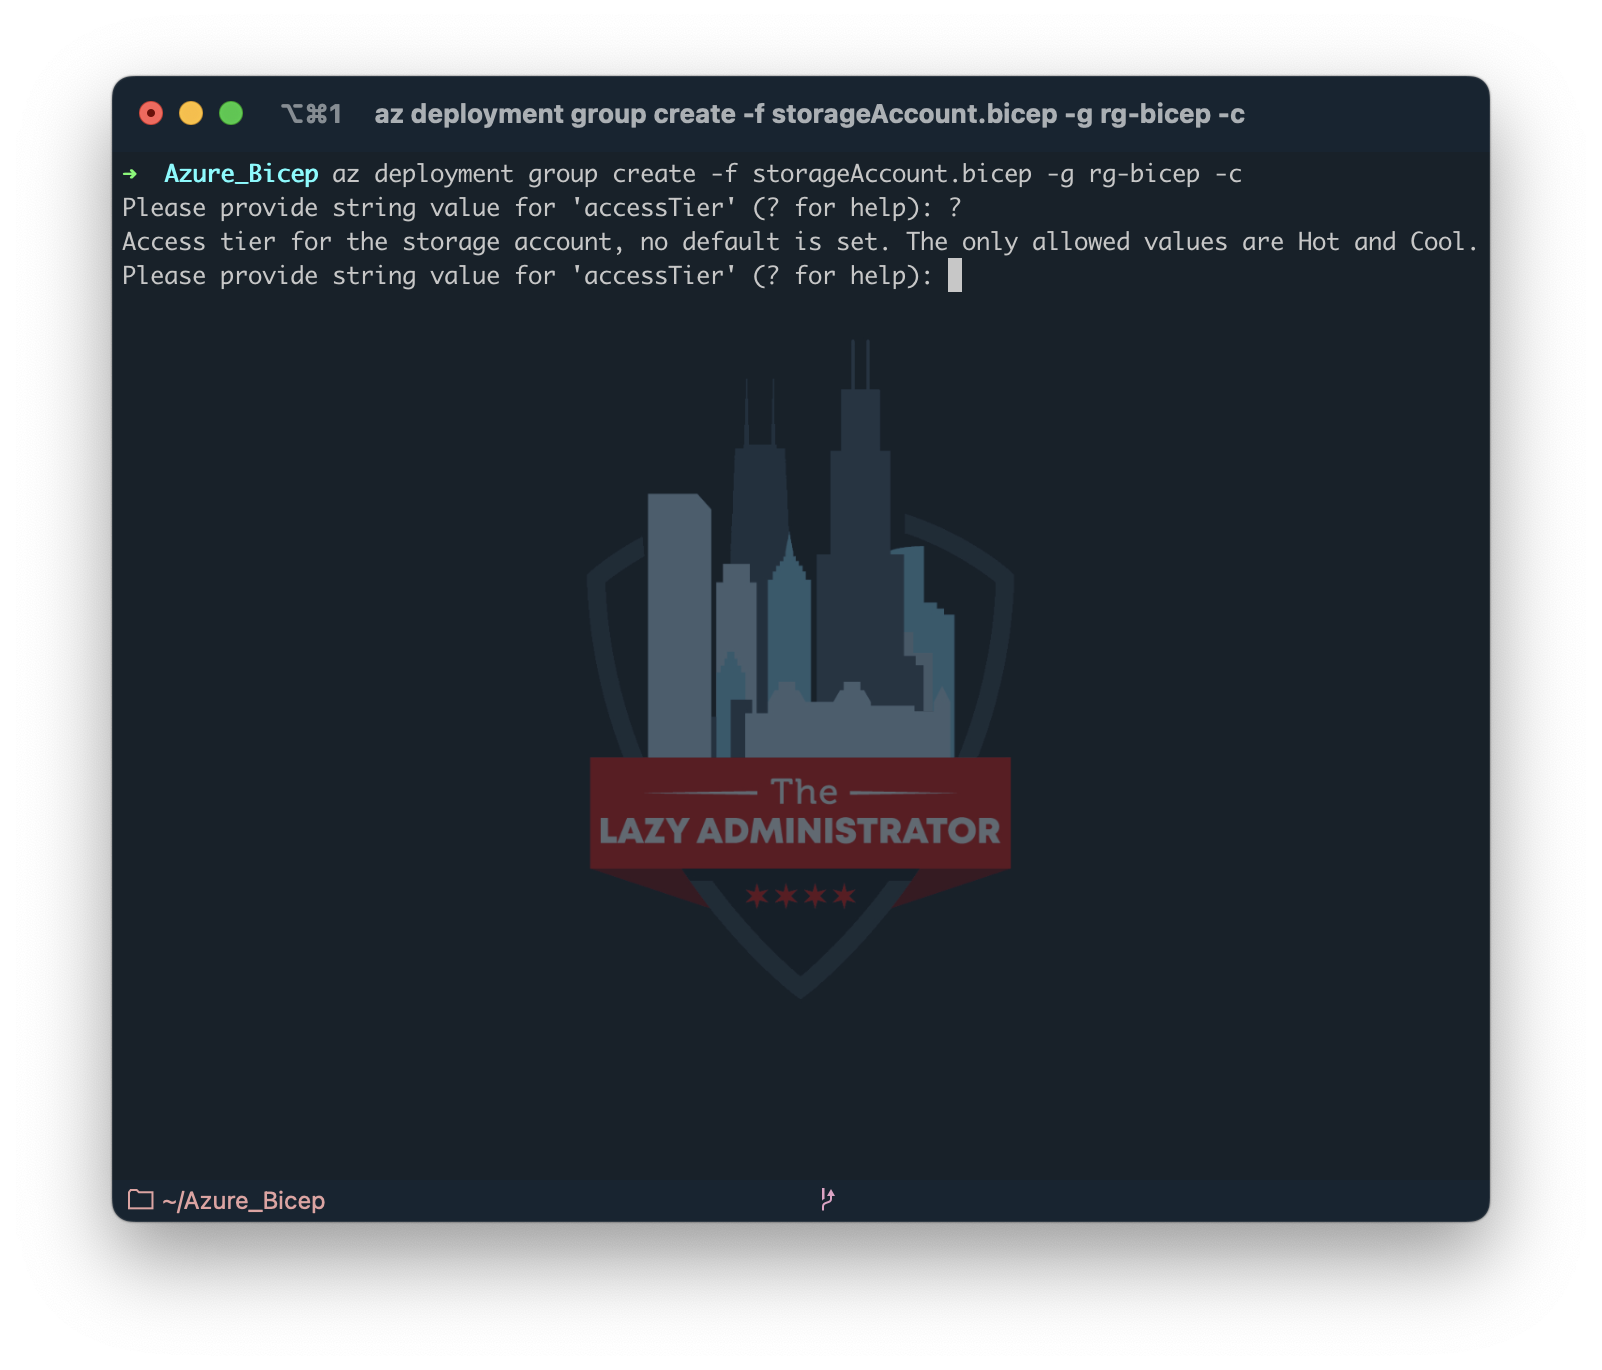
The allowed decorator specifies allowed values for an item. Looking at the earlier example we can make it so only the ‘Hot’ and ‘Cool’ values are available and nothing else. In the example below I changed the param from a boolean to a string and I declared that only Hot and Cool values are allowed by using the @allowed param decorator above. Since I did not set a default by declaring a value for the param (param accessTier string = ‘Cool’) then during deployment it will ask me what the access tier should be.
Description
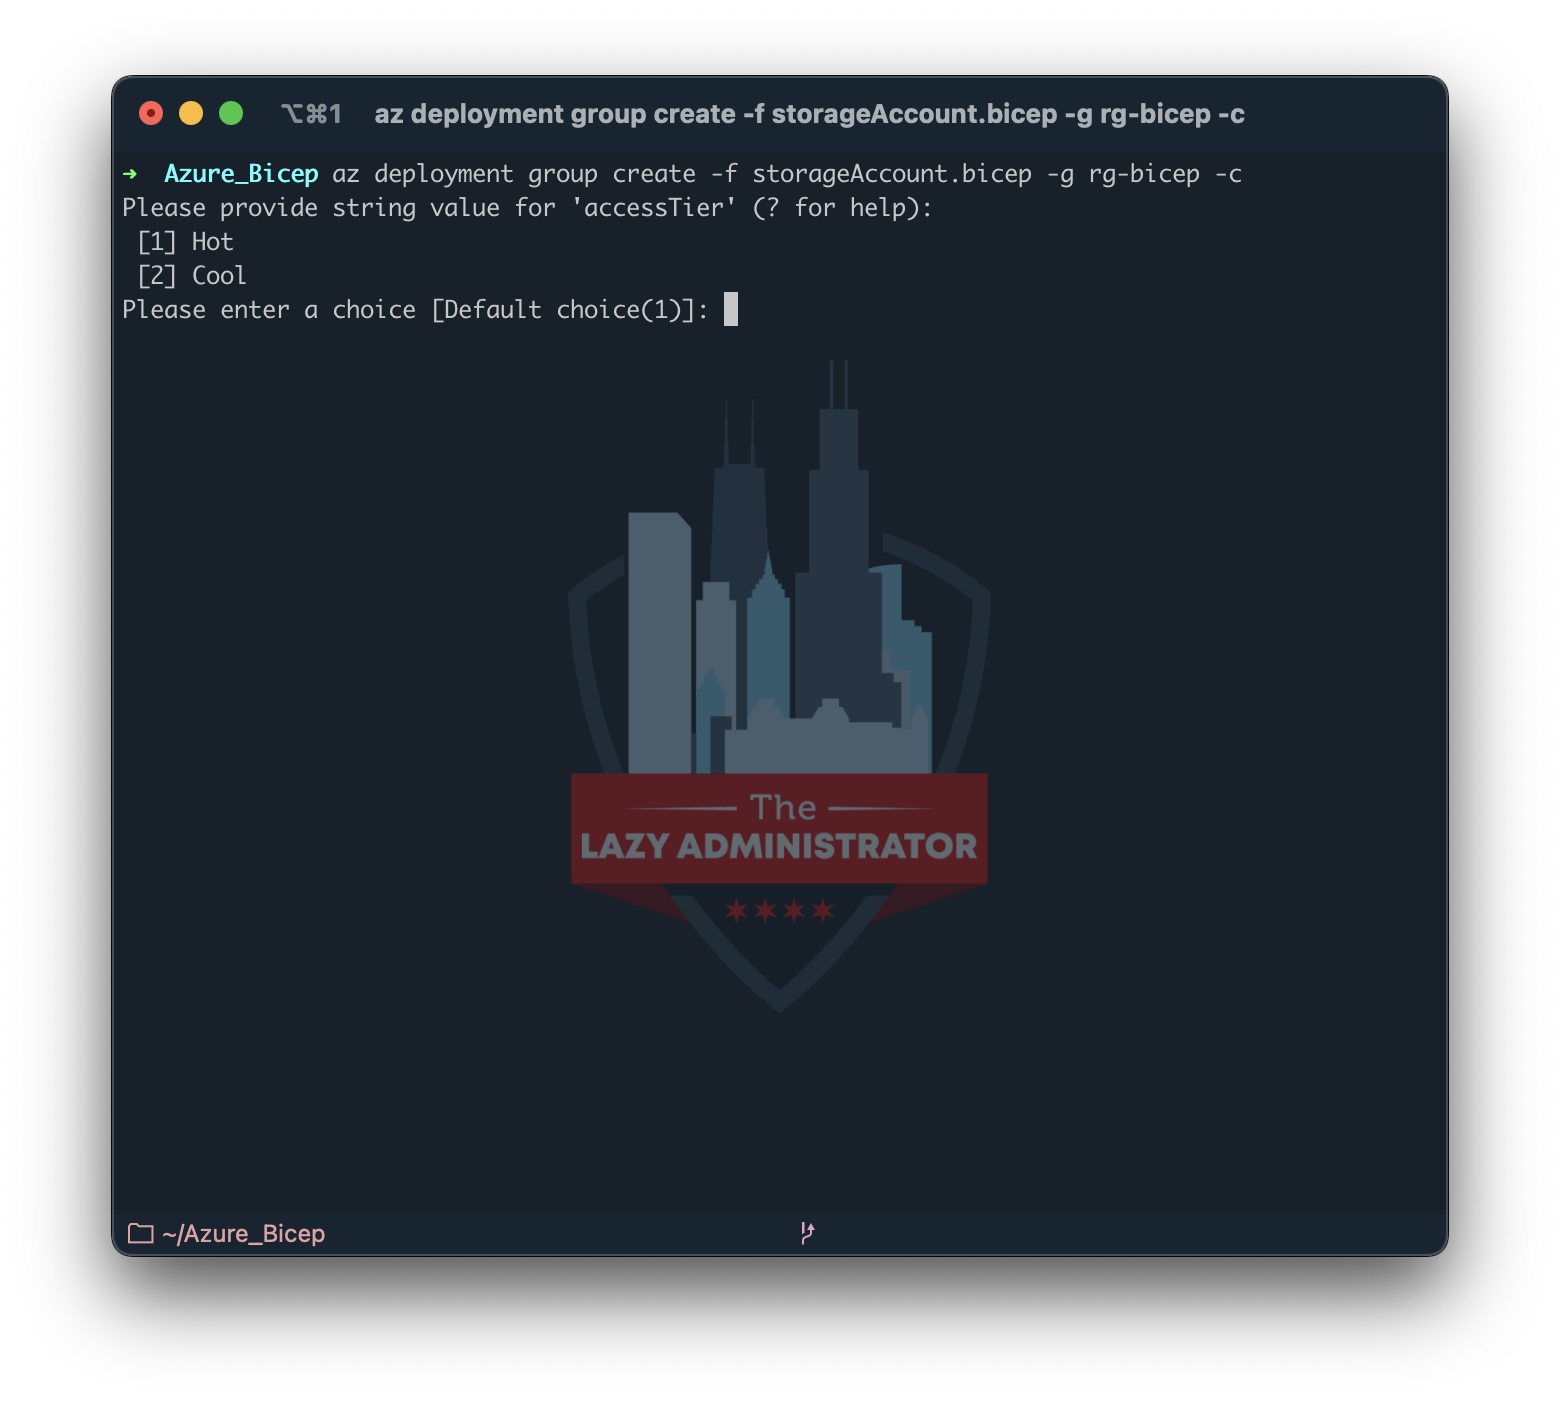
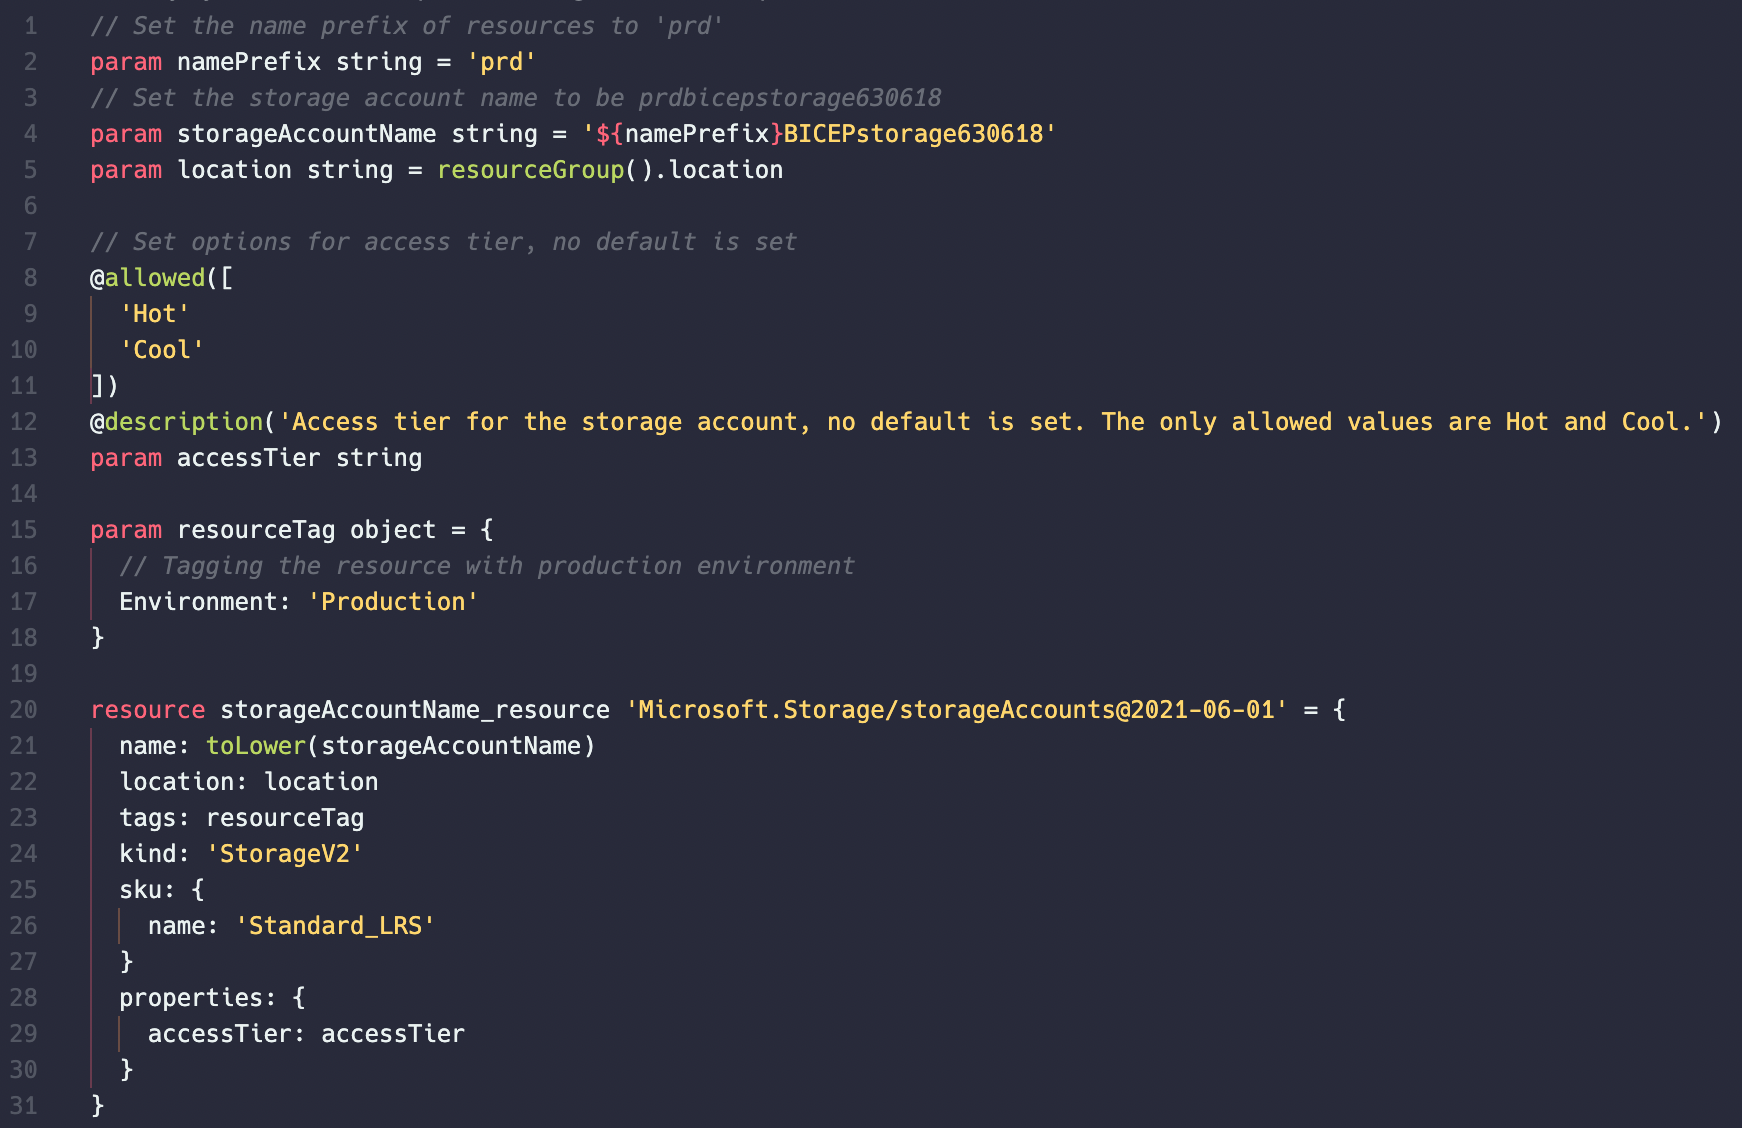
Looking at the above example, it may be unclear what you are setting, especially if you name your parameters poorly. Using the Description param decorator I can provide a much more friendlier message. The description value is only shown during deployment if you enter ‘?’ for help.
maxLength
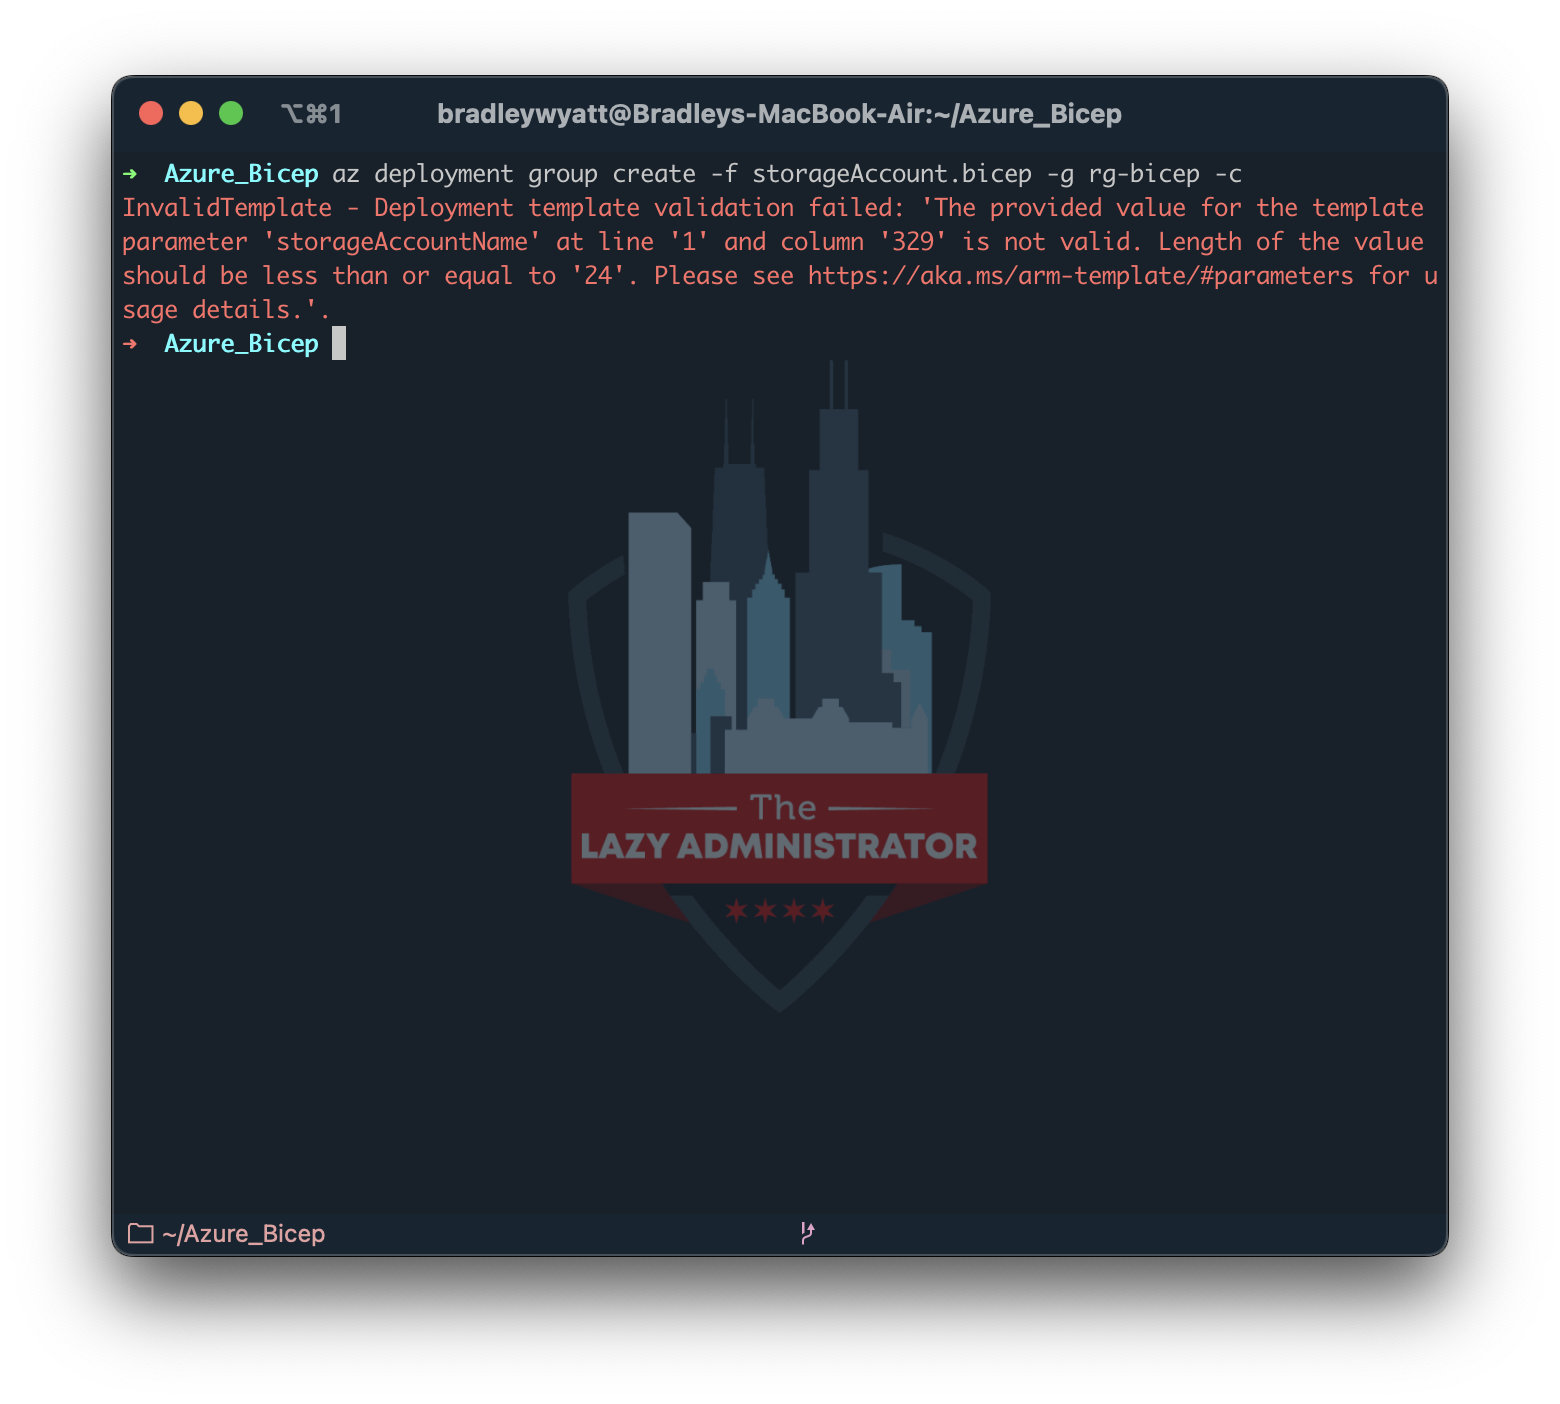
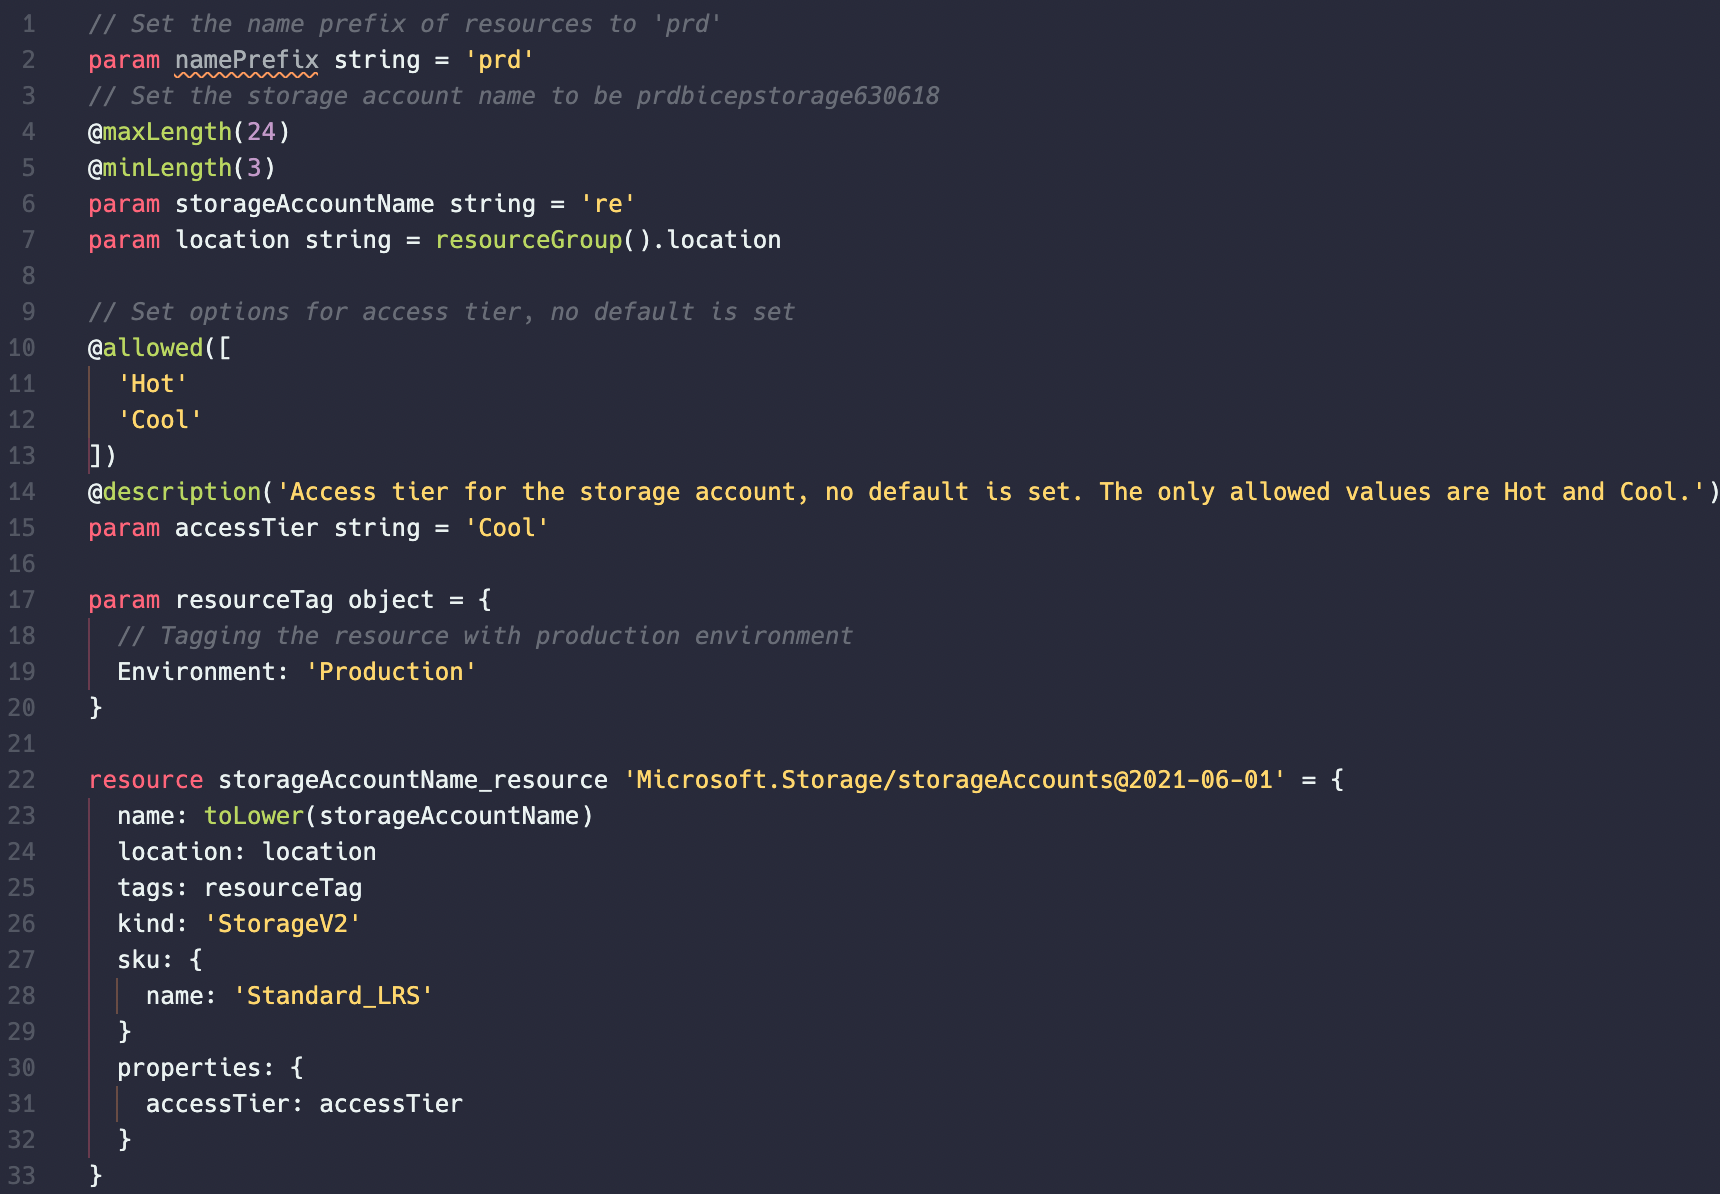
A Storage Account name is restricted to a max 24 characters. We can ensure the maxLength of the name does not exceed 24 characters and cause the deployment to fail by using the maxLength decorator. In my example below, I added the @maxLength decorator on line 4 and made the potential name on line 5 larger than 24 characters. You can also view the failure during a potential deployment as well.

minLength
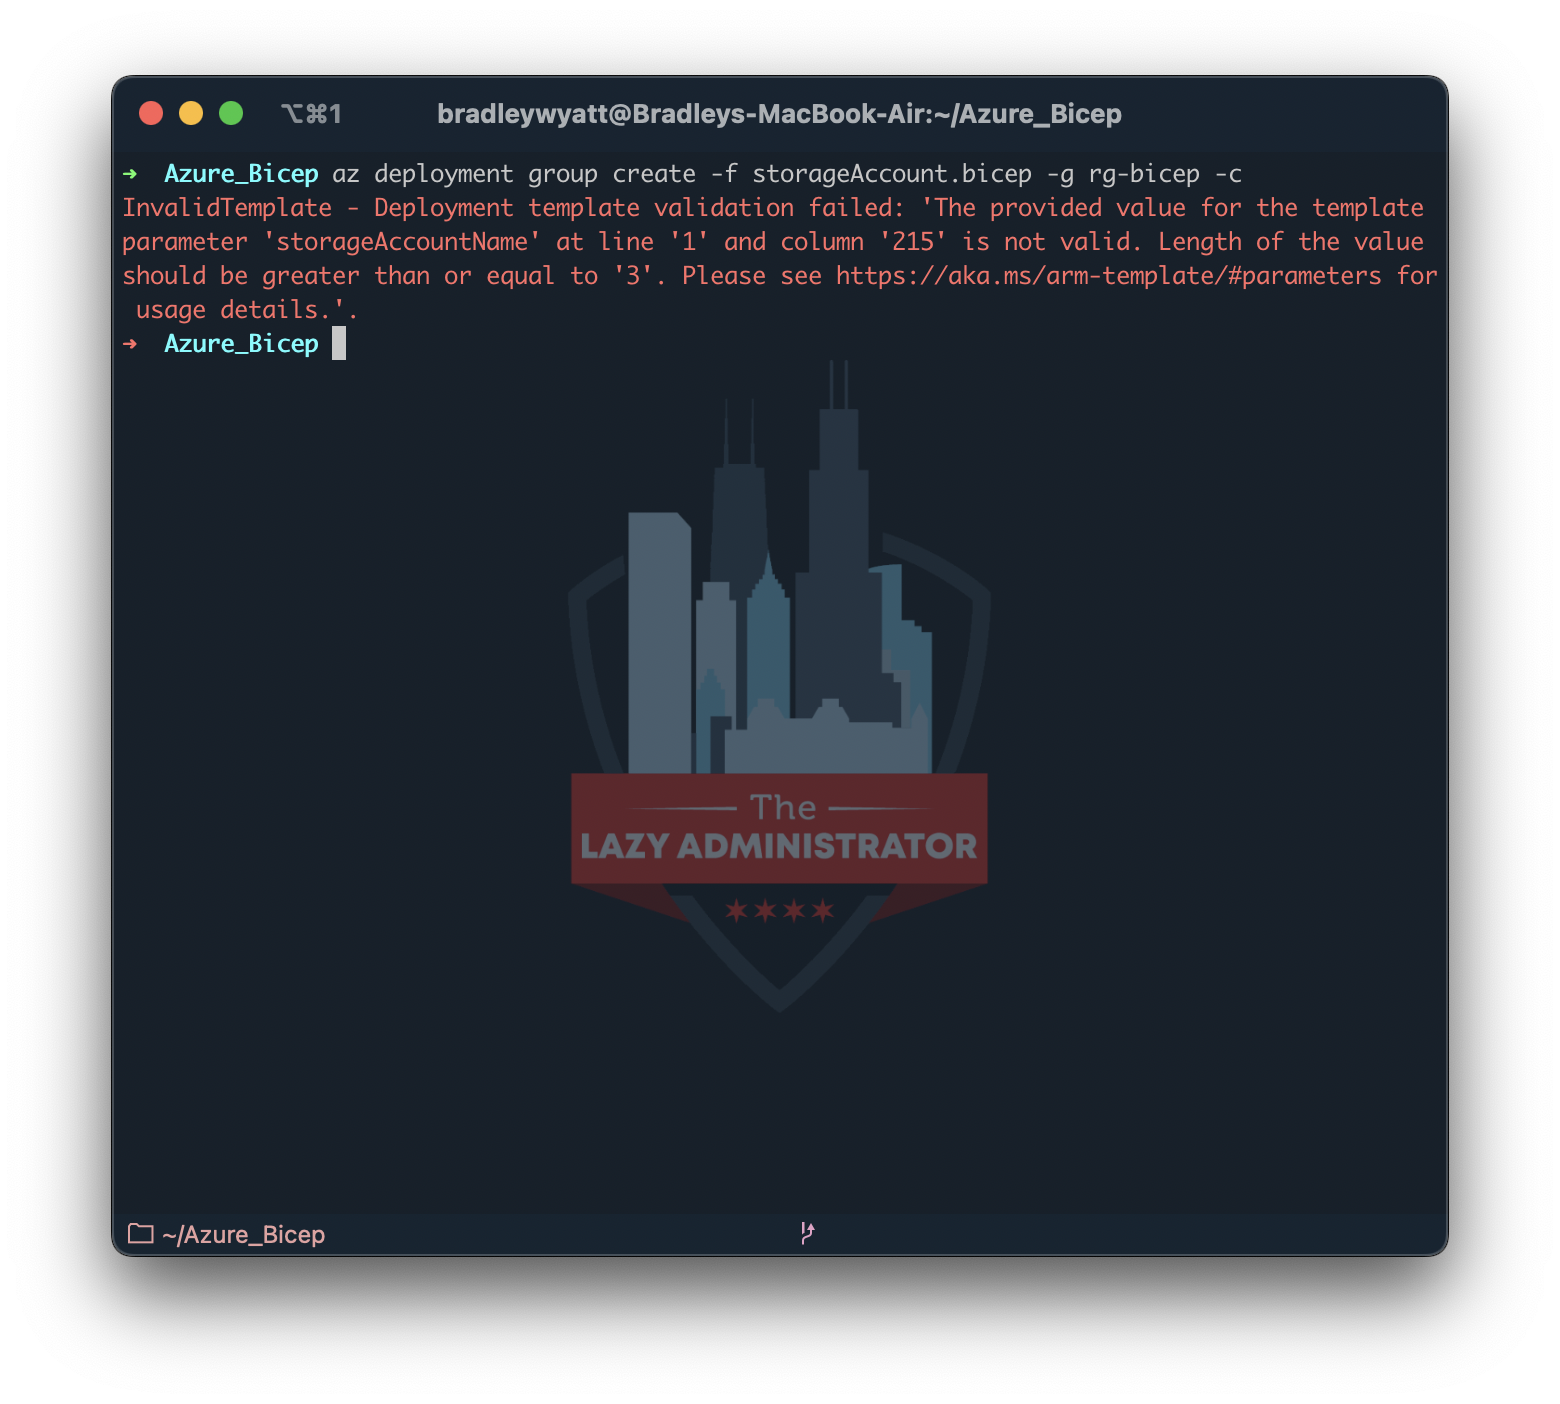
Storage Account names also have a minimum value of 3 characters. We can use the minLength decorator to ensure a value below that number will fail validation.
metadata
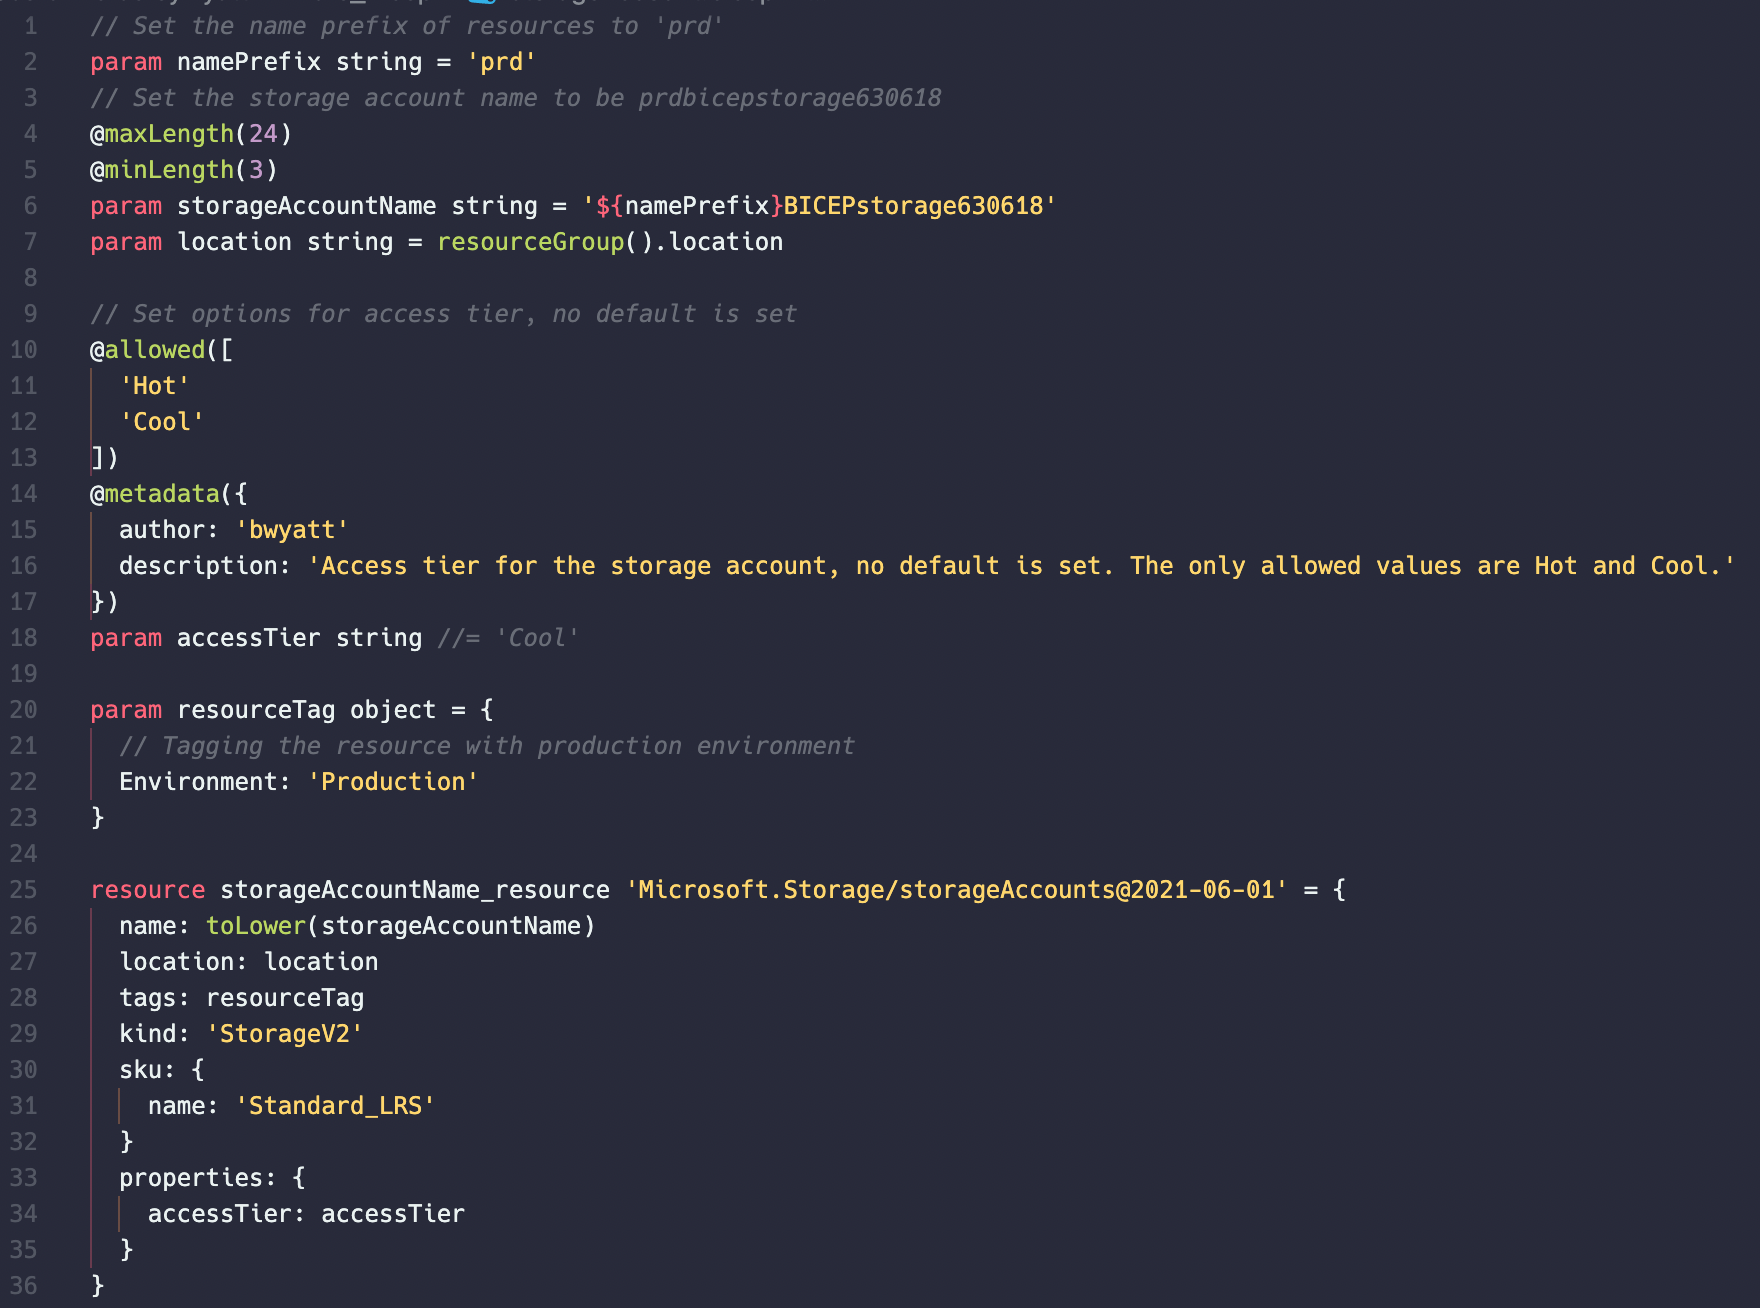
The @metadata decorator can be used to specify any other custom properties that describe the parameter or its significance. You can add any custom property to @metadata decorator; however, for description, the value will be passed as if you defined it using the @description decorator.
minValue
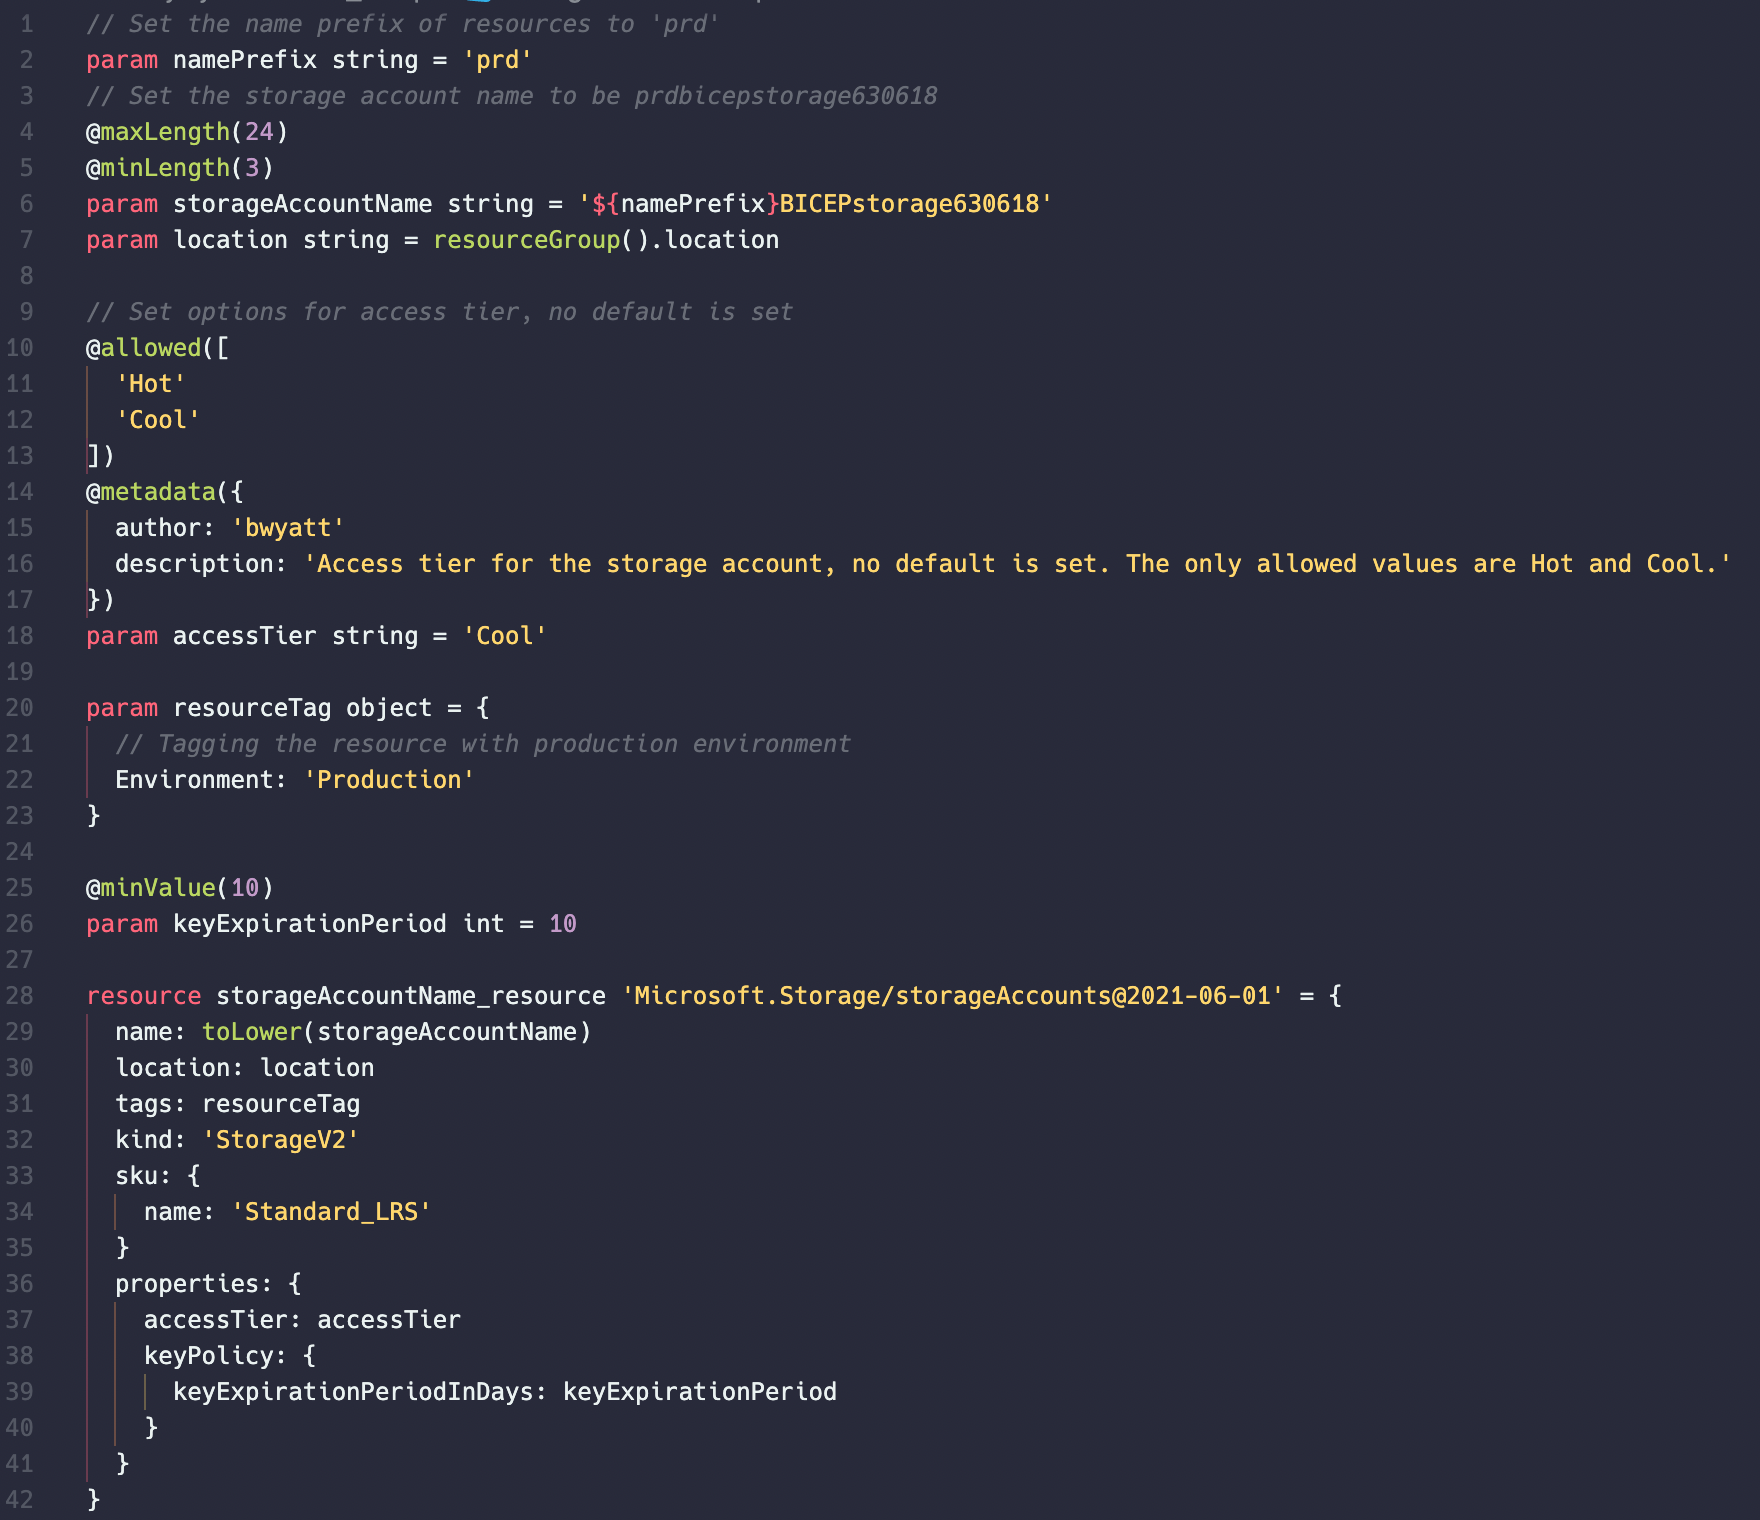
minValue is an integer parameter decorator. Meaning instead of setting a minimum amount of characters in a string, it sets a minimum number value.
In the example below I added a new property (line 38-40): ‘keyExpirationPeriodInDays,’ which sets your storage account’s access key rotation value. I set a minvalue on line 25 of the parameter.
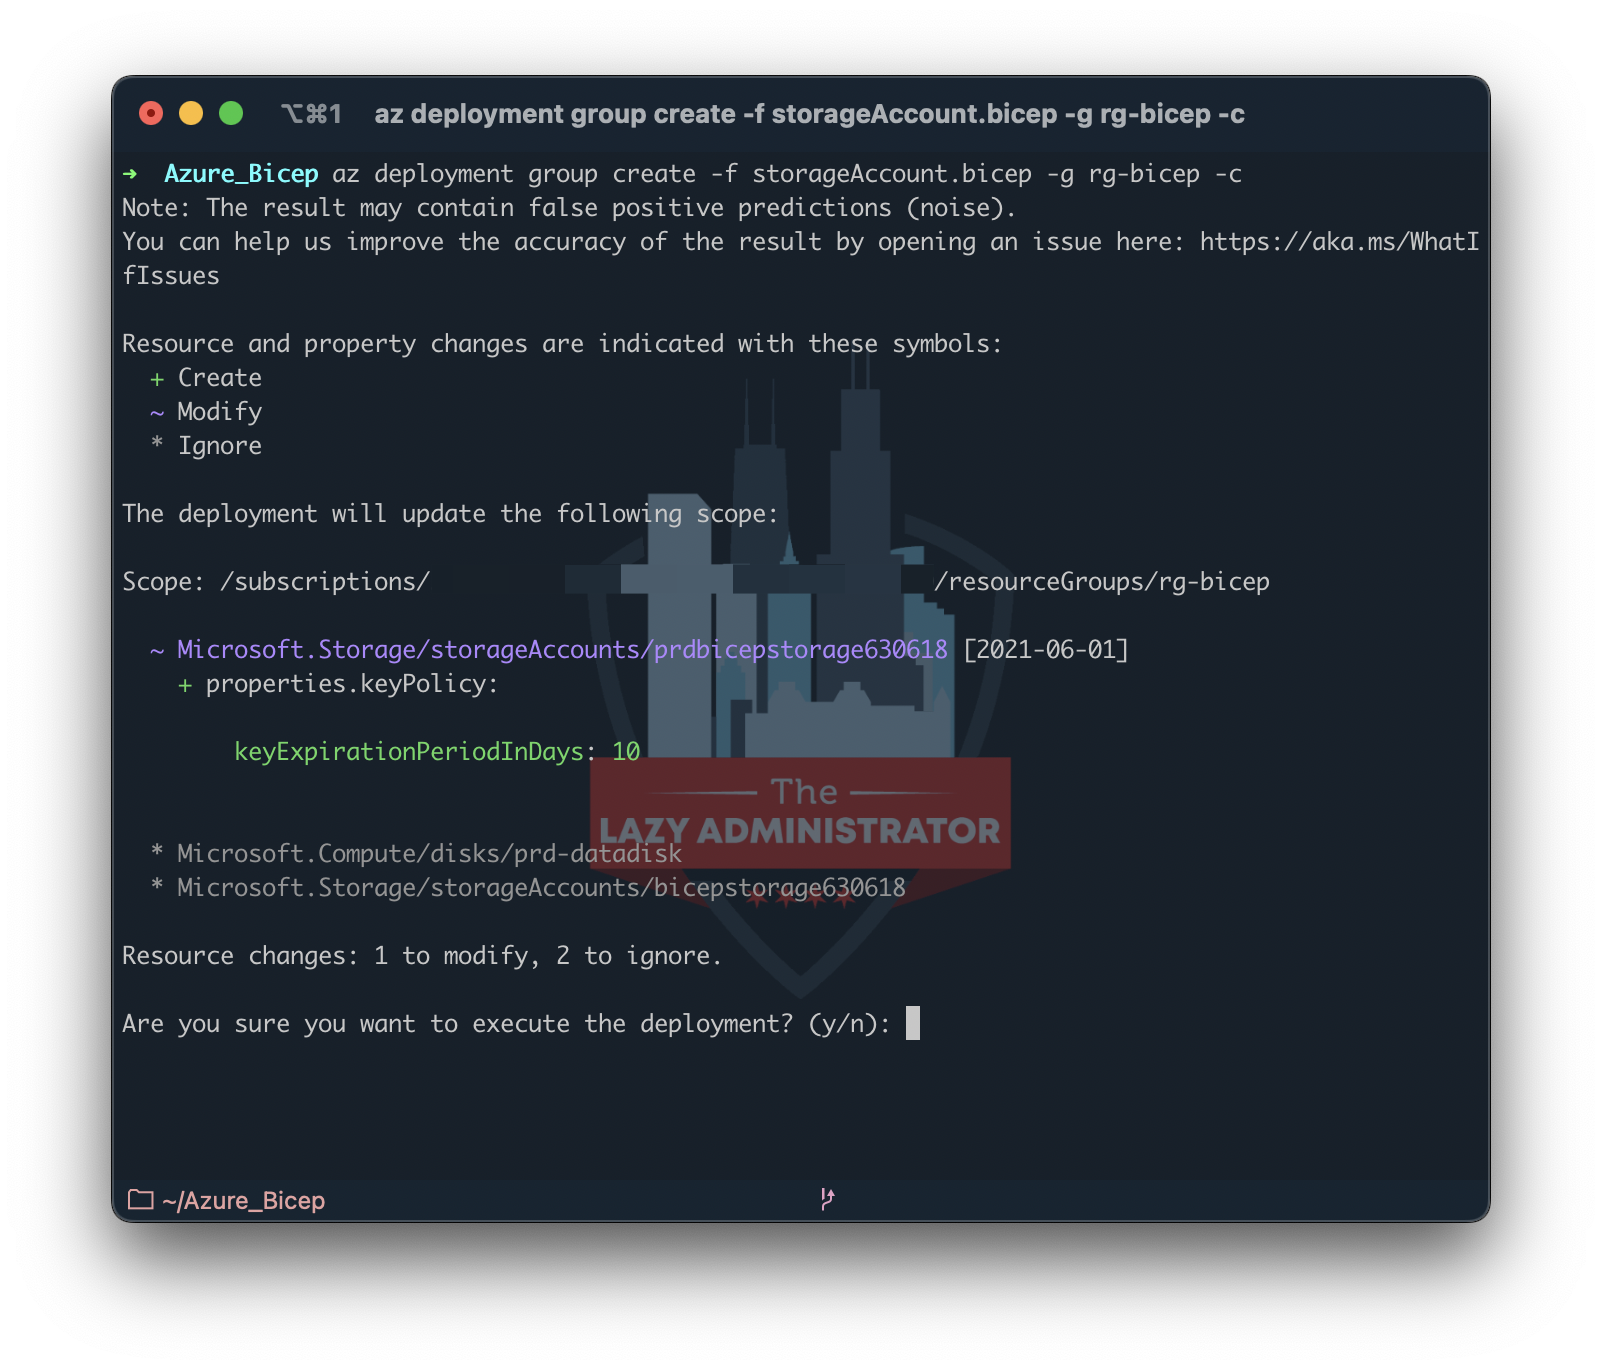
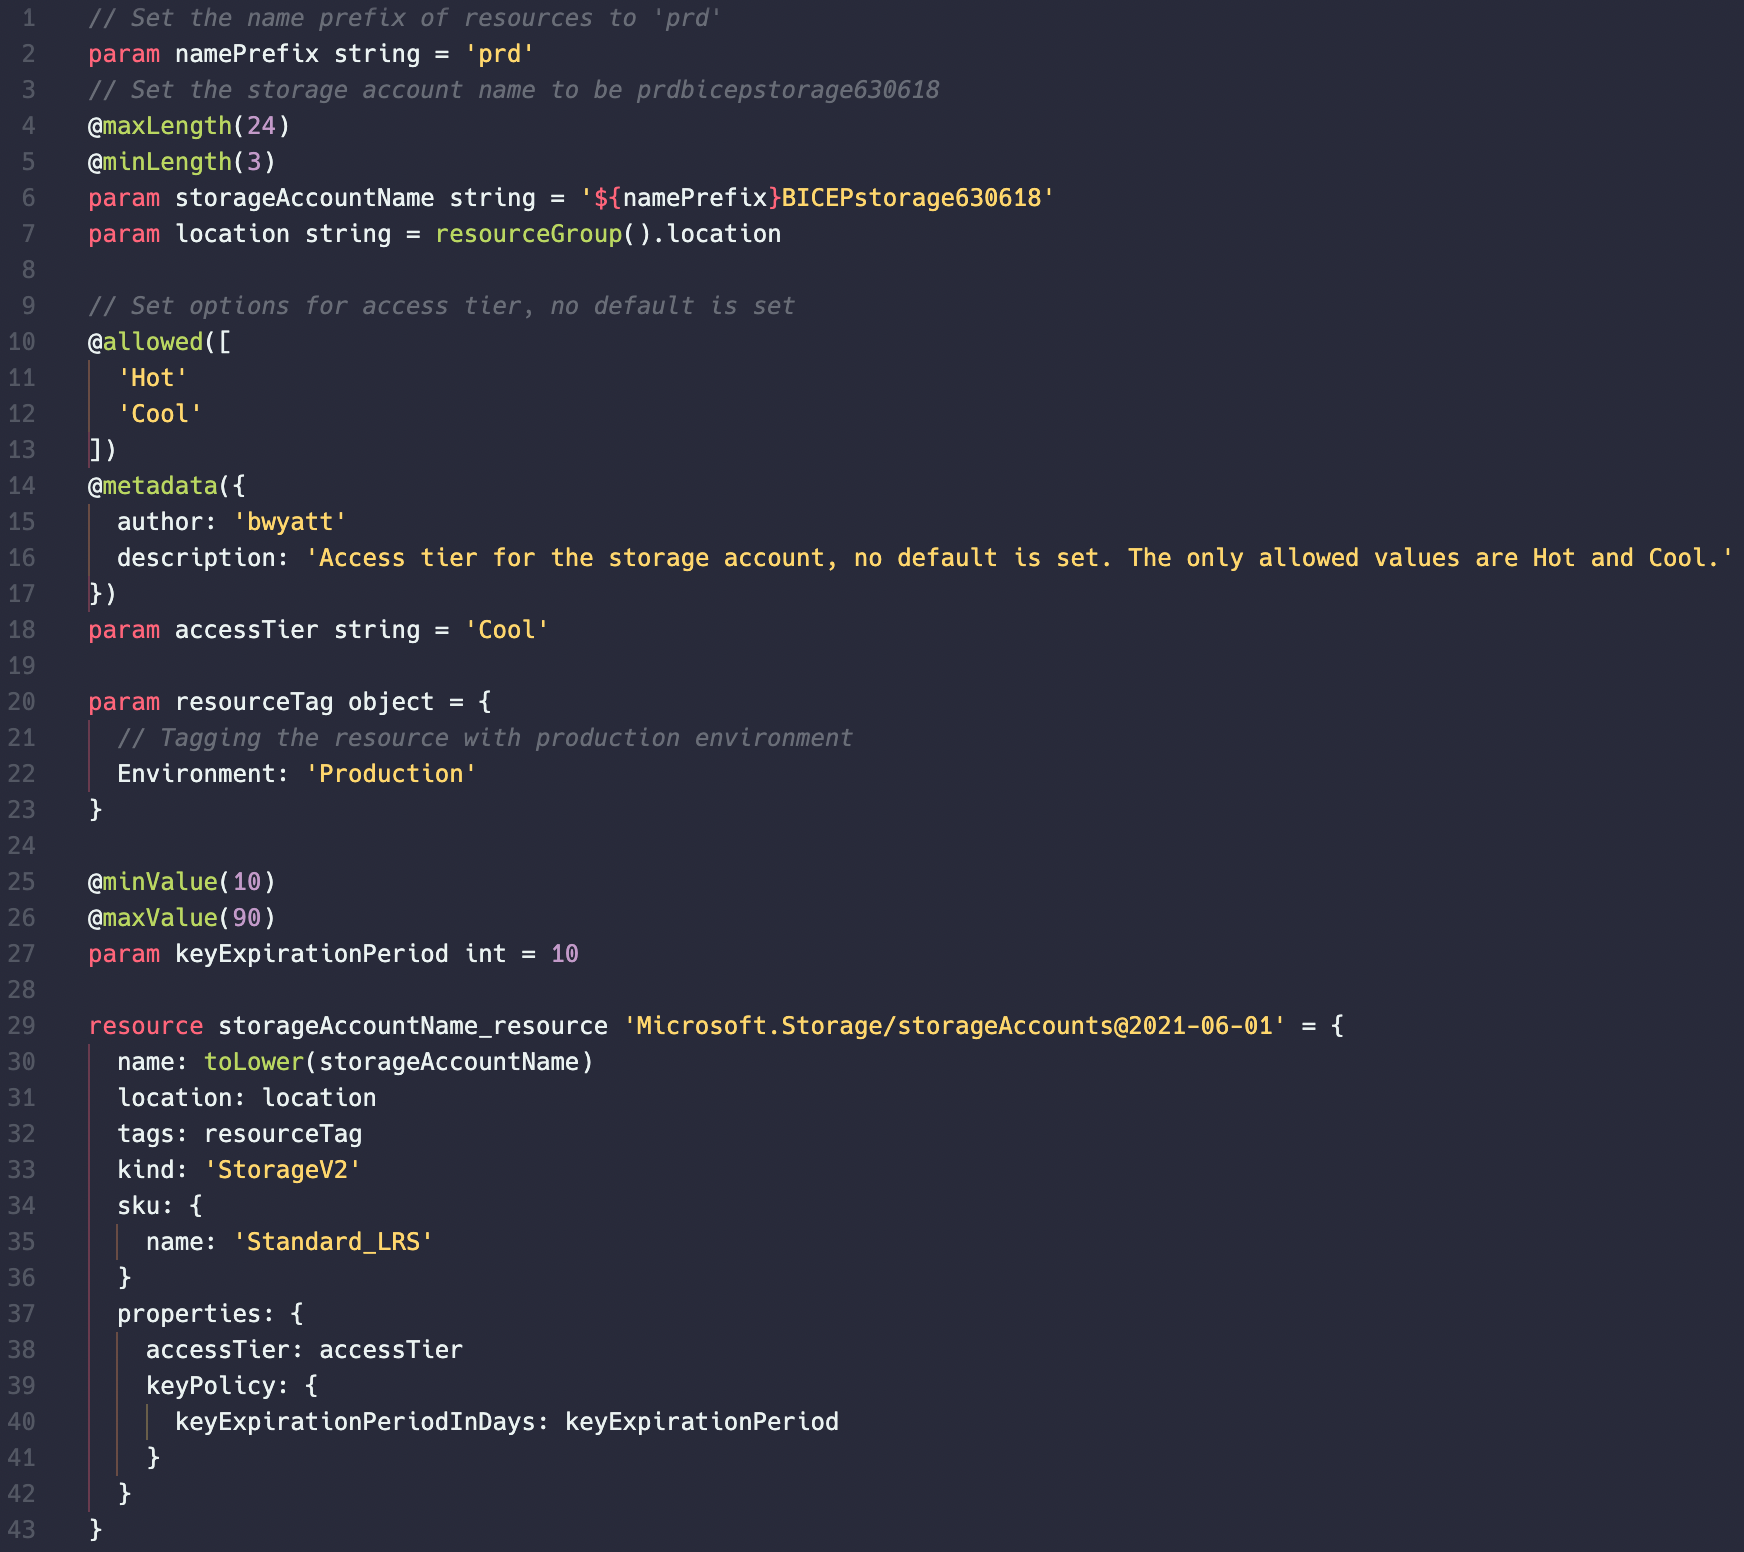
maxValue
maxValue does the opposite and sets a maximum int value that the parameter can have. In my example below I set the maxValue at 90 days.
secure
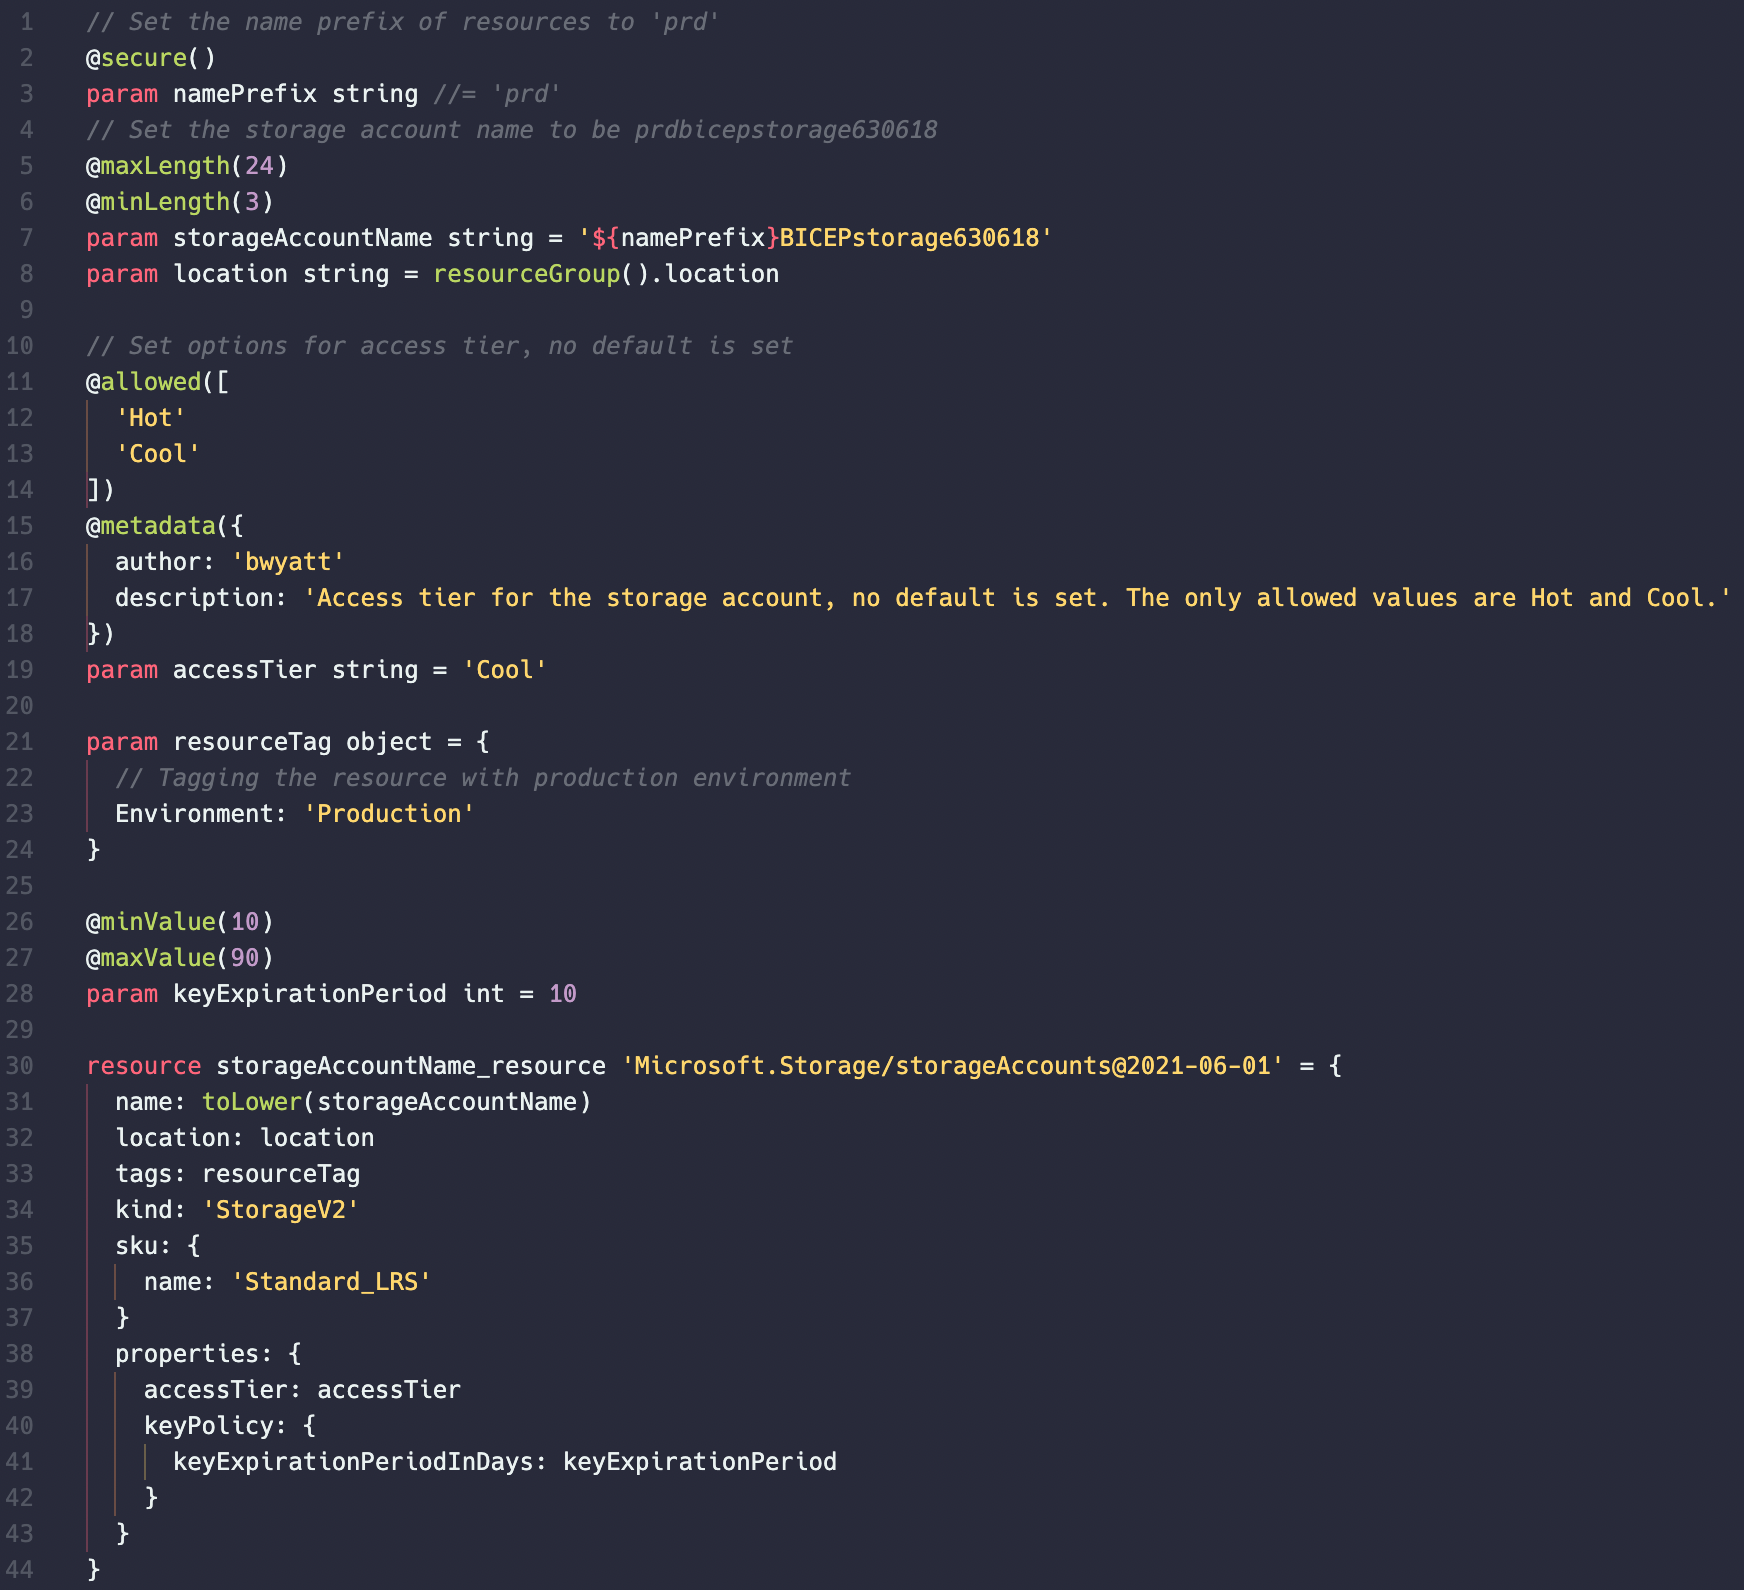
The @secure parameter decorator marks your parameter as secure and prevents the parameter’s value from being saved to the deployment history and logs. It will not transform any plaintext value in the deployment file itself to anything but plaintext. If you have a parameter that uses @secure it should not have any default value.
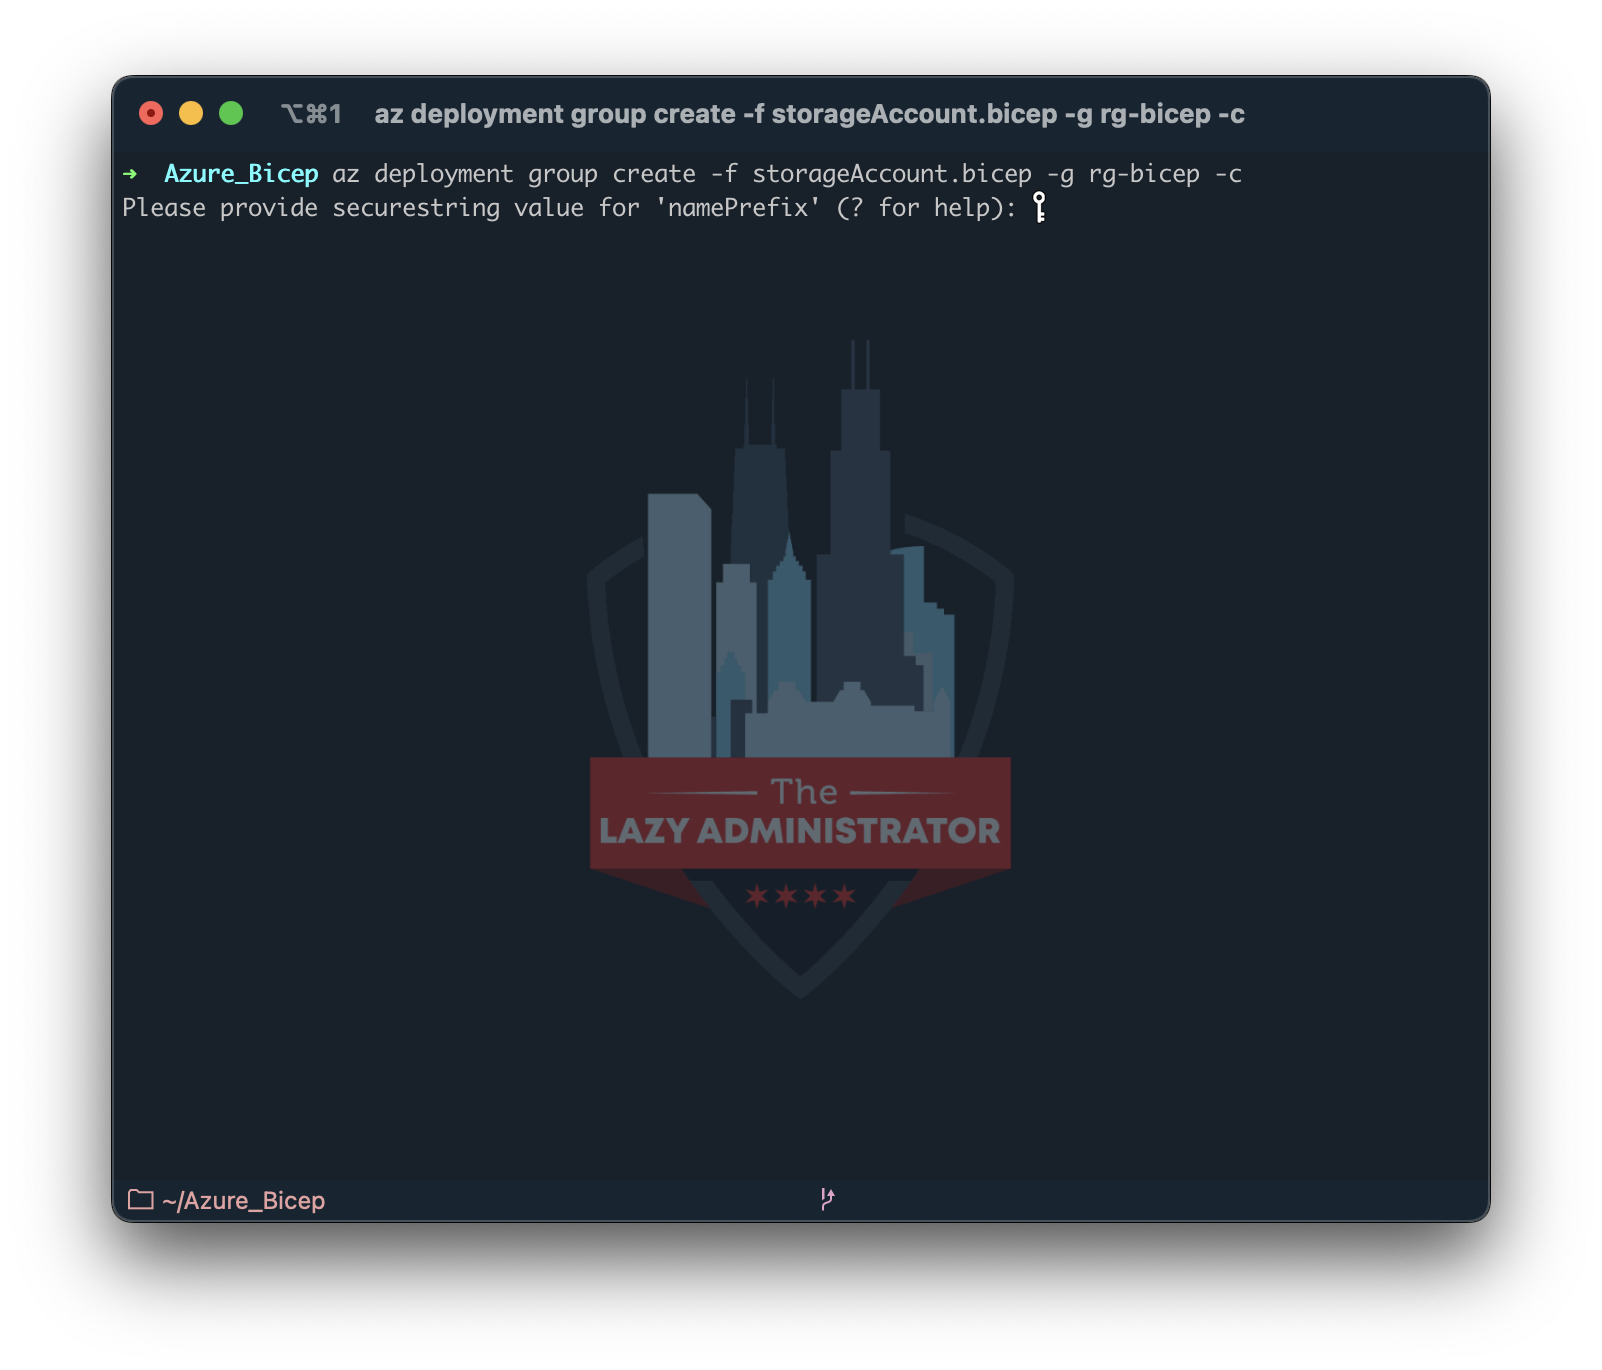
In my example below I modified the namePrefix param for my storage account from a hardcoded value of ‘prd’ to null. I also used the @secure parameter decorator to indicate that the parameter value should be secured. When I run the deployment I am prompted for the value, which is not shown even on the console.
@secure is used more when you need to enter a secret value, like a password or key.

My name is Bradley Wyatt; I am a 6x Dual-Microsoft Most Valuable Professional (MVP) in Microsoft Azure and Microsoft 365. I have given talks at many different conferences, user groups, and companies throughout the United States, ranging from PowerShell to DevOps Security best practices, and I am the 2022 North American Outstanding Contribution to the Microsoft Community winner.
3 thoughts on “In-Depth Look at Azure Bicep Syntax”
HI Bradd,
Fantastic stuff beginners like me.
May I know what is the VS code theme you are using while performing the examples.
Monokai Pro
Hello
I have a bicep script that creates a route with several patternsToMatch, but I can’t get a good configuration:
1. From the .ps1
I send the parameters of parRoutePatternsToMatch0 with content “\prueba” and parRoutePatternsToMatch with content “\prueba\*”
2. I pass these parameters to main.bicep
3. Within main I invoke a module that creates the fr-rt (module to create routes in Front door)
param parRoutePatternsToMatch0 string
param parRoutePatternsToMatch1 string
3.1. This sends the parameters of
parRoutePatternsToMatch0: parRoutePatternsToMatch0
parRoutePatternsToMatch1: parRoutePatternsToMatch1
But when I run it I get this event
“message”:”Unable to process template language expressions for resource ‘/subscriptions/xx/resourceGroups/GR_FrontDoor/providers/Microsoft.Cdn/profiles/afdp-xxx/afdEndpoints/endpointxxx/routes/rt-xx’ at line ‘1’ and column ‘1165’. ‘The language expression property array index ‘1’ is out of bounds.'”,
What am I doing wrong and how can I add multiple patternsToMatch?
Regards
Thank you for your attention.