Connect and Navigate the Microsoft Graph API with PowerShell
Table of Contents
Graph is Microsoft’s RESTful API that allows you to interface directly with Azure AD, Office 365, Intune, SharePoint, Teams, OneNote, and a whole lot more. By using the Invoke-RestMethod PowerShell cmdlet we can connect and interact directly with the Graph API. The Invoke-RestMethod cmdlet sends HTTP and HTTPS requests to Representational State Transfer (REST) web services that returns richly structured data. PowerShell formats the response based on the data type. For an RSS or ATOM feed, PowerShell returns the Item or Entry XML nodes. For JavaScript Object Notation (JSON) or XML, PowerShell converts (or deserializes) the content into objects.1 In this article, I will walk you through setting up the Azure Application, assigning proper permissions, Authentication and finally running queries against the Graph API. Once you understand how to properly authenticate and format queries you will see how powerful Graph can be for you and your organization.
1. Application Registration
The first step to connect to Graph and make requests is to register a new Azure Active Directory Application. The application is used to connect to Graph and manage permissions.
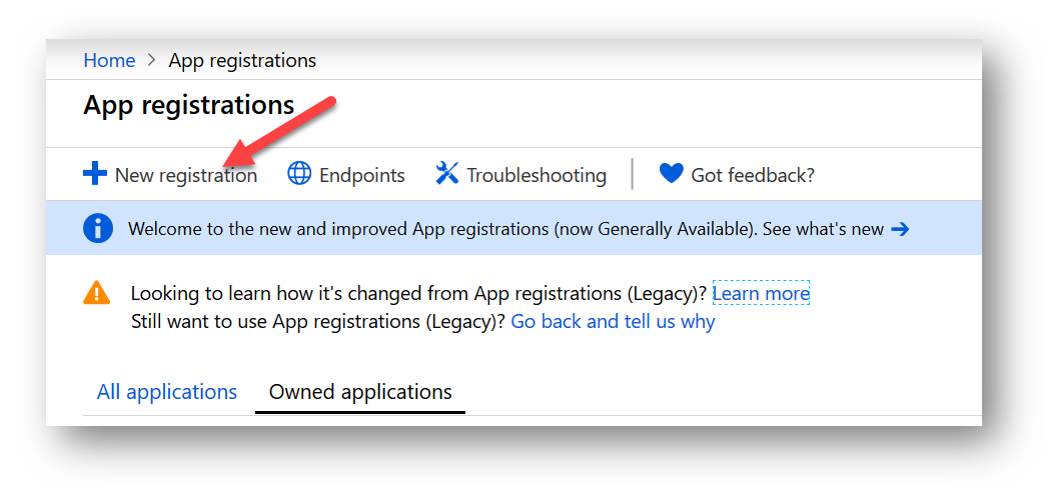
Navigate to App Registrations in Azure and select “New Registration” (Azure Portal > Azure Active Directory > App Registration > New Application Registration)
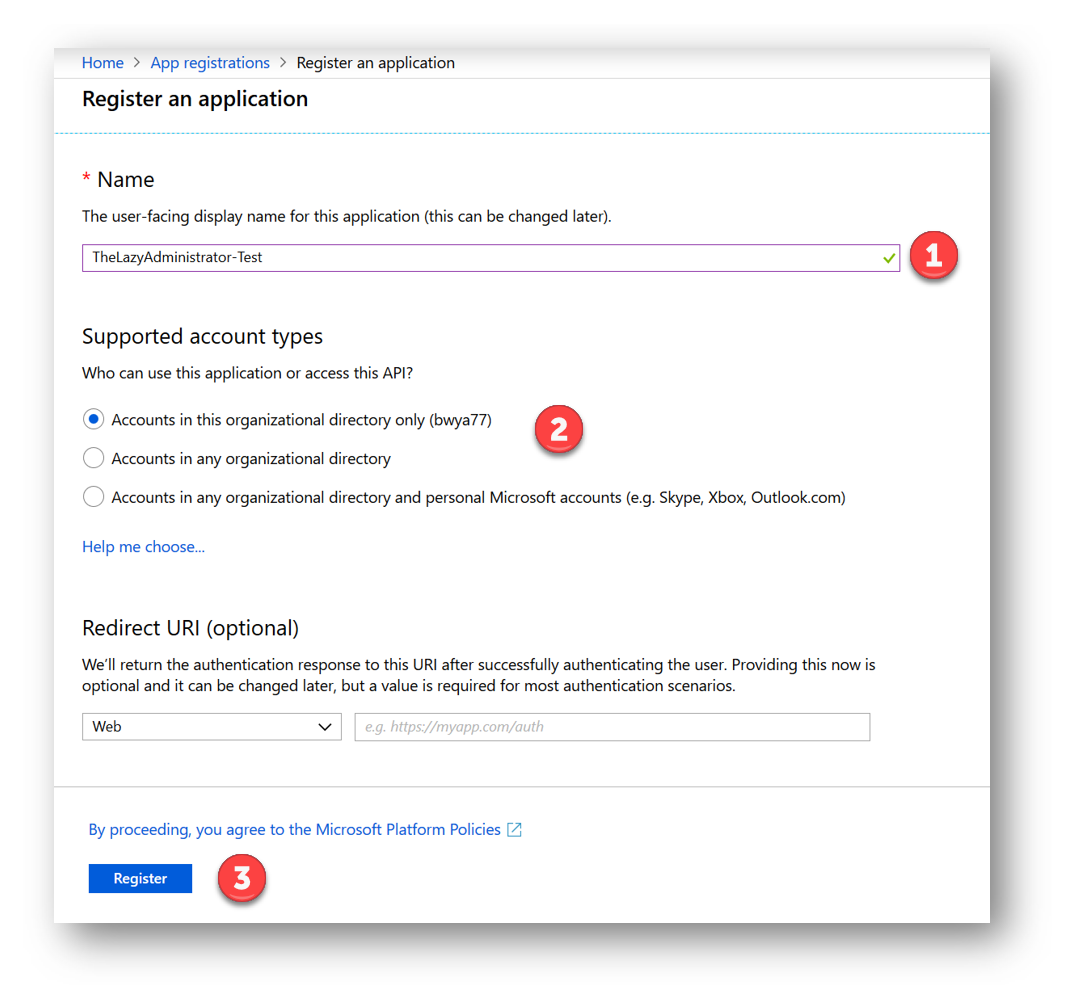
Next, give your application a name. In my example, I am naming my application, “TheLazyAdministrator-Test”. Then, specify who can use this application. Click on the “Register” button to create your new application.
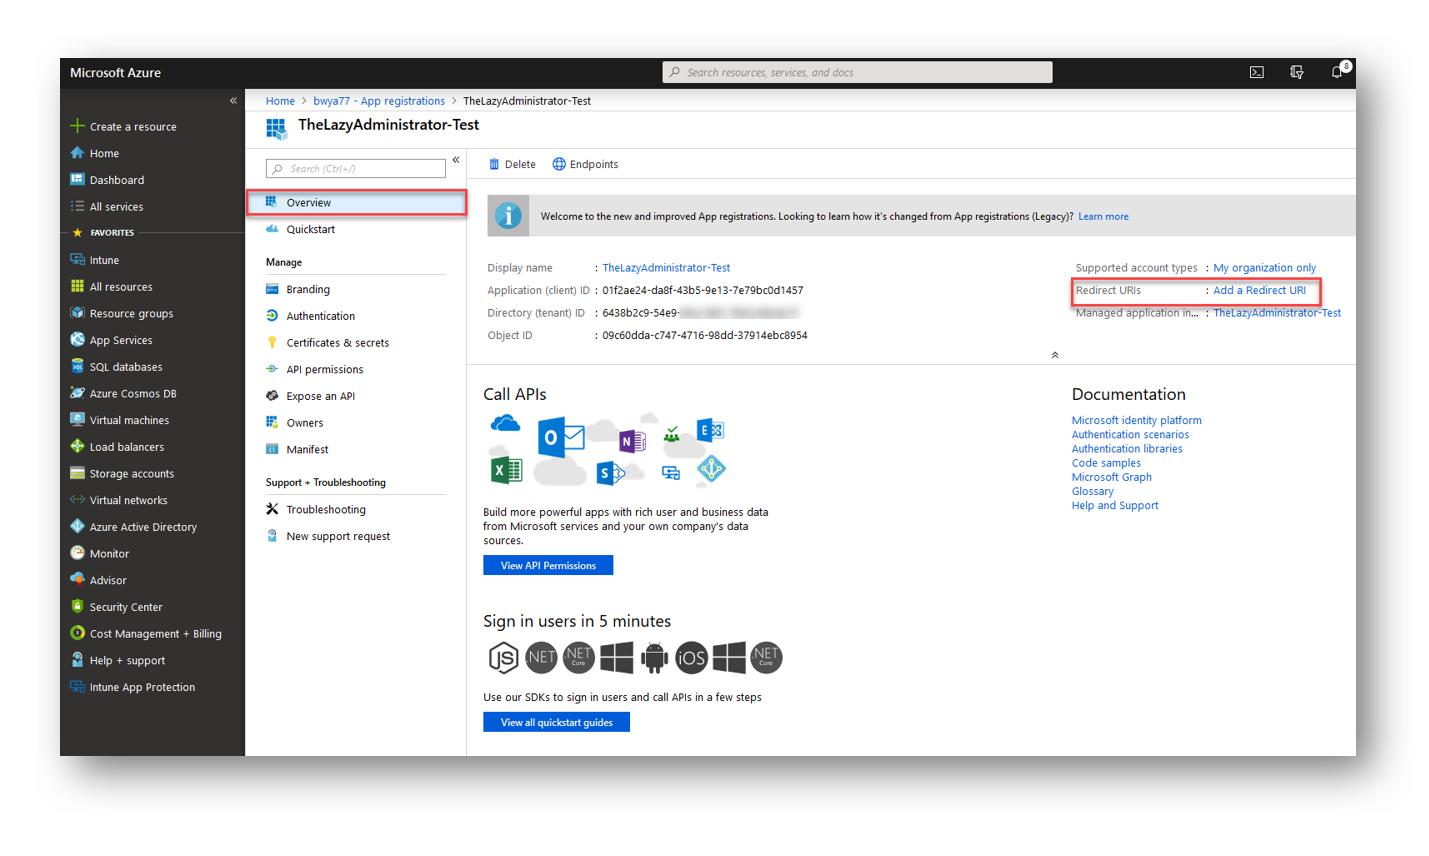
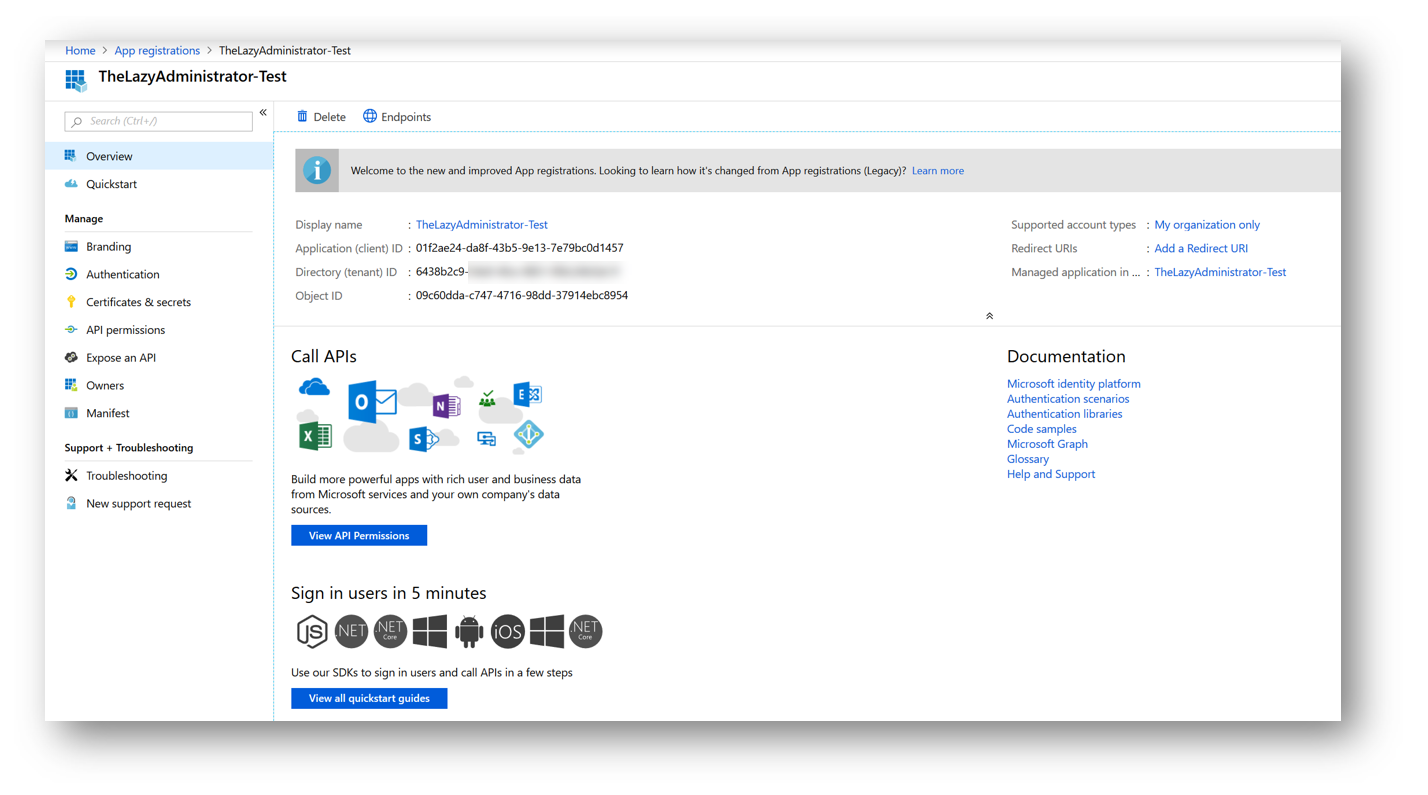
You will now see your newly created application! Some key items regarding the application are the Application ID (which is the Client ID), the Directory ID (which is the Tenant ID) and Client Secret, which is required if you use the Application Permission type but not if you use the Delegated Permission Type. In the next section, we will walk through the permission type differences, permissions, and admin consent.
And finally we need to configure and get our applications redirect URI. Go to your Azure Applications overview page by going to Azure Active Directory > App Registrations. Click on “Add a Redirect URI”
 Enter in ANY url as a redirect URI value. It DOES NOT have to even resolve! You could put http://localhost, in my example I put a URL that isn’t even valid on my website. Press ‘Save’ and take note of this URL.
2. Configuring App Permissions
Now that we have created an Application we need to configure its permissions. In the OAuth world, when Apps try to access information they must have the appropriate permissions to do.
Application Permissions vs Delegated Permissions
It is important to understand the difference between Application permissions and Delegated permissions as well as effective permissions. Effective permissions are the permissions that your app will have when making requests to the Graph API.
- Application permissions are used by apps that run without a signed-in user present; for example, apps that run as background services or daemons. Application permissions can only be consented by an administrator. This permission type would be preferred for items like automated scripts and runbooks.
- For application permissions, the effective permissions of your app will be the full level of privileges implied by the permission. For example, an app that has the User.ReadWrite.All application permission can update the profile of every user in the organization.
- Delegated permissions are used by apps that have a signed-in user present. For these apps, either the user or an administrator consents to the permissions that the app requests and the app is delegated permission to act as the signed-in user when making calls to the target resource. Some delegated permissions can be consented to by non-administrative users, but some higher-privileged permissions require administrator consent.
-
- For delegated permissions, the effective permissions of your app will be the least privileged intersection of the delegated permissions the app has been granted and the privileges of the currently signed-in user. Your app can never have more privileges than the signed-in user. Within organizations, the privileges of the signed-in user may be determined by policy or by membership in one or more administrator roles.2 For example, assume your app has been granted the User.ReadWrite.All delegated permission. This permission nominally grants your app permission to read and update the profile of every user in an organization. If the signed-in user is a global administrator, your app will be able to update the profile of every user in the organization. However, if the signed-in user isn’t in an administrator role, your app will be able to update only the profile of the signed-in user. It will not be able to update the profiles of other users in the organization because the user that it has permission to act on behalf of does not have those privileges.2
Permission Requirements
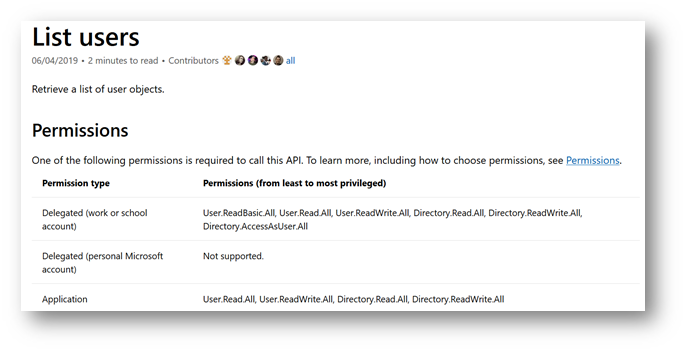
The Microsoft Graph documentation provides details on which permission levels are required or allowed for each permission type (application vs delegated). Some resources can only be reached using Delegated Permissions, others by Application permissions, and others by either of the two. Pictured below we can see the permissions listed to retrieve a list of all user objects for Application or Delegated. Permissions are listed from least privileged to most privileged.
 Assigning Permissions
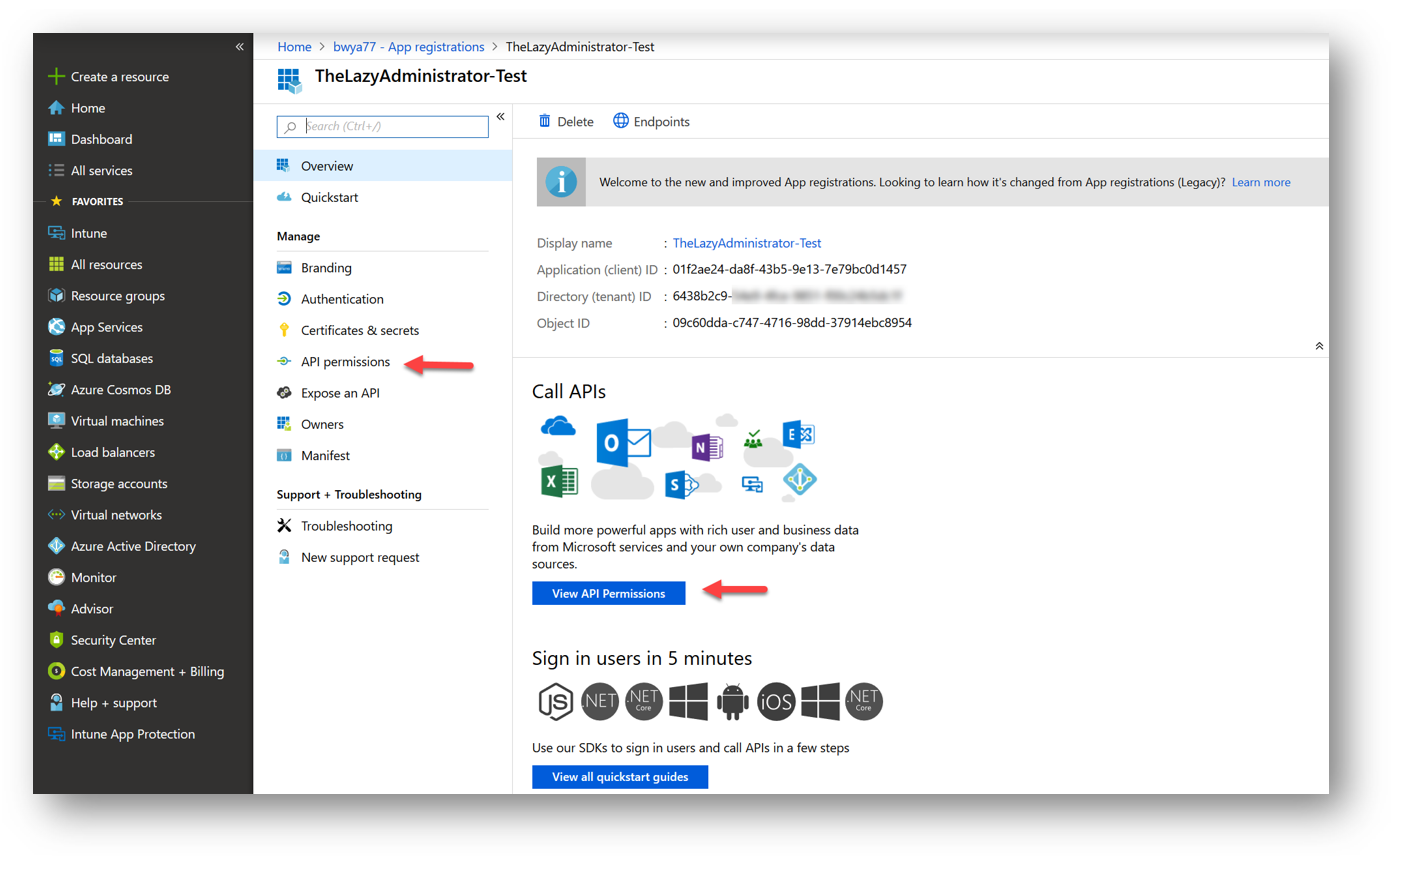
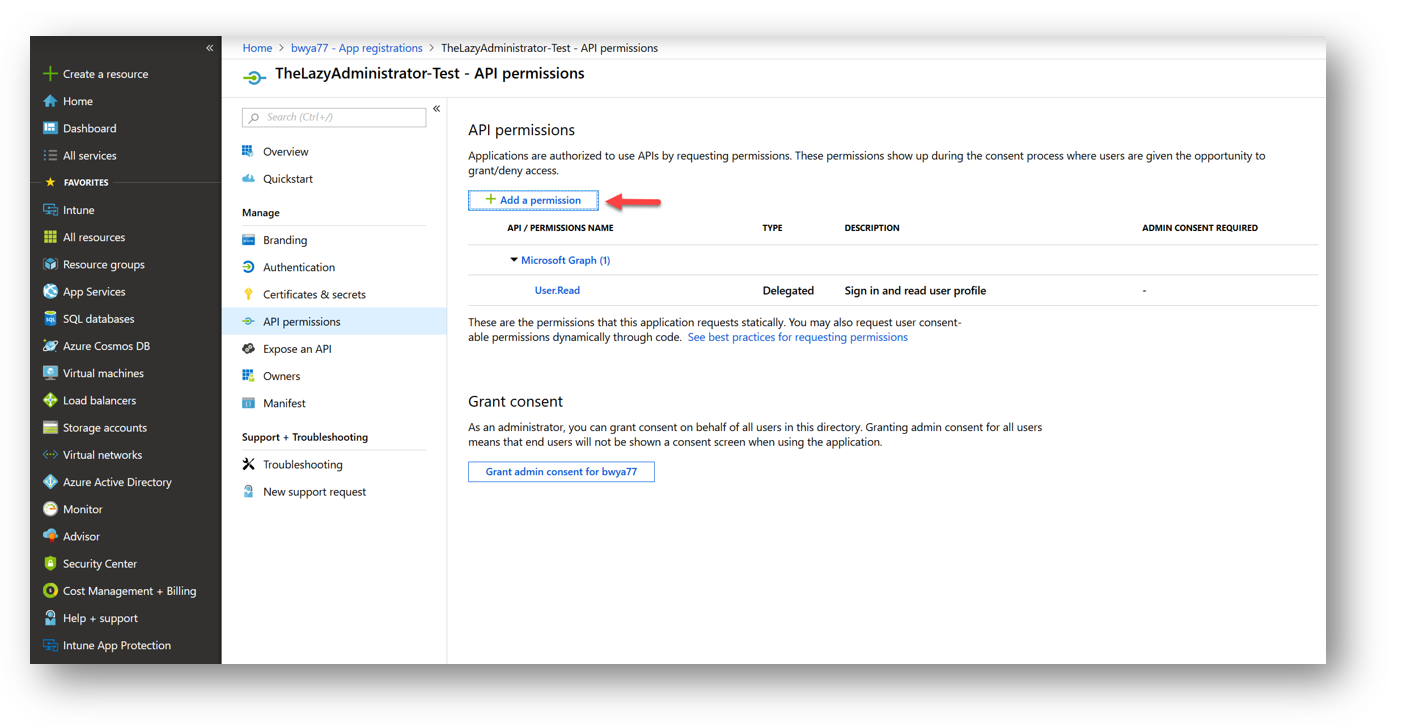
You can assign your application different permissions in the Azure Portal. First navigate to Azure Portal > Azure Active Directory >App Registrations and then select your application that you made above. Once you have selected your application, select “API Permissions” or “View API Permissions” (pictured below).
In my example I will give my application permission to return all groups that are in my tenant.
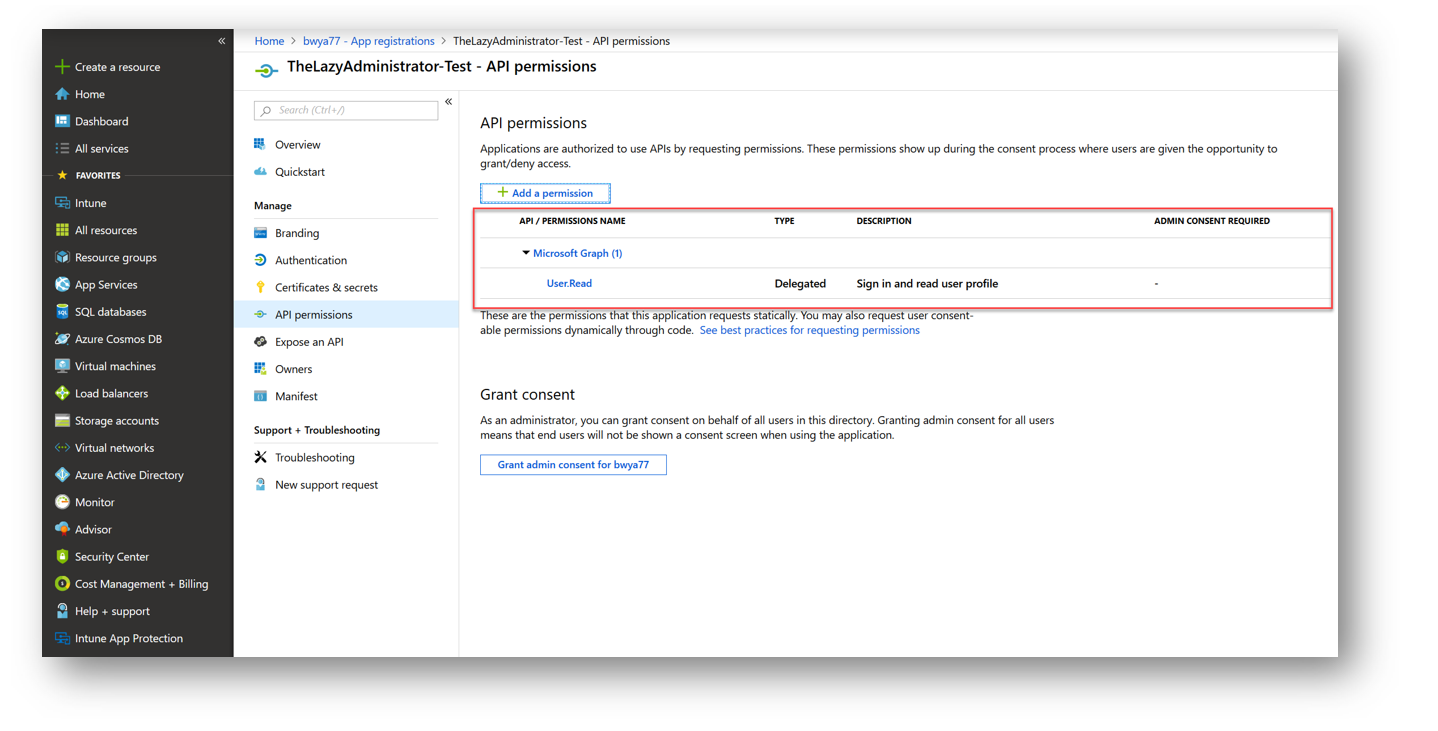
By default you will only have the User.Read permission assigned which allows you to sign in and read the user profile.
To assign a new permission to your application, click the “Add a permission” button.
In the “Request API Permissions” blade “Microsoft Graph”
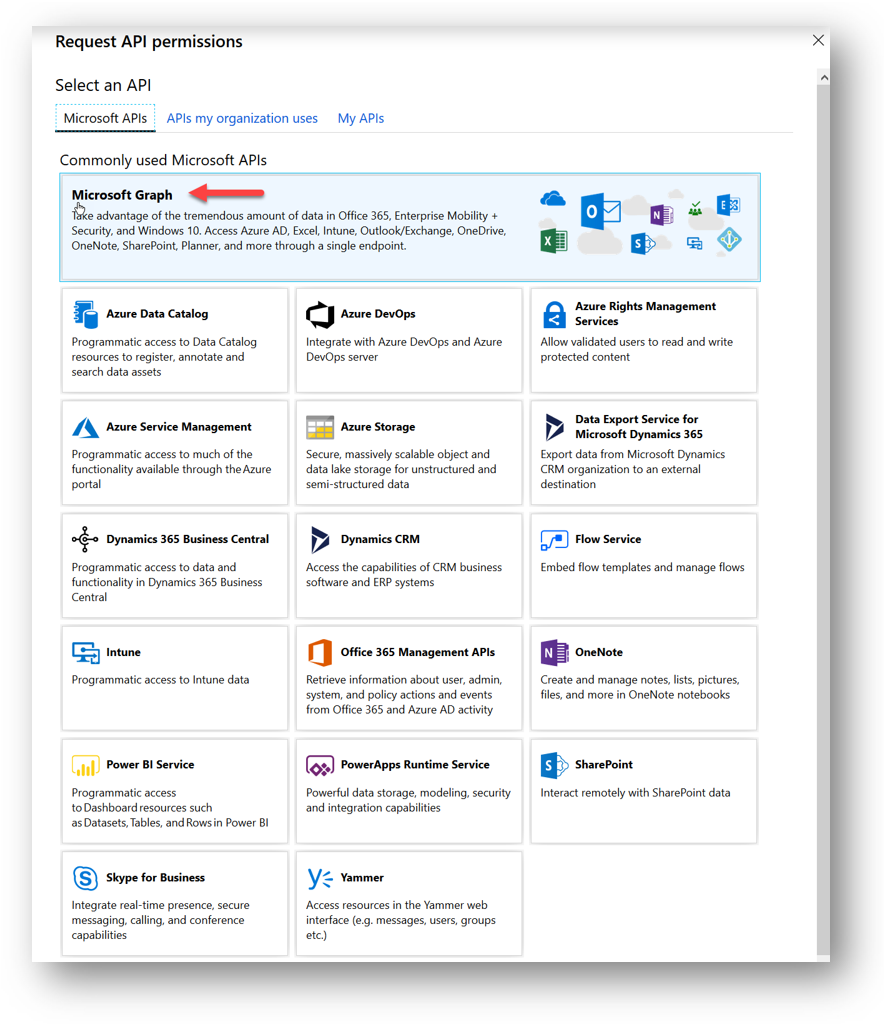 Next, we will have to choose the permission type. Remember that some permissions are only available for application permission type, some for delegated permission type, and some are available for both types. If, for example, I wanted to be able to List All Groups in my organization, I can see in the Graph API Documentation that I can use either delegated permissions or application permissions. So now it all depends how I will use my Azure Application. In my example I will be selecting Delegated Permissions.
 From looking at the documentation, to get all Groups in my tenant I need to at least assign the Group.Read.All permission. This is the least privileged permission I can assign. Once I find the permission and select the check box I can add the permission by selecting the “Add Permissions” button.
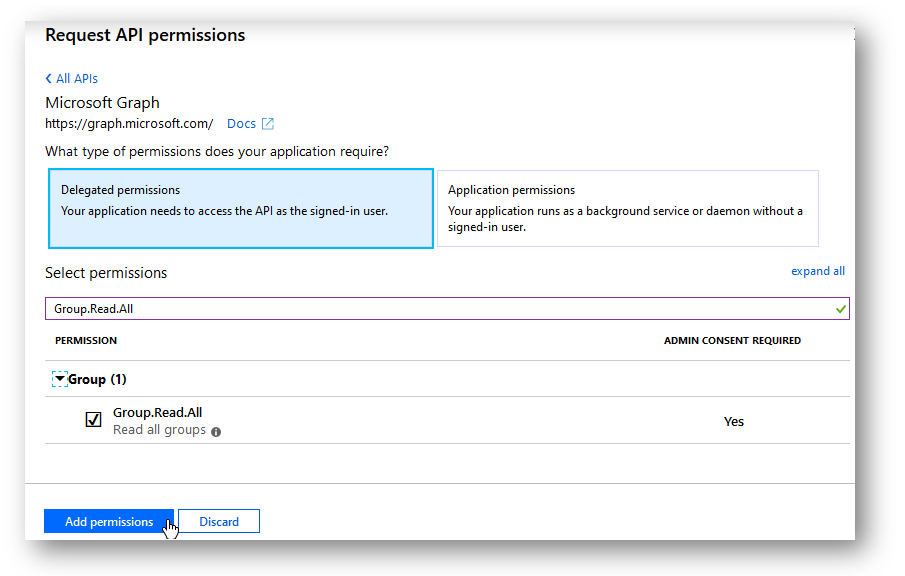 But since this permission type grants access to protected resources I need to grant Admin Consent. I go deeper into Admin Consent in the next section.
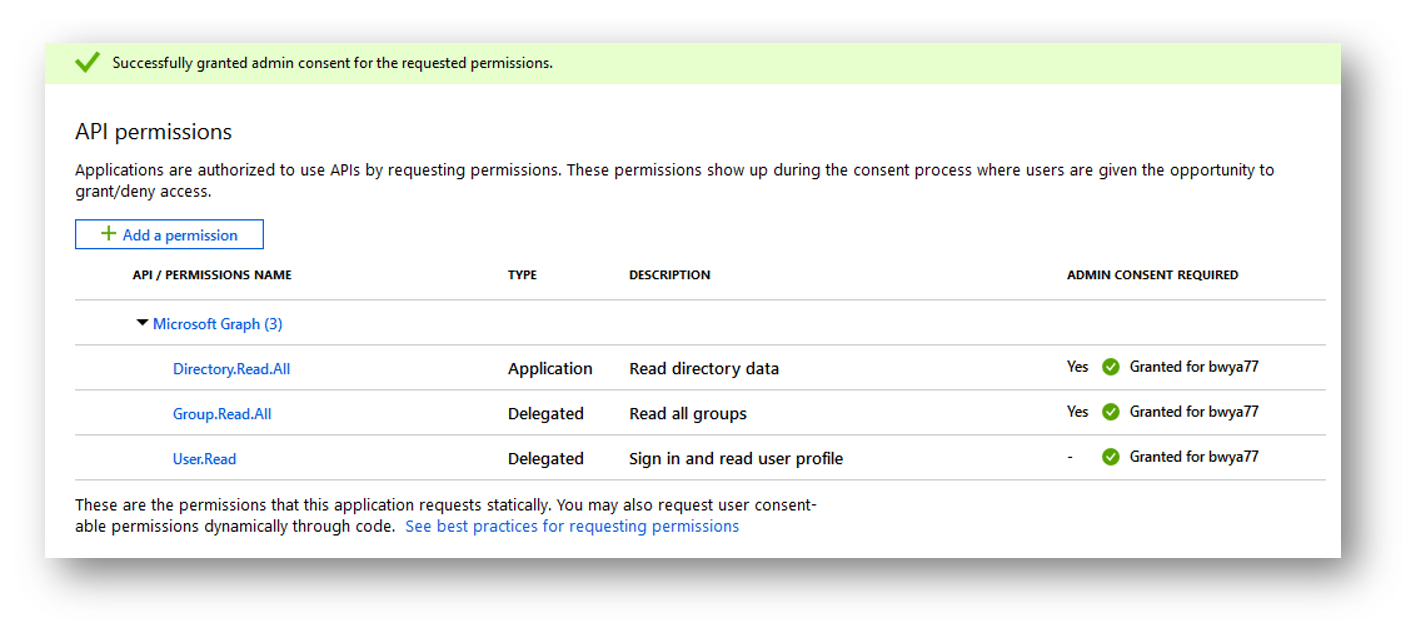
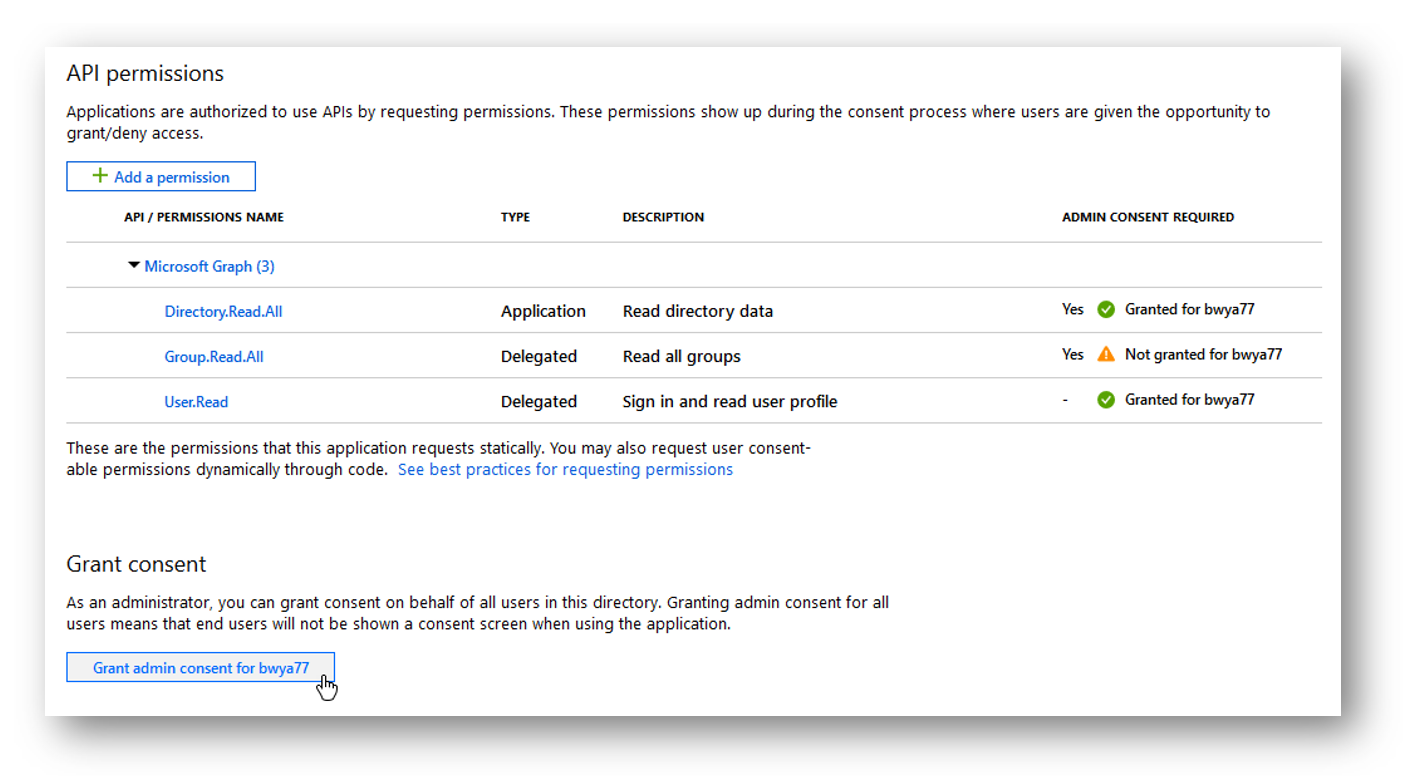 And now I can see in the permissions panel that I have properly granted consent to the application to read all groups in the tenant
So now you have successfully granted your Azure Application the permission to get all groups in your tenant. As you continue to use Graph, it is important to make sure you have the correct permission to access each resource. If you connect to Graph and then assign a new permission, you will need to re-connect to Graph to get an updated token. Make sure to pay close attention to the documentation to see which permission you need for each resource.
Admin Consent
Some high-privilege permissions can be set to admin-restricted and require an administrators consent to be granted. Examples of these kinds of permissions include the following:
- Read all user’s full profiles by using
User.Read.All - Write data to an organization’s directory by using
Directory.ReadWrite.All - Read all groups in an organization’s directory by using
Groups.Read.All
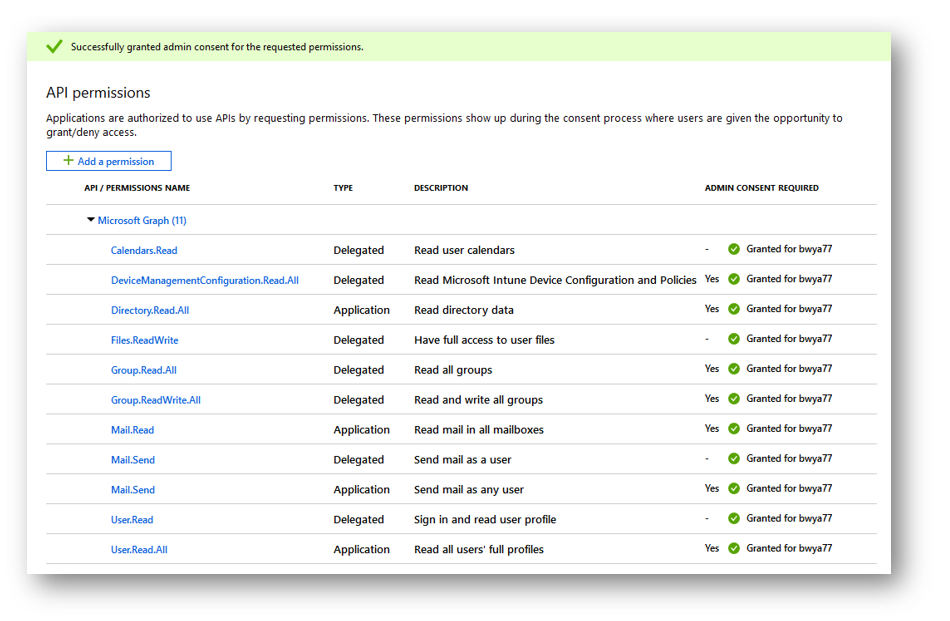
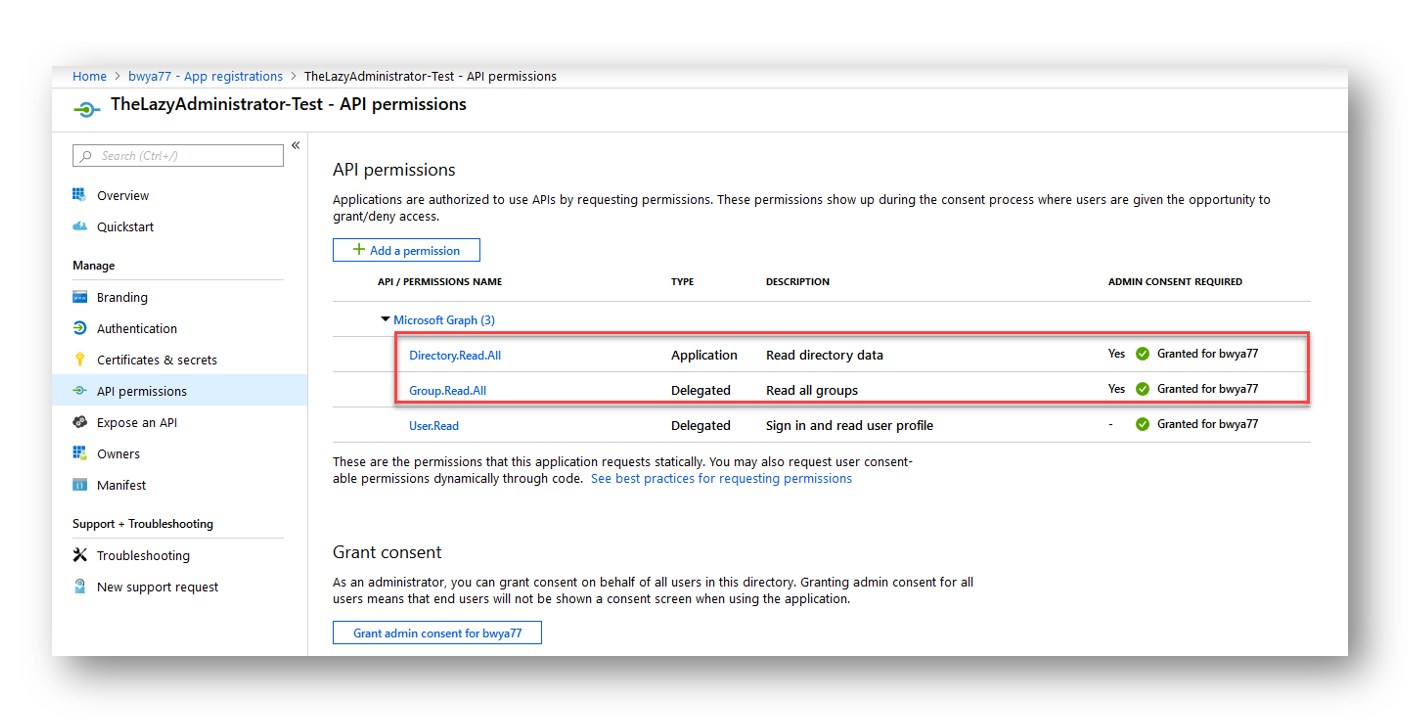
Below we can see 2 of my permissions require admin consent before applying. Groups.Read.All and User.Read.All. If I just assign the permission but forget to grant admin consent when its required, my application will not have that permission until its consented.
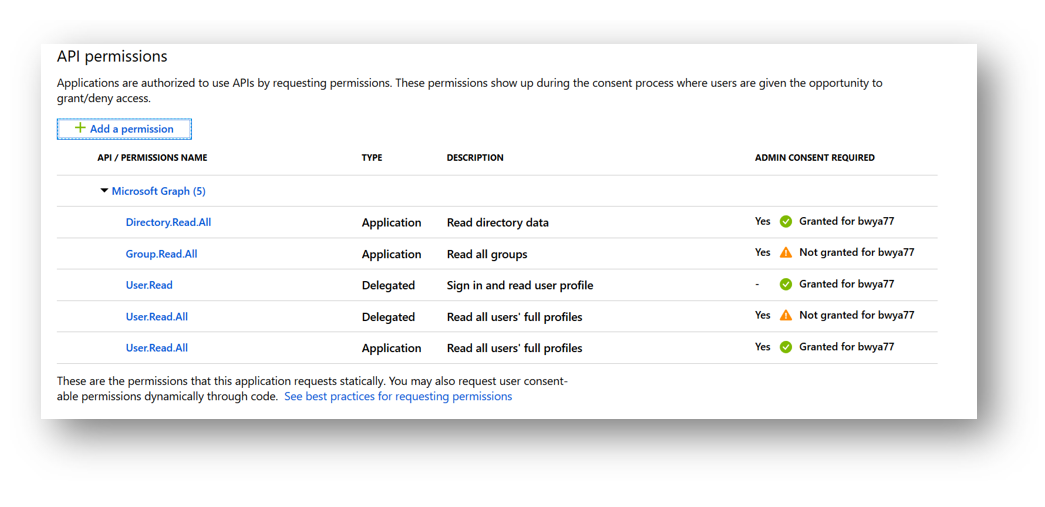
To grant admin consent to my application for these permissions I can press the “Grant admin consent for TENANT” button at the bottom of the screen (Pictured below).
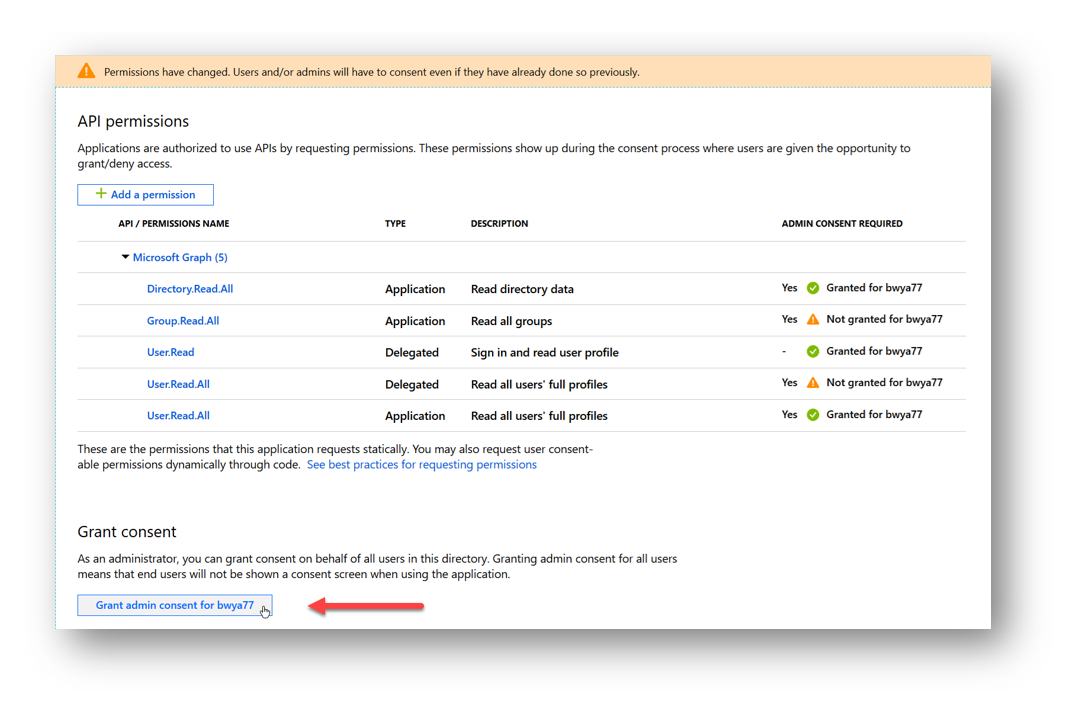 And now I see that my permissions have been granted and my application can now read all groups in my organization as well as read all user’s profiles.
3. Authentication and Authorization – Different Methods to Connect
There are multiple ways to authenticate to Graph with each has its own pros and cons. Below I will show you some of the methods, the benfits and use-cases, and finally the script on how you can use that authentication method to connect to Graph. Each authentication method is referred to as a Grant Type.
Device Code
Important – You need to set allowPublicClient to True in the applications Manifest. Otherwise you will see a similar error to:
“error_description”:”AADSTS7000218: The request body must contain the following parameter: ‘client_assertion’ or
‘client_secret’
OAuth 2.0 Device code flow grant type supports mult-factor authentication as you sign in using a web browser. You would not want to use this method of authentication for runbooks or any type of automated tasks as it requires user intervention to login to Graph. The Device Code grant type is used by browserless or input-constrained devices in the device flow to exchange a previously obtained device code for an access token.
For Device Code flow you do not need to know your Azure Applications client secret, but you do need to provide the client ID, and tenant name.
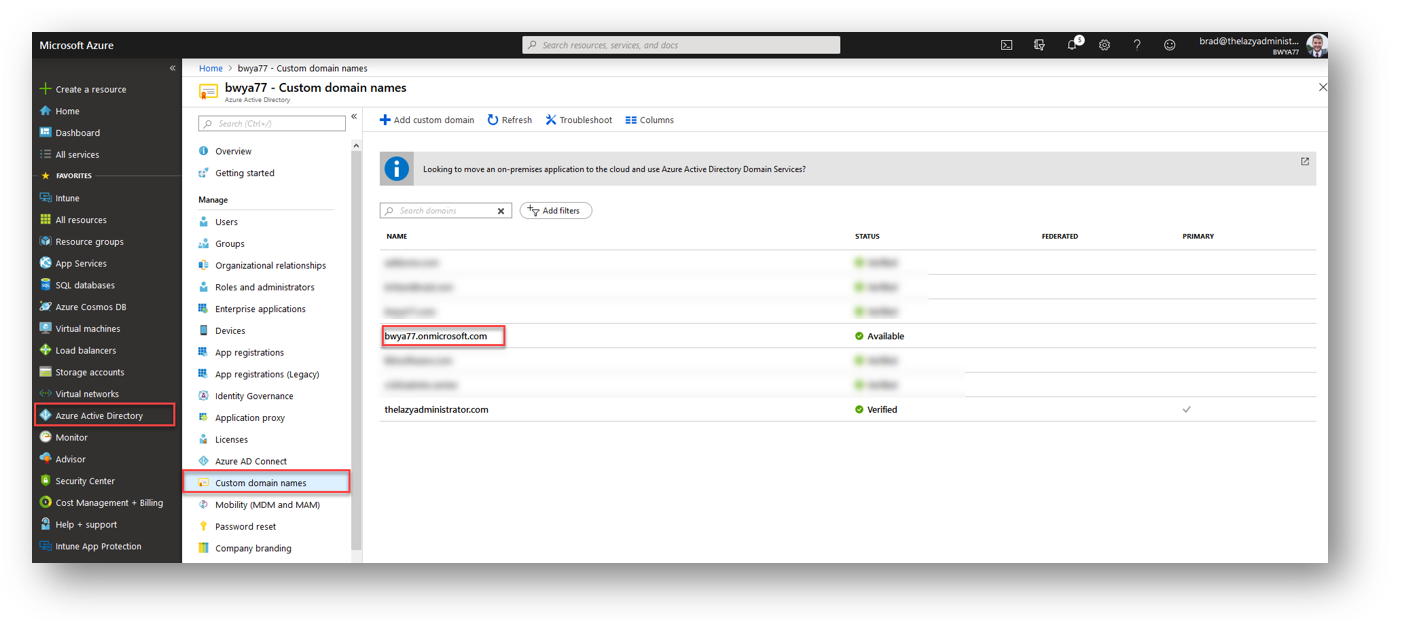
The first item we need to get is the Tenant Name. This can be found in Azure by going to Azure Active Directory > Custom Domain Names, and then finding the .onmicrosoft.com domain. Note this for later.
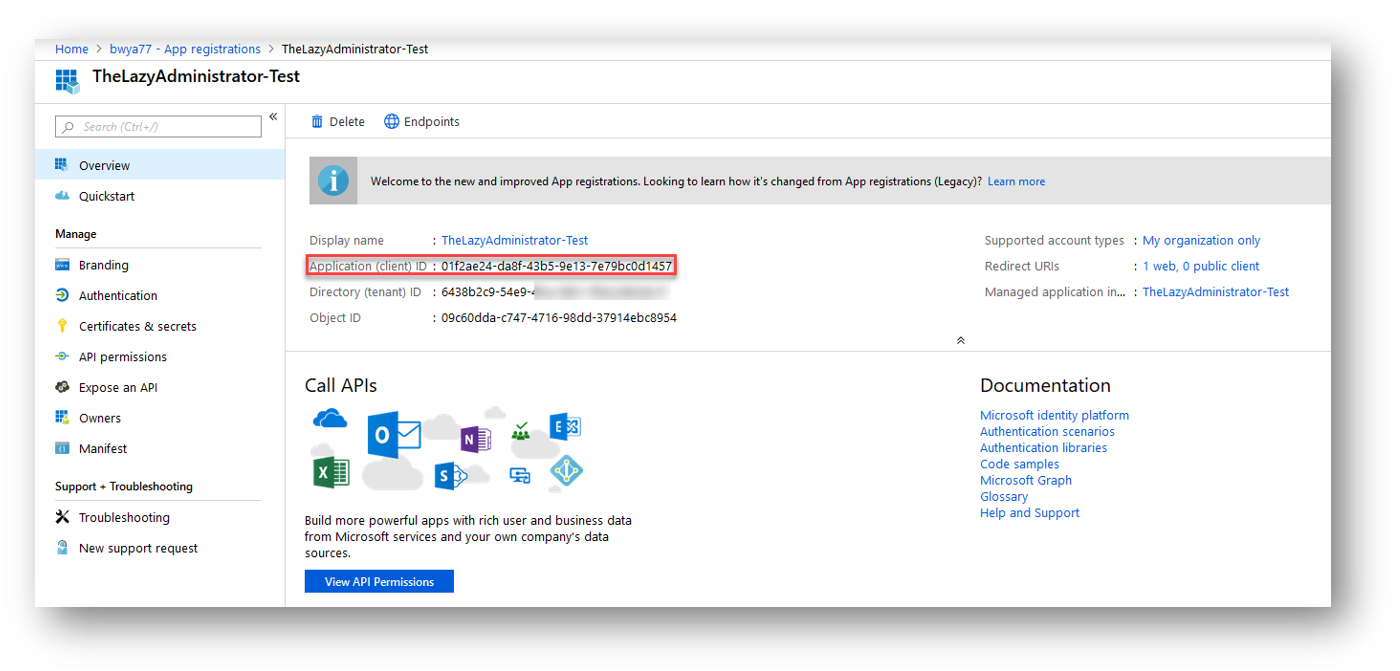
 Second, we want to find the Client ID of our Azure Application that we created earlier. To find this go to Azure and then Azure Active Directory > App Registrations > select your application and then copy the Application (client) ID value:
 Copy or save the code below. This is the script to authenticate and connect to graph using the Device Code Flow grant type. (You may need to change $RedirectURL to the redirect URL you set above when you created the azure AD application)
$clientId = ""
$redirectUrl = [System.Uri]"urn:ietf:wg:oauth:2.0:oob" # This is the standard Redirect URI for Windows Azure PowerShell
$tenant = "DOMAIN.onmicrosoft.com"
$resource = "https://graph.microsoft.com/";
$serviceRootURL = "https://graph.microsoft.com//$tenant"
$authUrl = "https://login.microsoftonline.com/$tenant";

$postParams = @{ resource = "$resource"; client_id = "$clientId" }
$response = Invoke-RestMethod -Method POST -Uri "$authurl/oauth2/devicecode" -Body $postParams
Write-Host $response.message
#I got tired of manually copying the code, so I did string manipulation and stored the code in a variable and added to the clipboard automatically
$code = ($response.message -split "code " | Select-Object -Last 1) -split " to authenticate."
Set-Clipboard -Value $code
#Start-Process "https://microsoft.com/devicelogin"
Add-Type -AssemblyName System.Windows.Forms

$form = New-Object -TypeName System.Windows.Forms.Form -Property @{ Width = 440; Height = 640 }
$web = New-Object -TypeName System.Windows.Forms.WebBrowser -Property @{ Width = 440; Height = 600; Url = "https://www.microsoft.com/devicelogin" }

$web.Add_DocumentCompleted($DocComp)
$web.DocumentText

$form.Controls.Add($web)
$form.Add_Shown({ $form.Activate() })
$web.ScriptErrorsSuppressed = $true

$form.AutoScaleMode = 'Dpi'
$form.text = "Graph API Authentication"
$form.ShowIcon = $False
$form.AutoSizeMode = 'GrowAndShrink'
$Form.StartPosition = 'CenterScreen'


$form.ShowDialog() | Out-Null


$tokenParams = @{ grant_type = "device_code"; resource = "$resource"; client_id = "$clientId"; code = "$($response.device_code)" }

$tokenResponse = $null

try
{
	$tokenResponse = Invoke-RestMethod -Method POST -Uri "$authurl/oauth2/token" -Body $tokenParams
}
catch [System.Net.WebException]
{
	if ($_.Exception.Response -eq $null)
	{
		throw
	}

	$result = $_.Exception.Response.GetResponseStream()
	$reader = New-Object System.IO.StreamReader($result)
	$reader.BaseStream.Position = 0
	$errBody = ConvertFrom-Json $reader.ReadToEnd();

	if ($errBody.Error -ne "authorization_pending")
	{
		throw
	}
}

If ($null -eq $tokenResponse)
{
	Write-Warning "Not Connected"
}
Else
{
	Write-Host -ForegroundColor Green "Connected"
}
Modify the ClientID variable and the Tenant variable with your client ID you got above, and the tenant domain name.
 Now if I run the script within PowerShell, the shell will display my device code and a winform to enter the code and sign in: (HINT: using the Set-Clipboard cmdlet within the script and string parsing, the code will automatically be sent to your clipboard. All you have to do is paste it in!)

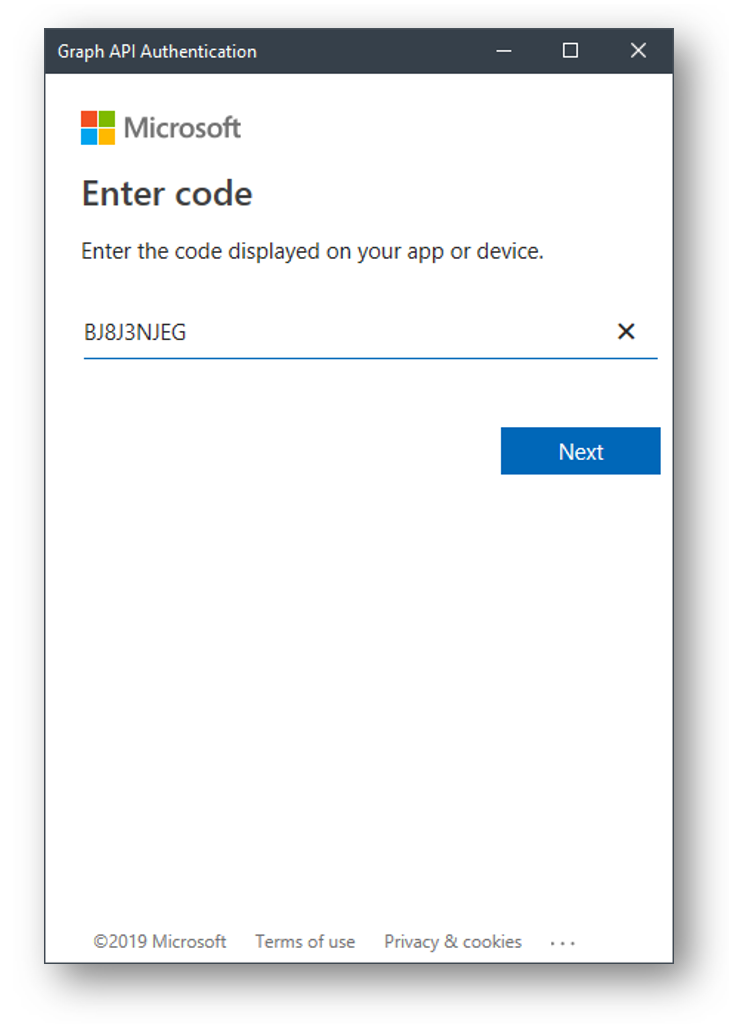 After you sign in you will be greeted with a message saying you have signed into the application and you can close the window.
The shell will also show if we have successfully authenticated to Graph and retrieved a valid token. Pictured is an invalid login response and a valid response.
 The token response is stored in a variable named $tokenResponse. Here we can see the scope (permissions we assigned earlier), expire date, token and more.
In the Data section, you will see how to use the token to make API calls and begin to navigate and manipulate your data.
Authorization Code
The Authorization Code grant type is very similar to the Device Code grant type in that we sign in using a web browser. The Authorization Code grant type does require us to have not only our client ID, but also the client secret and redirect URI.
First, lets get the Client ID:
To find this go to Azure and then Azure Active Directory > App Registrations > select your application and then copy the Application (client) ID value:
 Second, we will want the Client Secret.
In the Azure Portal, go to Azure Active Directory > App Registrations > and then Certificates and Secrets. Under “Client Secrets” click on the “New Client Secret” button to generate a new secret. Take note of this client secret as once you go away from this screen it will never display the secret again.
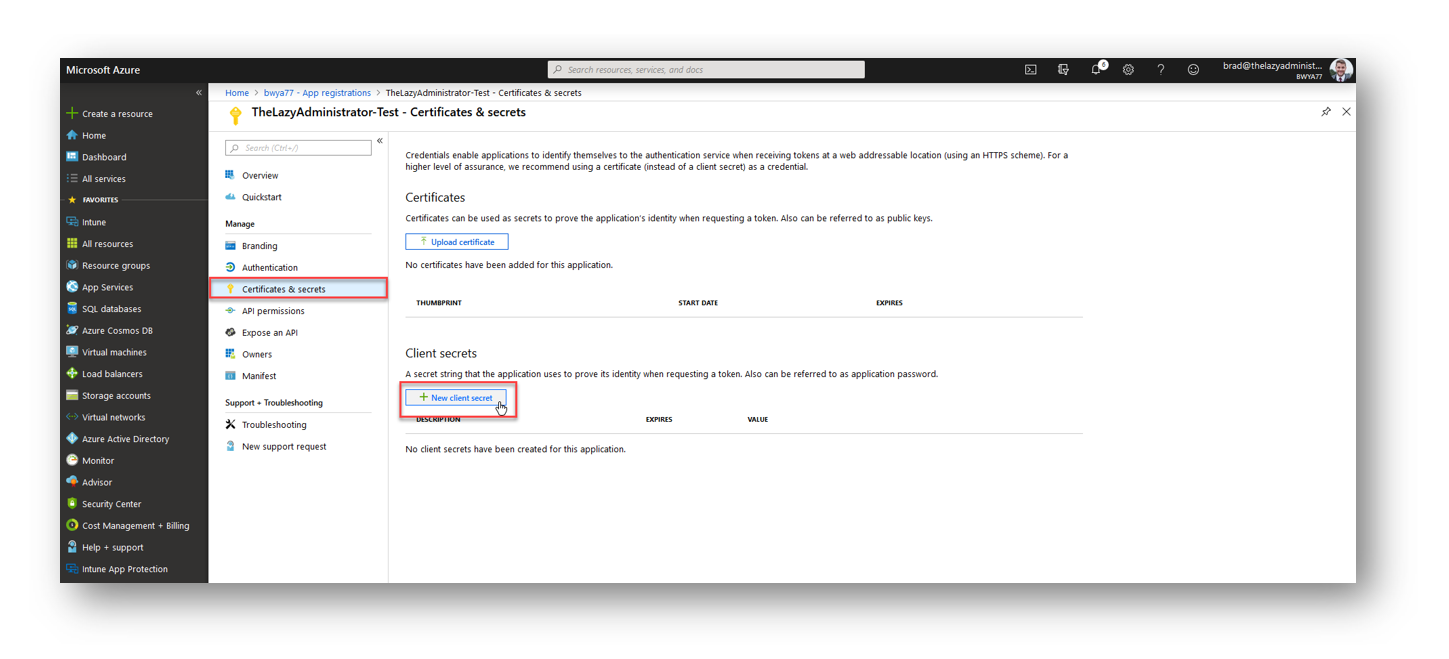 When you create a new client secret, give it a good description and select the expiration date
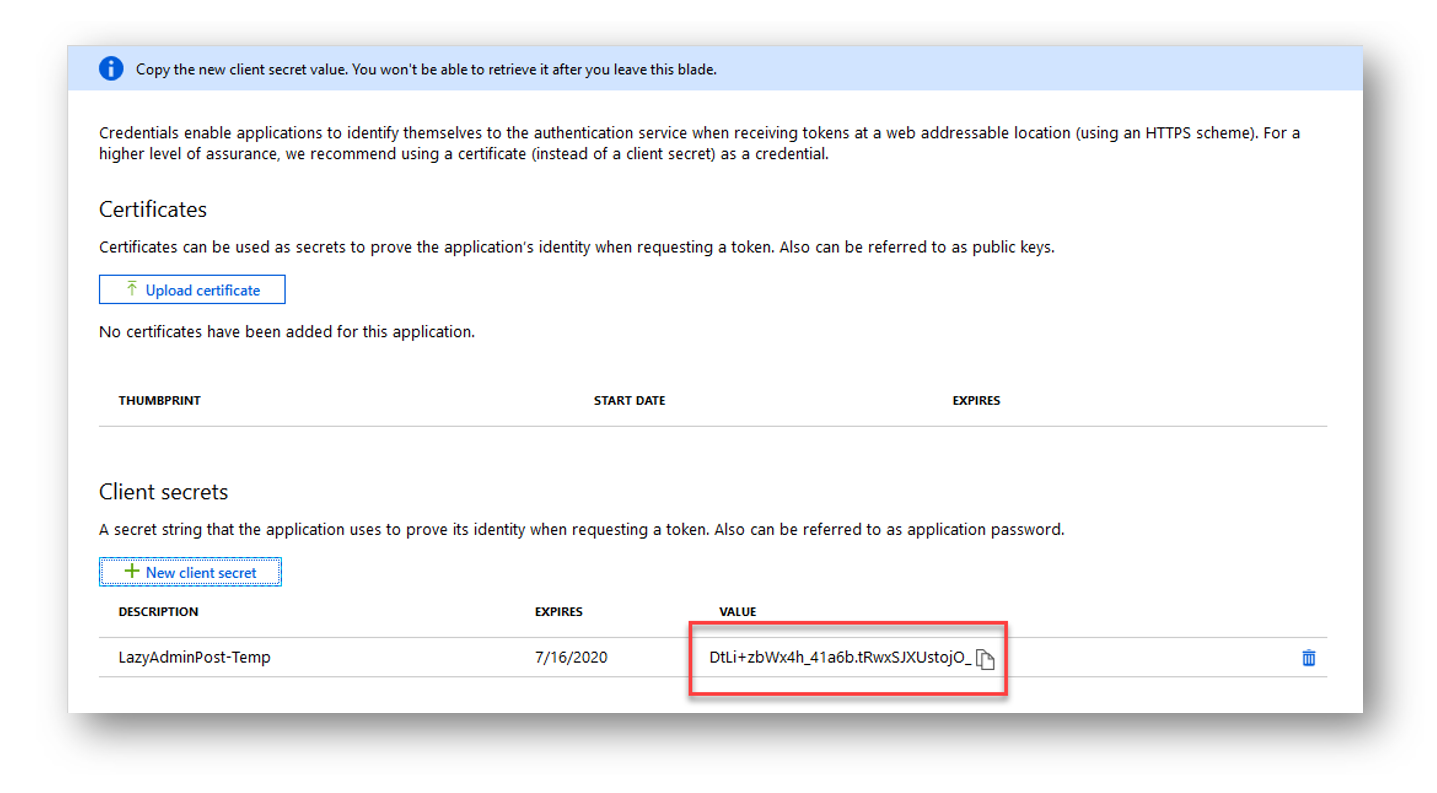
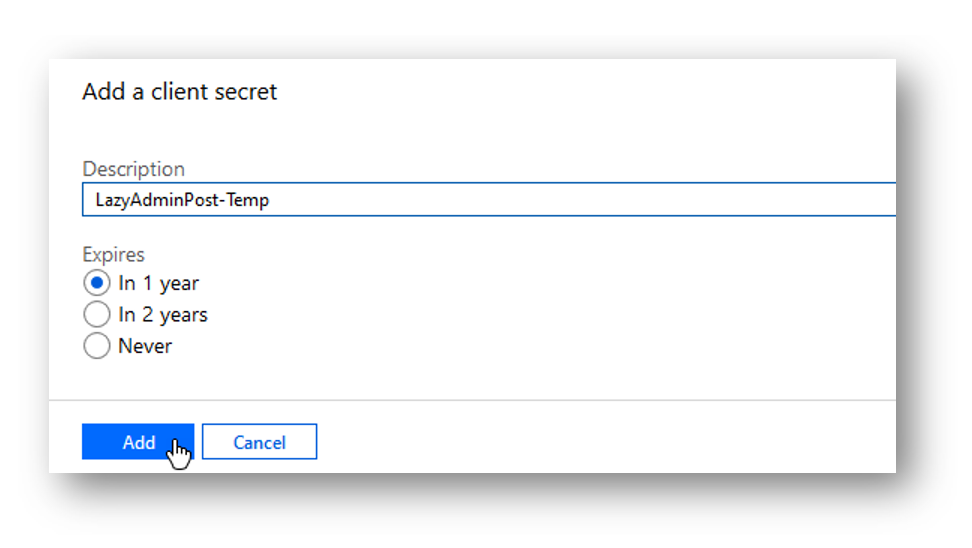 Copy the newly generated client secret. IMPORTANT: Once you click away, this client secret will never be able to be viewed again. Keep it safe and secure.
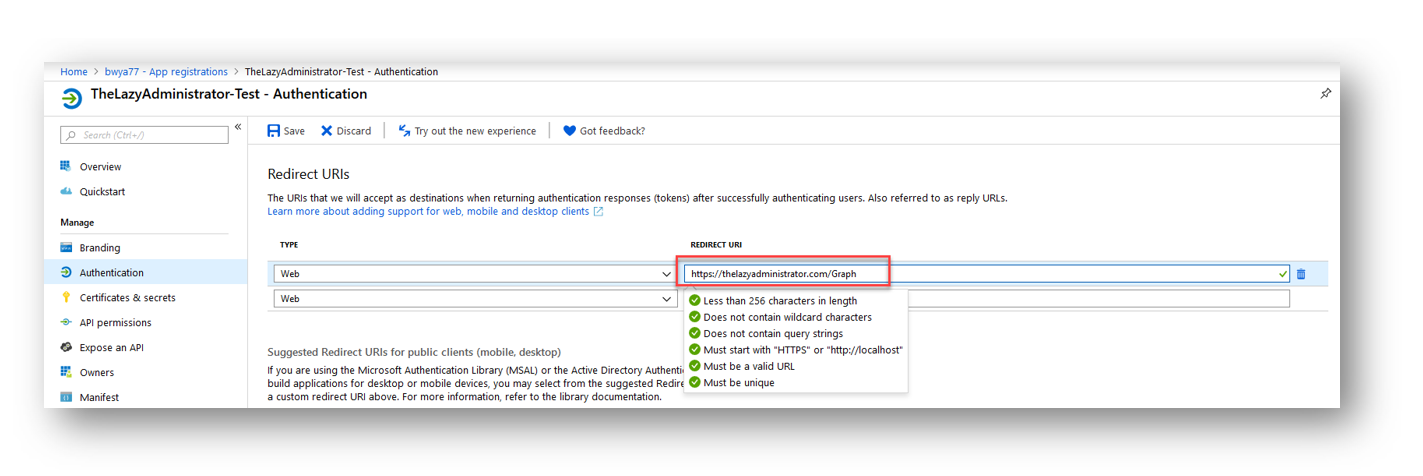
 And finally, we need to configure and get our applications redirect URI. Go to your Azure Applications overview page by going to Azure Active Directory > App Registrations. Click on “Add a Redirect URI”
 Enter in ANY url as a redirect URI value. It DOES NOT have to even resolve! You could put http://localhost, in my example I put a URL that isn’t even valid on my website. Press ‘Save’ and take note of this URL.
 Copy or save the code below. This is the script to authenticate and connect to graph using the Authorization Code grant type.
# The resource URI
$resource = "https://graph.microsoft.com"
# Your Client ID and Client Secret obainted when registering your WebApp
$clientid = ""
$clientSecret = ""
$redirectUri = ""

# UrlEncode the ClientID and ClientSecret and URL's for special characters
Add-Type -AssemblyName System.Web
$clientIDEncoded = [System.Web.HttpUtility]::UrlEncode($clientid)
$clientSecretEncoded = [System.Web.HttpUtility]::UrlEncode($clientSecret)
$redirectUriEncoded =  [System.Web.HttpUtility]::UrlEncode($redirectUri)
$resourceEncoded = [System.Web.HttpUtility]::UrlEncode($resource)
$scopeEncoded = [System.Web.HttpUtility]::UrlEncode("https://outlook.office.com/user.readwrite.all")

# Function to popup Auth Dialog Windows Form
Function Get-AuthCode {
    Add-Type -AssemblyName System.Windows.Forms

    $form = New-Object -TypeName System.Windows.Forms.Form -Property @{Width=440;Height=640}
    $web  = New-Object -TypeName System.Windows.Forms.WebBrowser -Property @{Width=420;Height=600;Url=($url -f ($Scope -join "%20")) }

    $DocComp  = {
        $Global:uri = $web.Url.AbsoluteUri
        if ($Global:uri -match "error=[^&]*|code=[^&]*") {$form.Close() }
    }
    $web.ScriptErrorsSuppressed = $true
    $web.Add_DocumentCompleted($DocComp)
    $form.Controls.Add($web)
    $form.Add_Shown({$form.Activate()})
    $form.ShowDialog() | Out-Null

    $queryOutput = [System.Web.HttpUtility]::ParseQueryString($web.Url.Query)
    $output = @{}
    foreach($key in $queryOutput.Keys){
        $output["$key"] = $queryOutput[$key]
    }

    $output
}


# Get AuthCode
$url = "https://login.microsoftonline.com/common/oauth2/authorize?response_type=code&redirect_uri=$redirectUriEncoded&client_id=$clientID&resource=$resourceEncoded&prompt=admin_consent&scope=$scopeEncoded"
Get-AuthCode
# Extract Access token from the returned URI
$regex = '(?<=code=)(.*)(?=&)'
$authCode  = ($uri | Select-string -pattern $regex).Matches[0].Value

Write-output "Received an authCode, $authCode"


#get Access Token
$body = "grant_type=authorization_code&redirect_uri=$redirectUri&client_id=$clientId&client_secret=$clientSecretEncoded&code=$authCode&resource=$resource"
$tokenResponse = Invoke-RestMethod https://login.microsoftonline.com/common/oauth2/token `
    -Method Post -ContentType "application/x-www-form-urlencoded" `
    -Body $body `
    -ErrorAction STOP
Next, in the clientID variable, enter your client ID that you got above. Do the same for the clientsecret variable and the redirectURI variable
When you now run the script it will prompt you to log in and approve the permissions. Here we can see the permissions we assigned the app in our earlier steps.
The token response is stored in a variable named $tokenResponse. Here we can see the scope (permissions we assigned earlier), expire date, token and more.
In the Data section, you will see how to use the token to make API calls and begin to navigate and manipulate your data.
Password
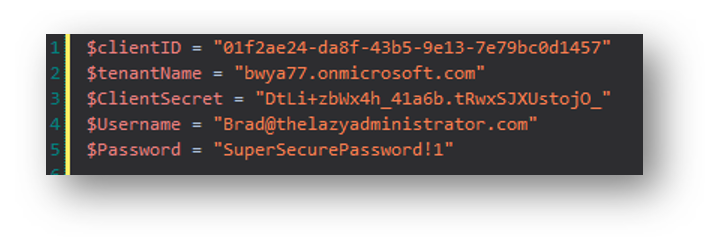
The Password grant type allows you to request a token for Delegated calls to the Graph API. In this script example, you will see that the client secret and the user’s password is hardcoded in. You should avoid this in any production environment. Encrypt the client secret as well as the password, you can store it in Azure Key Vault, but do not hard code it in plain text. The client secret should be treated similarly as a password.
This is beneficial because some permissions are only available using delegated permissions (like sending a message to a Team channel)
First, let’s get the Client ID:
To find this go to Azure and then Azure Active Directory > App Registrations > select your application and then copy the Application (client) ID value:
 Second, we will want the Client Secret.
In the Azure Portal, go to Azure Active Directory > App Registrations > and then Certificates and Secrets. Under “Client Secrets” click on the “New Client Secret” button to generate a new secret. Take note of this client secret as once you go away from this screen it will never display the secret again.
 When you create a new client secret, give it a good description and select the expiration date
 Copy the newly generated client secret. IMPORTANT: Once you click away, this client secret will never be able to be viewed again. Keep it safe and secure.
Lastly, we need to get is the Tenant Name. This can be found in Azure by going to Azure Active Directory > Custom Domain Names, and then finding the .onmicrosoft.com domain. Note this for later.
 Copy or save the code below. This is the script to authenticate and connect to graph using the Password grant type.
$clientID = ""
$tenantName = ""
$ClientSecret = ""
$Username = ""
$Password = ""


$ReqTokenBody = @{
    Grant_Type    = "Password"
    client_Id     = $clientID
    Client_Secret = $clientSecret
    Username      = $Username
    Password      = $Password
    Scope         = "https://graph.microsoft.com/.default"
}

$TokenResponse = Invoke-RestMethod -Uri "https://login.microsoftonline.com/$TenantName/oauth2/v2.0/token" -Method POST -Body $ReqTokenBody
Now we will want to enter the clientID into the clientID variable, and the same with the tenant name, and client secret. For the username and password variable, enter the user that you are using to delegate for. So if you were going to send a message to Teams, this user would be the sender.
When we run the script it will use those variables and automatically authenticate to the Graph API. We can confirm this by seeing what is returned in the $TokenResponse variable
 In the Data section you will see how to use the token to make API calls and begin to navigate and manipulate your data.
Client Credentials
The Client Credentials grant type is best for any automated tasks, runbooks or scripts as it can authenticate to Graph without any user intervention. In this script example, you will see that the client secret is hardcoded in. You should avoid this in any production environment. Encrypt the client secret, store it in Azure Key Vault, but do not hard code it in plain text. The client secret should be treated similarly as a password.
First, let’s get the Client ID:
To find this go to Azure and then Azure Active Directory > App Registrations > select your application and then copy the Application (client) ID value:
 Second, we will want the Client Secret.
In the Azure Portal, go to Azure Active Directory > App Registrations > and then Certificates and Secrets. Under “Client Secrets” click on the “New Client Secret” button to generate a new secret. Take note of this client secret as once you go away from this screen it will never display the secret again.
 When you create a new client secret, give it a good description and select the expiration date
 Copy the newly generated client secret. IMPORTANT: Once you click away, this client secret will never be able to be viewed again. Keep it safe and secure.
Lastly, we need to get is the Tenant Name. This can be found in Azure by going to Azure Active Directory > Custom Domain Names, and then finding the .onmicrosoft.com domain. Note this for later.
Copy or save the code below. This is the script to authenticate and connect to graph using the Client Credentials grant type.
# Application (client) ID, tenant Name and secret
$clientId = ""
$tenantName = ""
$clientSecret = ""
$resource = "https://graph.microsoft.com/"


$ReqTokenBody = @{
    Grant_Type    = "client_credentials"
    Scope         = "https://graph.microsoft.com/.default"
    client_Id     = $clientID
    Client_Secret = $clientSecret
}

$TokenResponse = Invoke-RestMethod -Uri "https://login.microsoftonline.com/$TenantName/oauth2/v2.0/token" -Method POST -Body $ReqTokenBody
Now we will want to enter the clientID into the clientID variable, and the same with the tenant name, and client secret
 When we run the script it will use those variables and automatically authenticate to the Graph API. We can confirm this by seeing what is returned in the $TokenResponse variable
 3. Playing With Graph Data – Get, Put, Post, Delete, and Patch
Now that we have created the Azure Application to allow us to connect to Graph, and have learned the multiple different ways to connect and authenticate to Graph, it’s time to learn some of the items we can do in Graph. This is where Graph shines and you can see how much more powerful it can be than just connecting to exchange online using PowerShell.
In my examples you will notice that my access token is always looking for the variable, ‘TokenResponse’ and the property, ‘access_token’. If you look in the different authentication methods above, the token is always stored in a variable named TokenResponse so if you just copied the code above you will be able to run these different items with minimal changes to the code.
Get All Tenant Groups
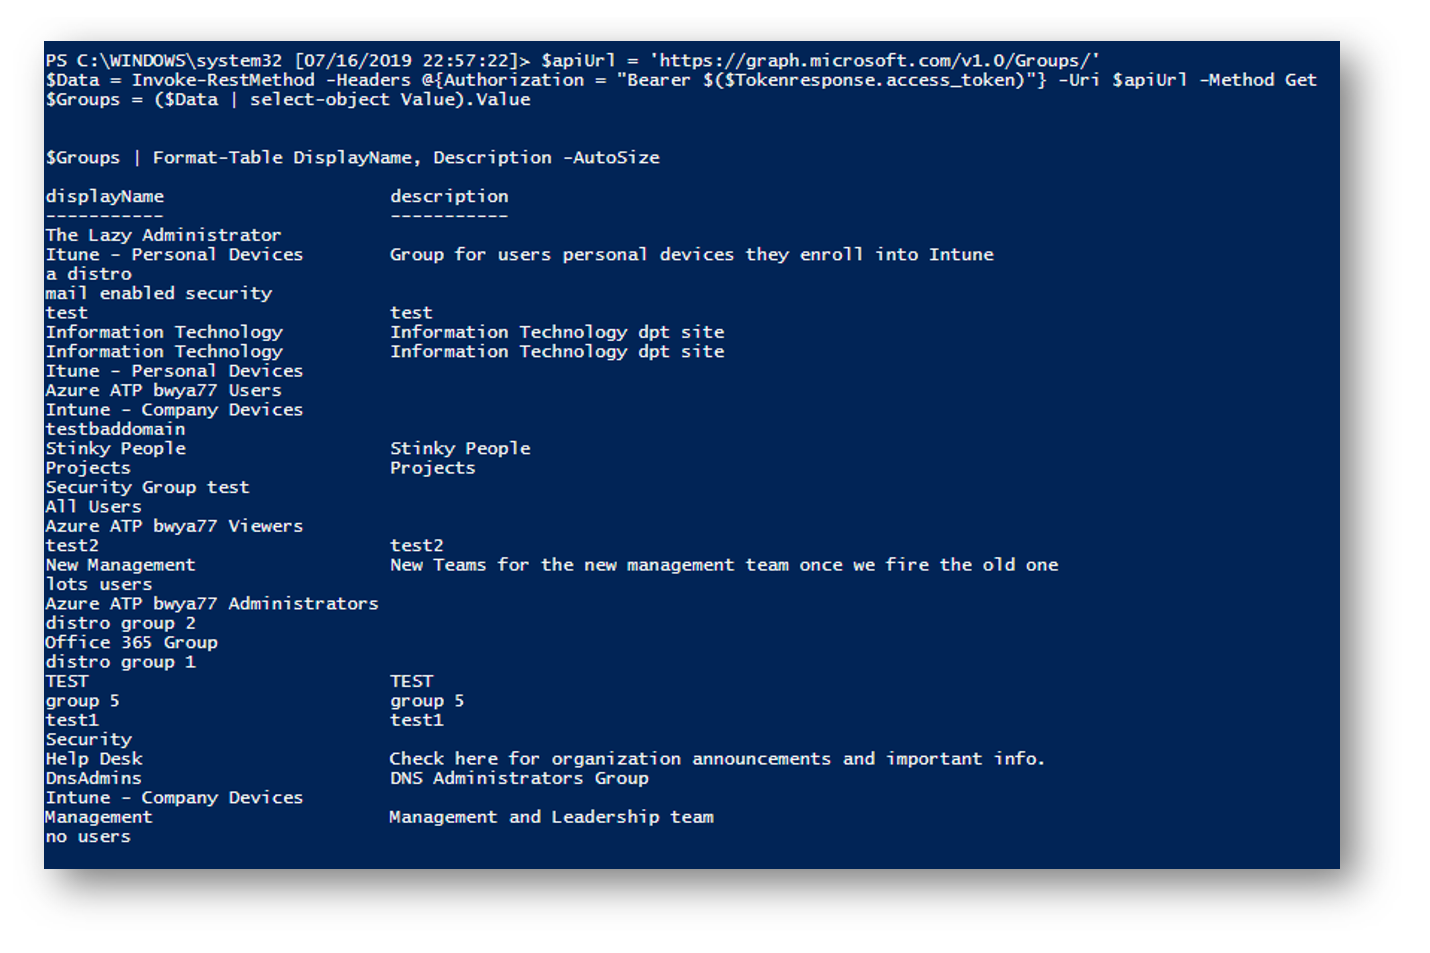
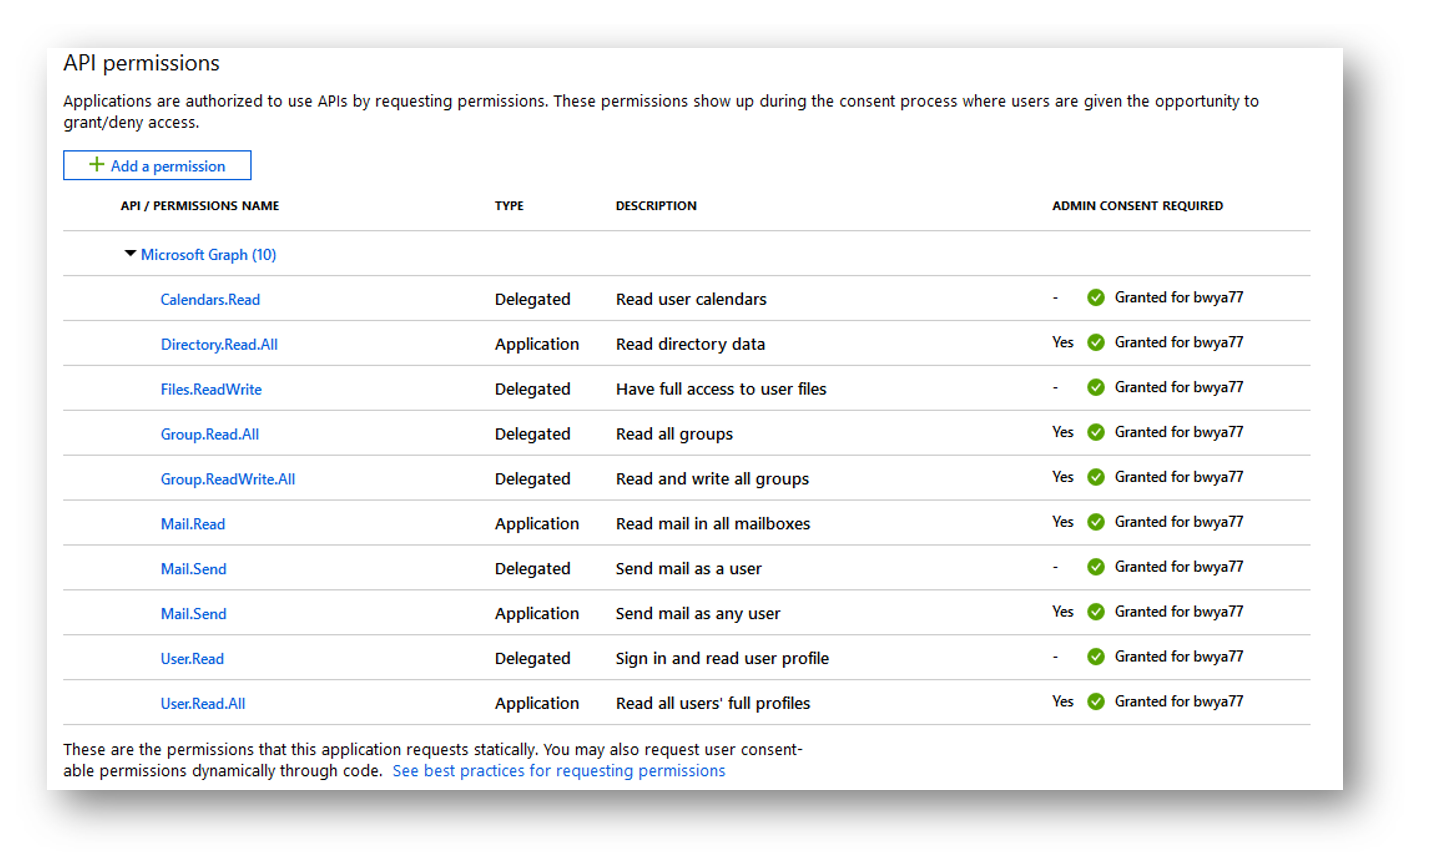
To get all Groups in a tenant we can find the documentation here. The least privileged permission we can grant our application is Group.Read.All and Directory.Read.All. By going into my application permissions I can see that I have these permissions assigned so I know that I will be able to make this call without issues.
The documentation also shows us the HTTP request which is https://graph.microsoft.com/v1.0/Groups/
Since I have already connected to graph using one of the grant types above and retrieved a valid token, I can use that access token to send an HTTP request to Graph and list all Groups.
$apiUrl = 'https://graph.microsoft.com/v1.0/Groups/'
$Data = Invoke-RestMethod -Headers @{Authorization = "Bearer $($Tokenresponse.access_token)"} -Uri $apiUrl -Method Get
$Groups = ($Data | select-object Value).Value


$Groups | Format-Table DisplayName, Description -AutoSize
Create a File in OneDrive
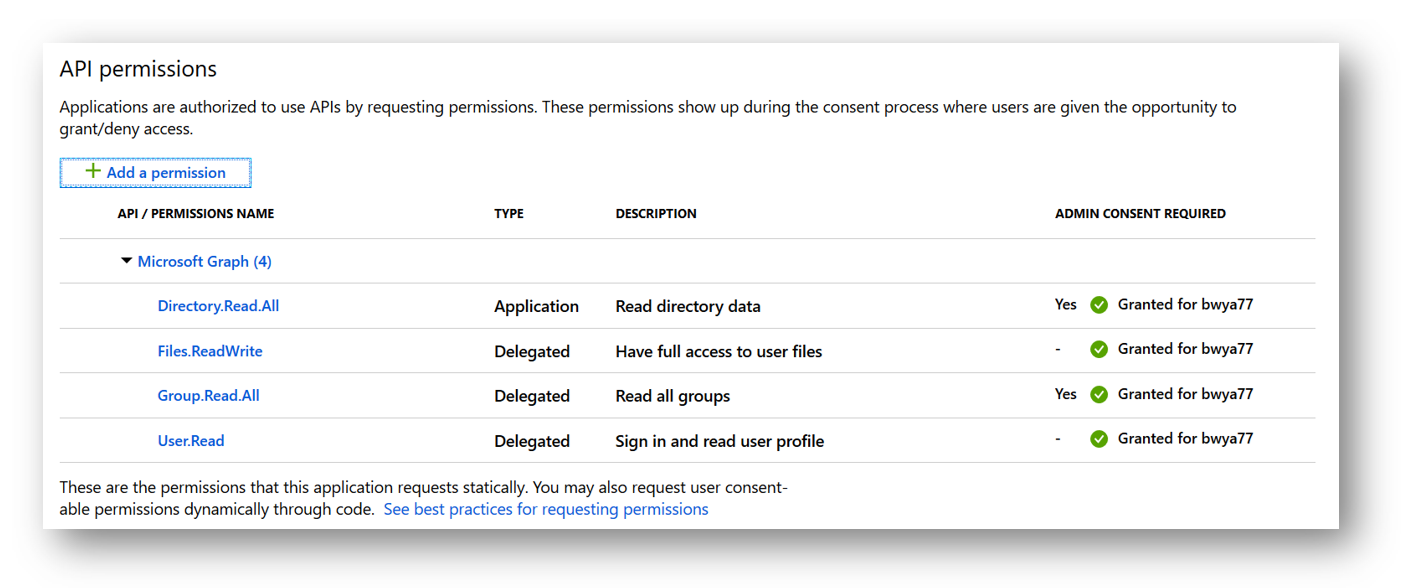
To create a new a file in OneDrive, we can find the documentation here. The least privileged permission we can grant our application is Files.ReadWrite because in this example I will be using the delegate permission and creating a new file in my OneDrive. By going into my application permissions I can see that I have these permissions assigned so I know that I will be able to make this call without issues.
Since I will be creating a new file in my OneDrive I need to authenticate to Graph with a delegate which means I can use Device Code flow, Authorization Code or Password. The account that I use to sign in will be the account with the new file in their OneDrive. You could use an Application grant type or even delegate to create a file in other users OneDrives, in that case you would want to modify the below URL and assign the following permissions: Files.ReadWrite.All, Sites.ReadWrite.All
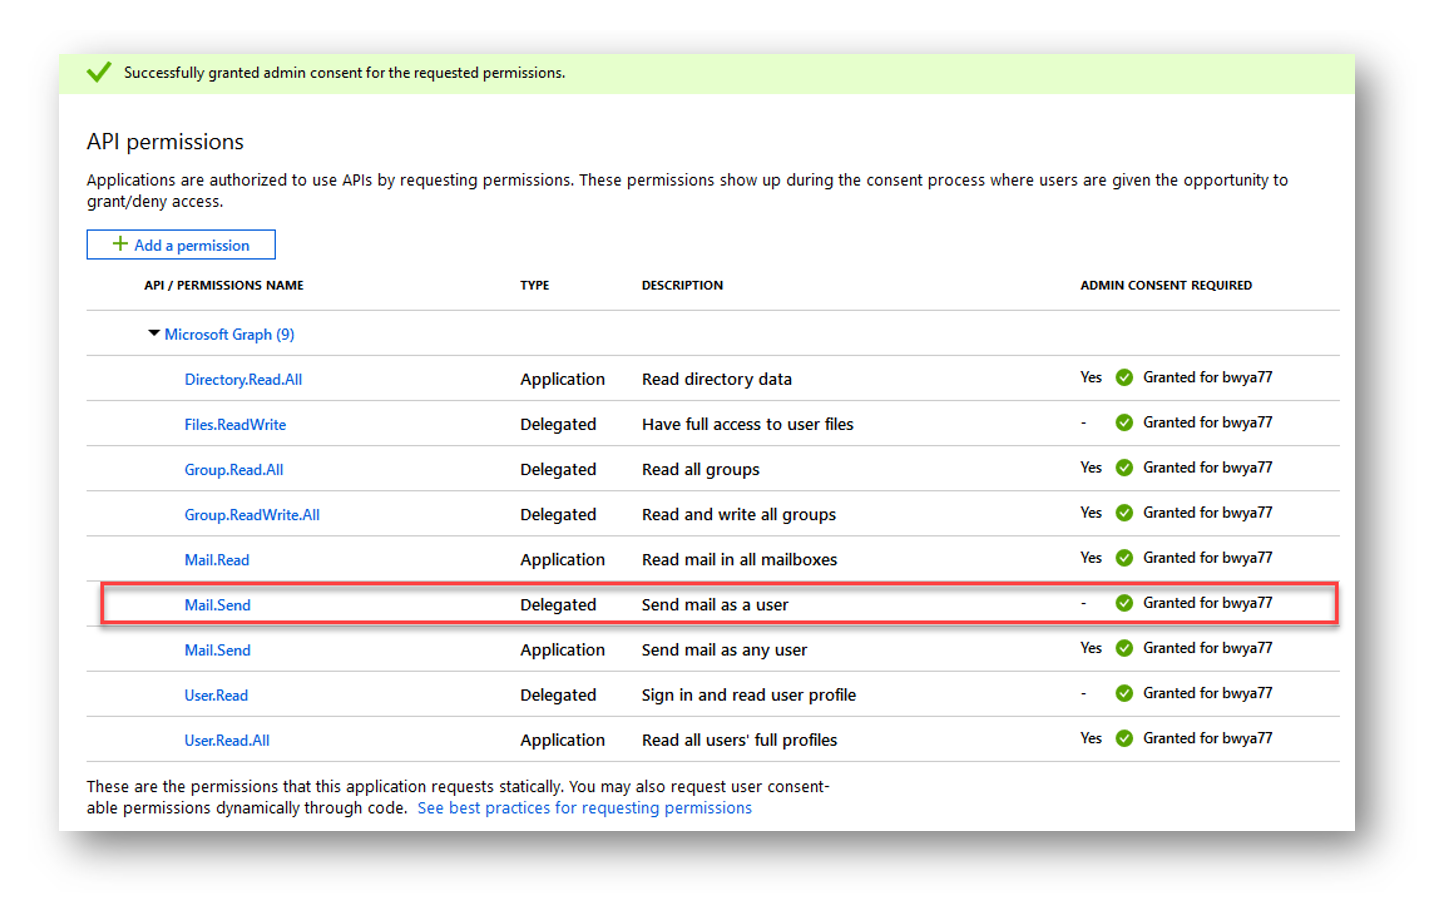
From looking at the Application API permissions I can see that I have the proper Files.ReadWrite permission needed
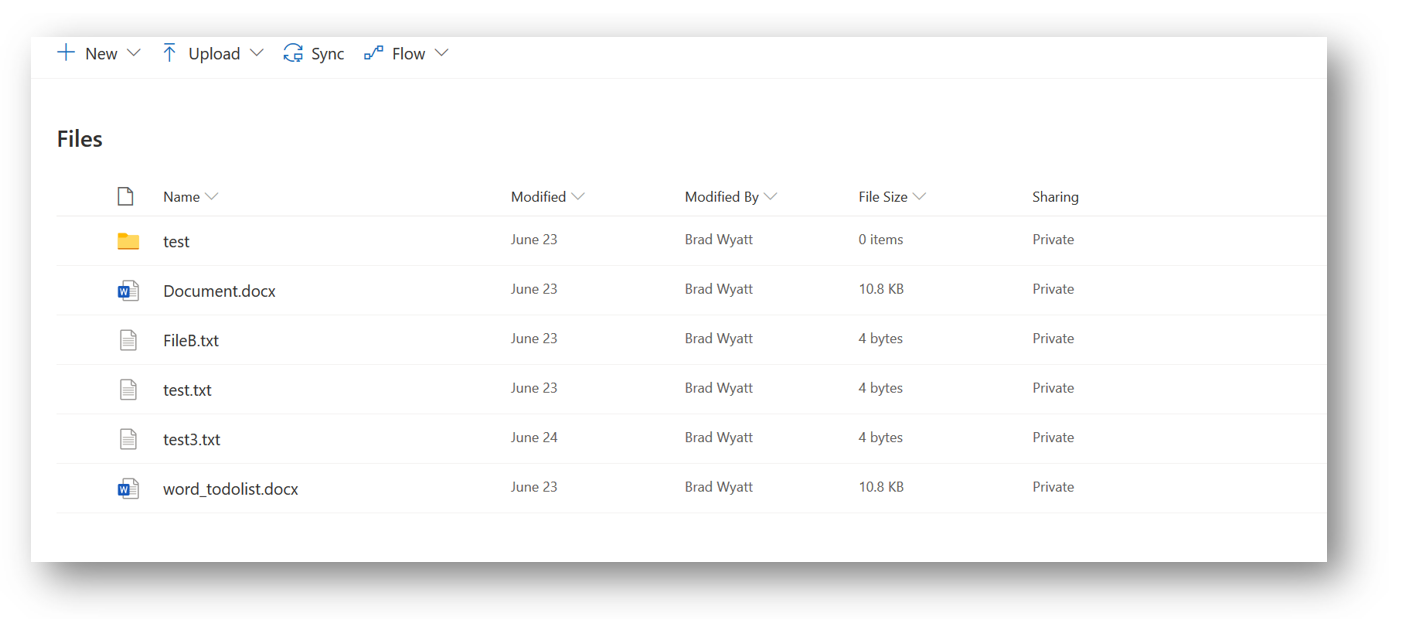
 Next, if we look at my OneDrive we can see the current files that reside in there
Since this file will be created in my root OneDrive the API Url will be ‘https://graph.microsoft.com/v1.0/me/drive/root:/FileTESTING.txt:/content’
The new file will be named FileTESTING.txt and we can see it will be at my root due to the /me/drive/root:
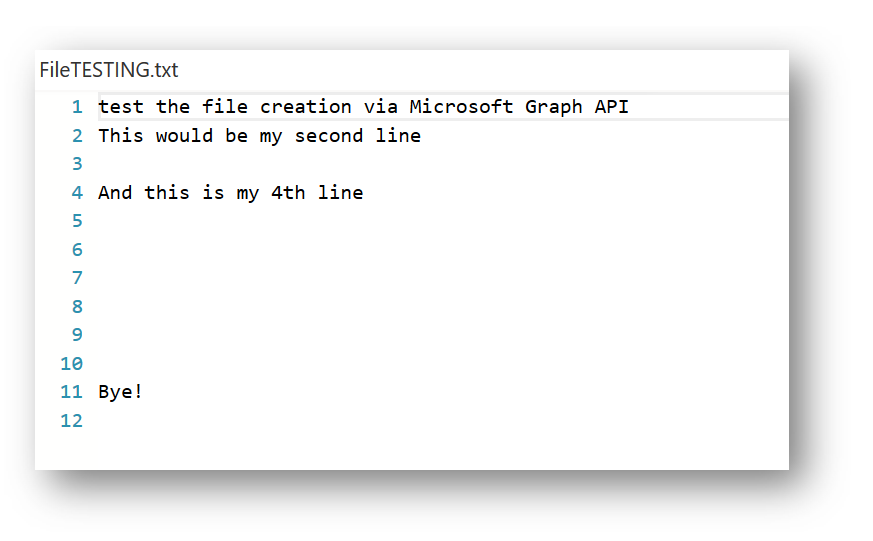
The body variable will contain the body of my new text file. In my case it will read:
$body = "test the file creation via Microsoft Graph API
This would be my second line

And this is my 4th line


Bye!
So all together the entire script will be:
$apiUrl = 'https://graph.microsoft.com/v1.0/me/drive/root:/FileTESTING.txt:/content'

$body = "test the file creation via Microsoft Graph API
This would be my second line

And this is my 4th line


Bye!
"
$Data = Invoke-RestMethod -Headers @{Authorization = "Bearer $($Tokenresponse.access_token)"} -Uri $apiUrl -Method Put -Body $body -ContentType "text/plain"
And now I can see my new file as well as the content
Post a Teams Message
List all Teams
The first task we need to do is to return a list of all of our Teams and their ID. For this we will be using the beta API URL. The PowerShell script will be the following:
$apiUrl = "https://graph.microsoft.com/beta/groups?`$filter=resourceProvisioningOptions/Any(x:x eq 'Team')"

$Data = Invoke-RestMethod -Headers @{Authorization = "Bearer $($Tokenresponse.access_token)"} -Uri $apiUrl -Method Get
$Teams = ($Data | select-object Value).Value | Select-Object displayName, id, description
By seeing whats contained in the $Teams variable, we can see that we have a table of all of our Teams, ID and their descriptions.
 List all Team Channels
If I want to post a message to the Management Team, I will then need to select the proper Teams channel. In the script below I can do another API call to that Teams using the ID for the Management Team I got above
$apiUrl = "https://graph.microsoft.com/beta/teams/fa9c9332-a85d-4349-aa15-f287793bde8f/channels"

$Data = Invoke-RestMethod -Headers @{Authorization = "Bearer $($Tokenresponse.access_token)"} -Uri $apiUrl -Method Get
$TeamChannels = ($Data | select-object Value).Value
I can then see all my channels in the $TeamChannels variable
 Post Message to Teams Channel
Now that I have the Teams ID and the channel ID, I can start crafting the message that I want to send to Microsoft Teams.
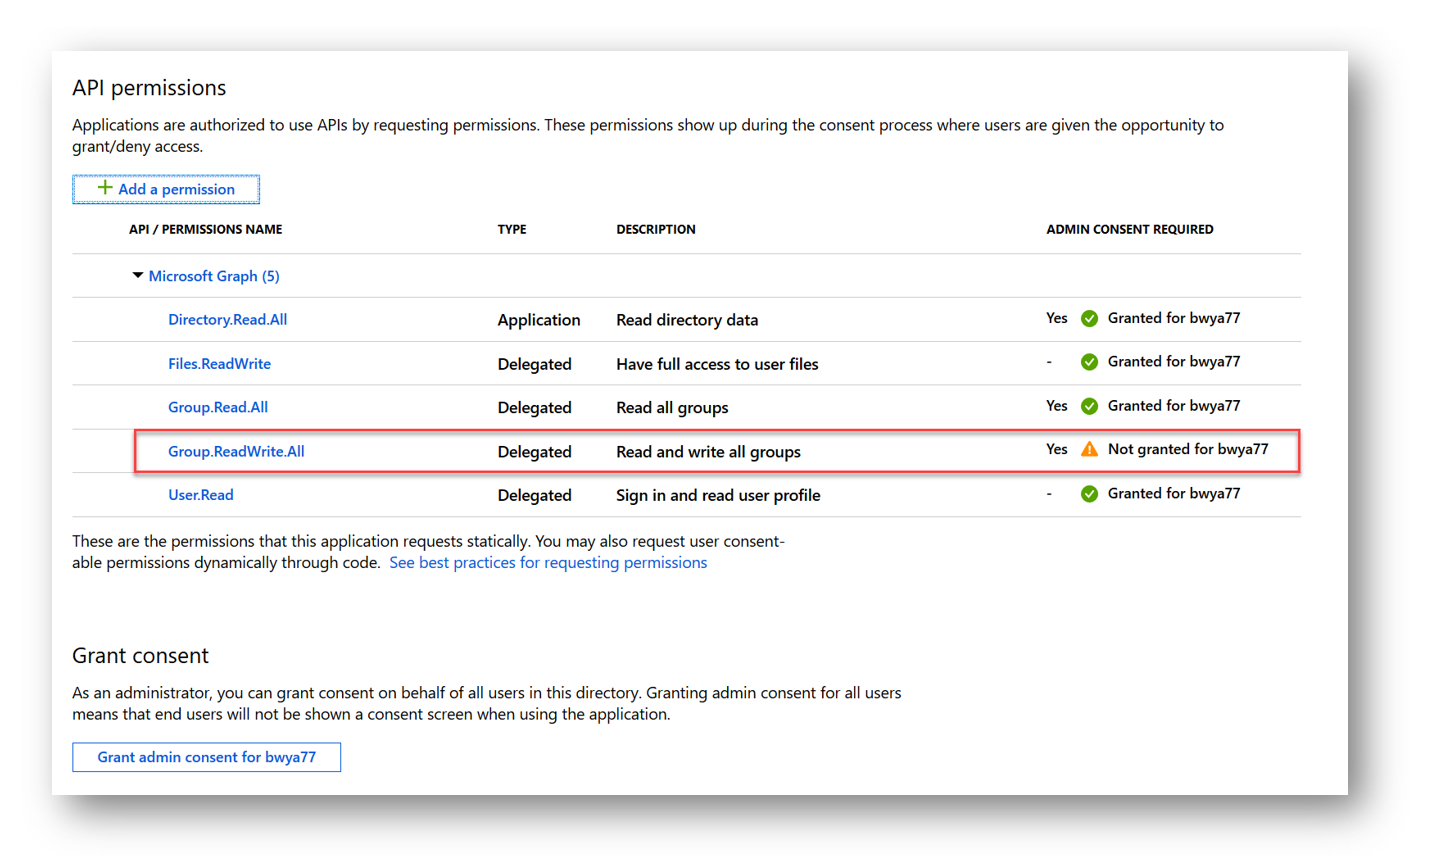
First I will check the documentation here to review the required permissions. Currently only Delegated permission type is available with the permission Group.ReadWrite.All. Since it only supports Delegated permissions I can authenticate to Graph by either Device Code flow, Authorization Code or Password.
In Azure Active Directory I add the permission, ‘Group.ReadWrite.All’ to my application and save. Since this affects all Groups it requires Admin Consent
Once and admin has granted consent to the application the warning icon will change to a green check mark. Now that my application has the correct permission I can authenticate to Graph.
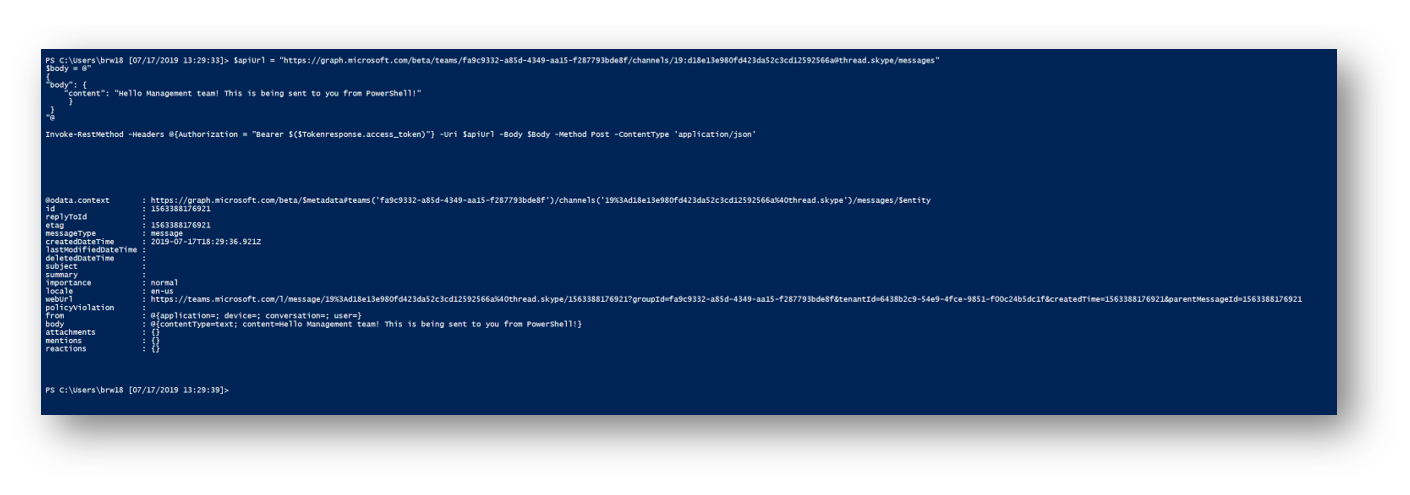
Once I have authenticated to Graph and retrieved my token I can then modify the following script to fit my needs. The first ID, “fa9c9332-a85d-4349-aa15-f287793bde8f” is the ID of the management Team we got earlier. The second ID, “19:[email protected]” is the General chat ID we got in the second step. The content is the message content.
$apiUrl = "https://graph.microsoft.com/beta/teams/fa9c9332-a85d-4349-aa15-f287793bde8f/channels/19:[email protected]/messages"
$body = @"
{
"body": {
    "content": "Hello Management team! This is being sent to you from PowerShell!"
     }
 }
"@

Invoke-RestMethod -Headers @{Authorization = "Bearer $($Tokenresponse.access_token)"} -Uri $apiUrl -Body $Body -Method Post -ContentType 'application/json'
Running the script I will get a response back
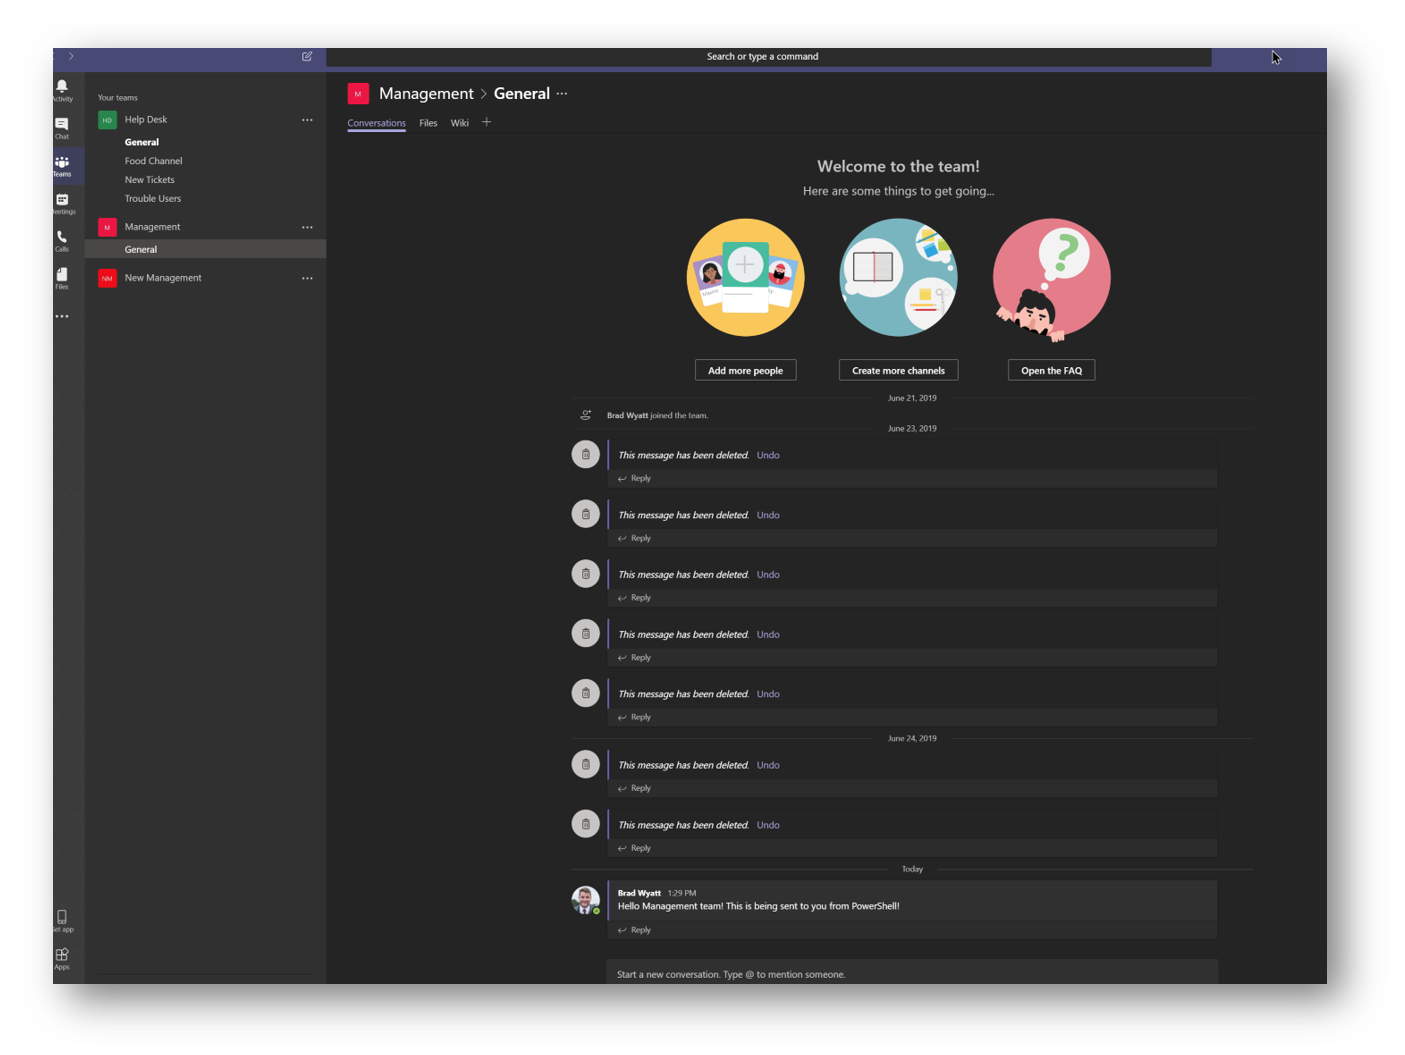
And if I go into my Microsoft Teams I can see the message is in the Management Team and in the General channel. Since this uses delegate permissions it appears to be sent as me as I signed into Graph using my account.
Get all Recent Emails for a User
Get All Users
The first item we have to do is return a list of all of our users and select the ID of the user we want to view recent emails of. If you wanted to view your emails the HTTP request would just go to https://graph.microsoft.com/v1.0/me/message. According to the documentation, we need to assign our application the following permissions (Application): User.Read.All and Directory.Read.All
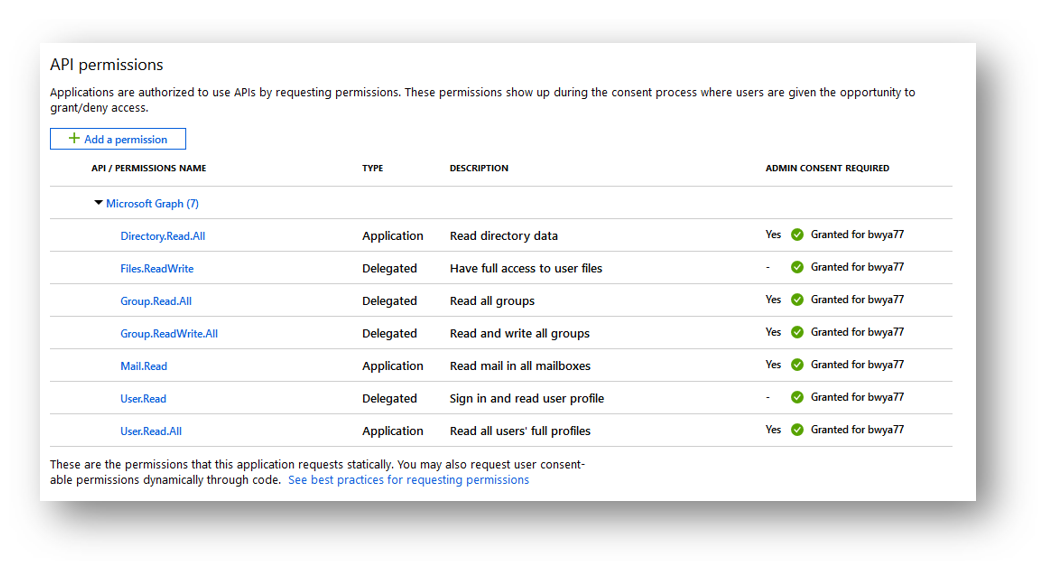
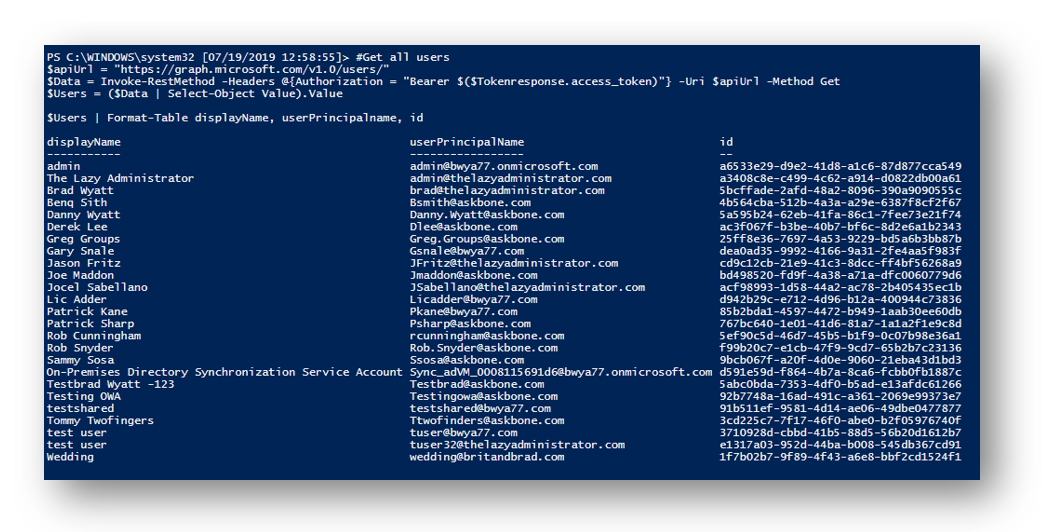
Once I grant my application the proper permissions and authenticate to Graph using one of my authentication methods above (in my example since I assigned Application type permissions, I authenticated to Graph using Client Credentials) I can run the following PowerShell code to return a list of all my users:
#Get all users
$apiUrl = "https://graph.microsoft.com/v1.0/users/"
$Data = Invoke-RestMethod -Headers @{Authorization = "Bearer $($Tokenresponse.access_token)"} -Uri $apiUrl -Method Get
$Users = ($Data | Select-Object Value).Value

$Users | Format-Table displayName, userPrincipalname, id
In my case I am going to be retrieving all recent emails for the user, “Gary Snale” so I will take note of his ID value.
Get Another Users Recent E-Mails
Next, from looking at the Graph documentation I need to have the following permission to retrieve a users emails: Mail.Read
Once I have assigned the proper permissions I can run the following PowerShell code to retrieve emails for a user (NOTE: notice how I entered the users ID into the HTTP URL, you can also use the users UserPrincipalName):
$apiUrl = "https://graph.microsoft.com/v1.0/users/dea0ad35-9992-4166-9a31-2fe4aa5f983f/messages"
$Data = Invoke-RestMethod -Headers @{Authorization = "Bearer $($Tokenresponse.access_token)"} -Uri $apiUrl -Method Get
$Emails = ($Data | Select-Object Value).Value

$Emails | Select-Object  @{Name = 'From'; Expression = {(($_.sender).emailaddress).name}}, @{Name = 'To'; Expression = {(($_.toRecipients).emailaddress).name}}, subject, hasattachments, isRead
NOTE: Notice the isRead property. This will change when the user has read the message. This does not rely on a read receipt and will work with every email.
You can also see the body of the email but since my email was sent in HTML the body is entirely HTML. It can be saved as a HTML file and opened without issues or you can do some string parsing to piece out the body content
 Once I have assigned the proper permissions I can run the following PowerShell code to send an Email as myself
Send an Email
Using Graph we can send emails to internal and external recipients either from us or another user. We have a wide array of message options exposed to us which can be found here. Some of the items include:
- Read Receipt
- Importance
- Marking message as a draft
- Don’t save to sent items folder
- Attachments
- and more…
This will make more sense below when we create the JSON body of our email.
Send an Email as Myself
From looking at the documentation the permission I need to send an e-mail using Graph is Mail.Send
Since this be sent from myself I need to authenticate using a delegated grant type so I can do Device Code, Auth Code, or Password. Once I authenticate to Graph I can modify the following PowerShell code to send an e-mail from myself: (NOTE: Notice the URL is /me/Sendmail)
$apiUrl = "https://graph.microsoft.com/v1.0/me/sendMail"
$body = @"
{
  "Message": {
    "Subject": "Did you see that ludicrous display last night?",
    "importance":"High",
    "Body": {
      "ContentType": "Text",
      "Content": "Thing about Arsenal is, they always try and walk it in."
    },
    "ToRecipients": [
      {
        "EmailAddress": {
          "Address": "[email protected]"
        }
      }
    ]
  },
  "SaveToSentItems": "false",
  "isDraft": "false"
}
"@

Invoke-RestMethod -Headers @{Authorization = "Bearer $($Tokenresponse.access_token)"} -Uri $apiUrl -Body $Body -Method Post -ContentType 'application/json'
In Outlook I can now see my e-mail
Send an Email From Another User
In the other examples I show how you can do tasks as other users, or on behalf of other users using the users’ ID value. In this example I will instead do the users’ UserPrincipalName (UPN). Most items will accept the ID value or UPN value. You will want to confirm by checking the documentation for each call. For sending an e-mail from another user the documentation shows that I can use either the users’ ID or UPN:
The documentation also shows that the permission I need is Mail.Send
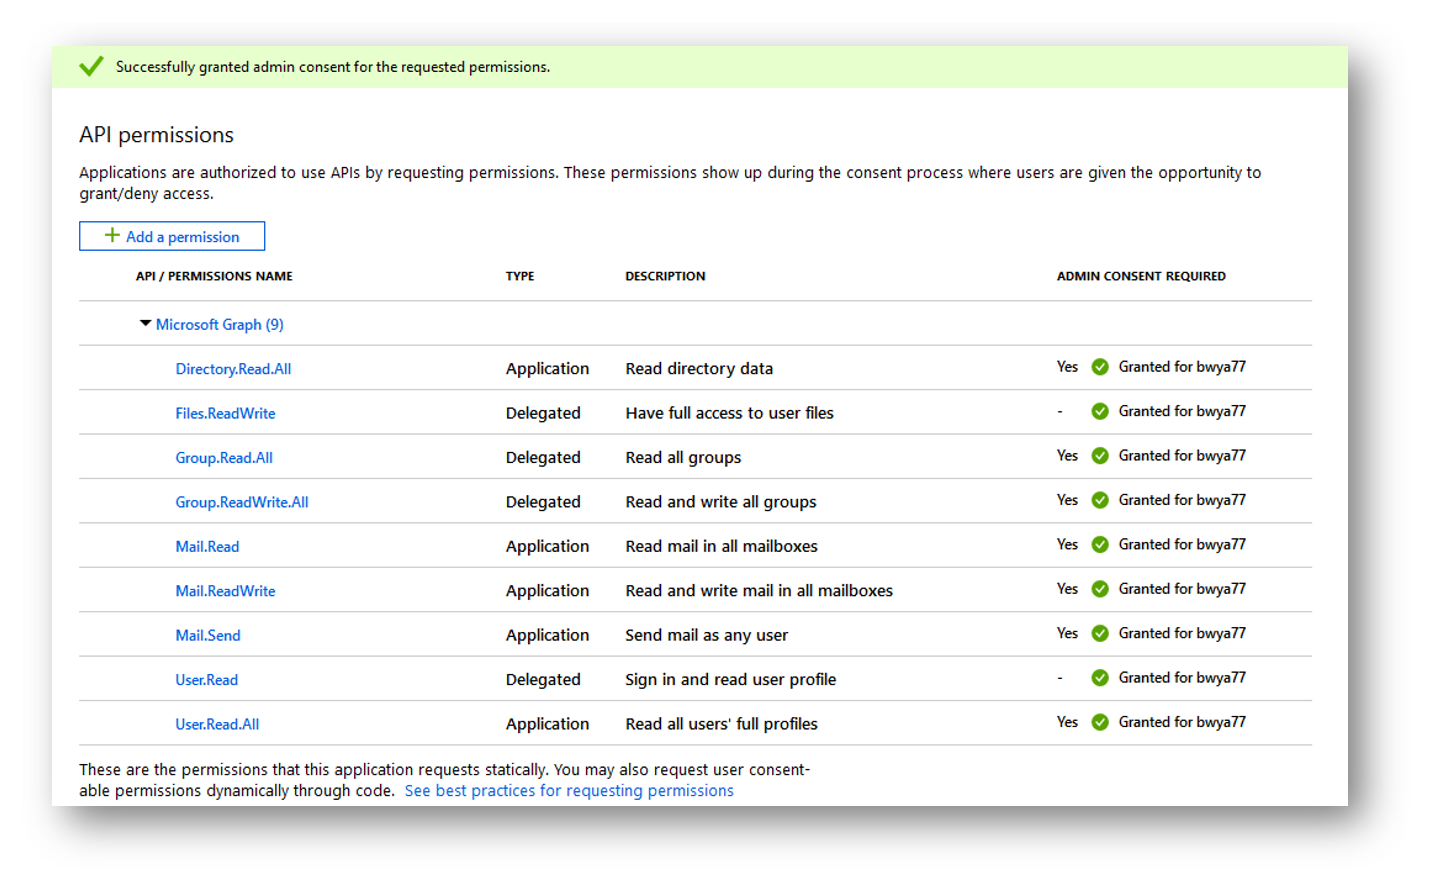 Since I am connecting to Graph using client credentials as shown above, I granted the Mail.Send permission as a Application permission. The Endpoint we will be calling is https://graph.microsoft.com/v1.0/users/[email protected]/sendMail. Notice that the user I am going to be sending the e-mail from is [email protected].
$apiUrl = "https://graph.microsoft.com/v1.0/users/[email protected]/sendMail"
The entire PowerShell script to send the email would be the following:
$apiUrl = "https://graph.microsoft.com/v1.0/users/[email protected]/sendMail"
$body = @"
{
  "Message": {
    "Subject": "Did you see that ludicrous display last night?",
    "importance":"High",
    "Body": {
      "ContentType": "Text",
      "Content": "Thing about Arsenal is, they always try and walk it in."
    },
    "ToRecipients": [
      {
        "EmailAddress": {
          "Address": "[email protected]"
        }
      }
    ]
  },
  "SaveToSentItems": "false",
  "isDraft": "false"
}
"@

Invoke-RestMethod -Headers @{Authorization = "Bearer $($Tokenresponse.access_token)"} -Uri $apiUrl -Body $Body -Method Post -ContentType 'application/json'
Some of the resources I am calling in the email are:
- SavetoSentItems: The e-mail will not be saved to the Sent Items folder
- isDraft: By default if you do not specify this to False, it will create the email and save to the Drafts folder and NOT send.
- importance: Setting the importance of the e-mail to ‘High’
Now if I go to Outlook I can see that I have a new e-mail with the proper subject,
Get Calendar Events
Using Graph we can get calendar events for ourselves or other users in our enviornment. Looking at the documentation we need the Calanders.Read permission.
I am going to be getting my calendar events so I granted the permission as delegated and authenticated to Graph using device code flow ( but I can use Device Code, Auth Code, or Password). Once I am authenticated to Graph I can begin my API request by using the following PowerShell code:
$apiUrl = "https://graph.microsoft.com/v1.0/me/calendar/events"
$Data = Invoke-RestMethod -Headers @{Authorization = "Bearer $($Tokenresponse.access_token)"} -Uri $apiUrl -Method Get
$CalEvents = ($Data | Select-Object Value).Value

$CalEvents | Select-Object -Property subject, importance, showAs, @{Name = 'Location'; Expression = {$_.location.displayname}}, @{Name = 'Response'; Expression = {$_.responseStatus.response}}, @{Name = 'Start'; Expression = {$_.start.dateTime.Replace(":00.0000000","").Replace("T"," ") }}, @{Name = 'End'; Expression = {$_.End.dateTime.Replace(":00.0000000","").Replace("T"," ") }} | Format-Table
Because of my custom Select properties I can get a clean response, start, and end time
OneDrive
Get OneDrive Contents
To list all OneDrive content, according to the documentation, we will need the Files.ReadWrite permission of the Files.ReadWrite.All Permission (If I am going to list the contents on another users OneDrive).
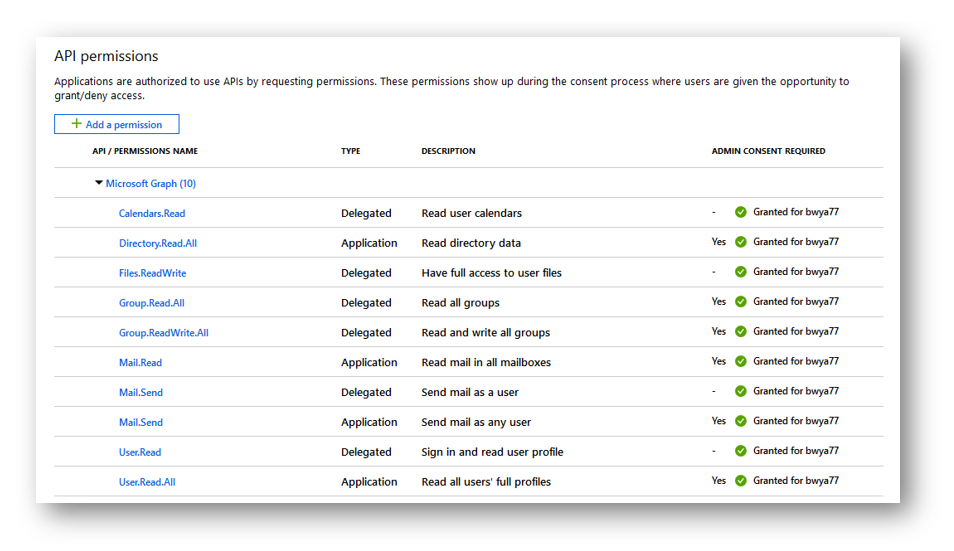 Once I have the correct permission(s) and authenticate to Graph, I can run the following PowerShell script to return all OneDrive items. This script will work recursively so it will return every item. In my example I am returning my OneDrive items so I authenticated to Graph using device code flow ( but I can use Device Code, Auth Code, or Password).
$apiUrl = 'https://graph.microsoft.com/v1.0/me/drive/root/children'
$Data = Invoke-RestMethod -Headers @{Authorization = "Bearer $($Tokenresponse.access_token)"} -Uri $apiUrl -Method Get
$DriveItems = ($Data | Select-Object Value).Value

$DriveItems | Select-Object name, size, id
The shell will display my OneDrive items and because of my Select-Object statement, I also see the name, size and ID of each file
Rename OneDrive File
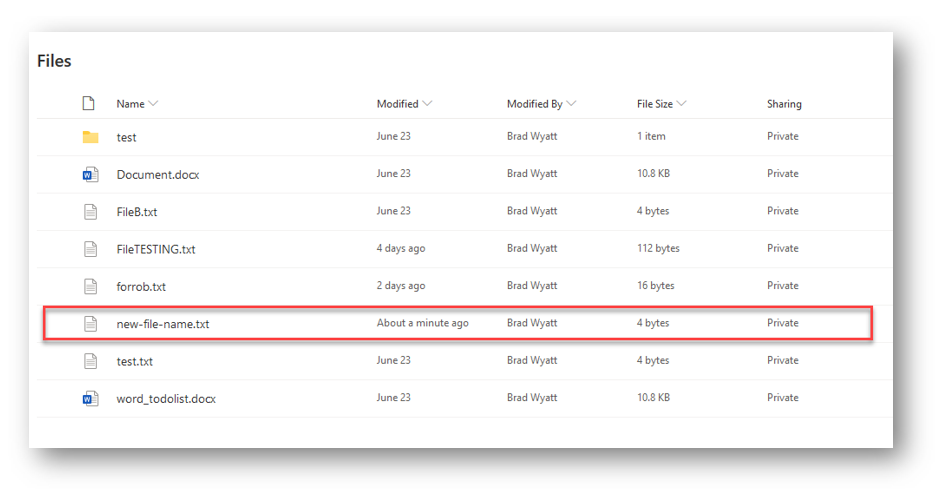
Now, using the data I was able to retrieve above, I will rename test3.txt to new-file-name.txt. According to the documentation, the permission I need to achieve this is Files.ReadWrite
The one item we need is the files “ID” value to put into the HTTP request.
$apiUrl = 'https://graph.microsoft.com/v1.0/me/drive/items/01L2I7SSEMKJ3BGWGG6RE3VR2LWVDHHAUZ'
The entire PowerShell code would be the following:
$apiUrl = 'https://graph.microsoft.com/v1.0/me/drive/items/01L2I7SSEMKJ3BGWGG6RE3VR2LWVDHHAUZ'
$body = @"
{
   "name": "new-file-name.txt"
}
"@
$Data = Invoke-RestMethod -Headers @{Authorization = "Bearer $($Tokenresponse.access_token)"} -Uri $apiUrl -Method Patch -ContentType 'application/json' -Body $body
the shell wont display any verbose message if it’s successful but I can list all OneDrive items again to see that it has been renamed
 And I can see in the web client that the file has been renamed as well
Get all Intune Compliance Policies
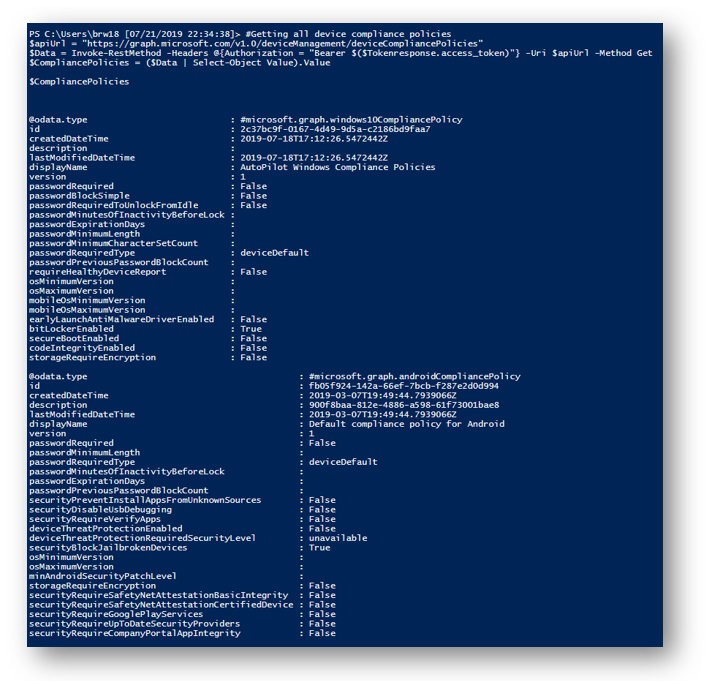
I can also leverage Graph to list all of my Intune Compliance Policies. From referencing the documentation the permission needed is DeviceManagementConfiguration.Read.All. Another item to note that this call will only work with a delegated permission type so I can authenticate to Graph using Device Code, Auth Code, or Password. This permission does require admin consent.
 Once I am authenticated to Graph I can run the following PowerShell code to return a list of all my Compliance Policies and their configuration properties
$apiUrl = "https://graph.microsoft.com/v1.0/deviceManagement/deviceCompliancePolicies"
$Data = Invoke-RestMethod -Headers @{Authorization = "Bearer $($Tokenresponse.access_token)"} -Uri $apiUrl -Method Get
$CompliancePolicies = ($Data | Select-Object Value).Value

$CompliancePolicies
The shell will display the policies and properties
Other Graph Examples
On my GitHub I have tons of other API calls including uploading a file to OneDrive, get tenant security alerts, and more.
Sources
2: https://docs.microsoft.com/en-us/azure/active-directory/develop/v2-permissions-and-consent
3. https://docs.microsoft.com/en-us/graph/

My name is Bradley Wyatt; I am a 5x Microsoft Most Valuable Professional (MVP) in Microsoft Azure and Microsoft 365. I have given talks at many different conferences, user groups, and companies throughout the United States, ranging from PowerShell to DevOps Security best practices, and I am the 2022 North American Outstanding Contribution to the Microsoft Community winner.









23 thoughts on “Connect and Navigate the Microsoft Graph API with PowerShell”
Excellent write-up
A quick way to get started is to navigate to https://developer.microsoft.com/en-us/graph/graph-explorer and authenticate with your AAD credential
Hi,
I get an error when running the first script in Section 3. It’s on line 43 and it says that:
The request body must contain the following parameter: ‘client_assertion’ or ‘client_secret’
The script runs successfully to bring up the login box and get the device code up to this point.
Cheers
can you post a little bit of the script block so I can take a look – not sure which one youre looking at
Found a fix on github, it’s related to the Manifest value “allowPublicClient” being set to null instead of true. Changing that value in the Application Registration fixed the issue for me.
In the list of pages for the app, select Manifest, and:
In the manifest editor, set the allowPublicClient property to true
Select Save in the bar above the manifest editor.
I found I had the same issue but resolved it differently.
This is for the first script using the Device Code flow grant type.
Need to add the redirect URI to line 37.
$tokenParams = @{ grant_type = “device_code”; resource = “$resource”; client_id = “$clientId”; code = “$($response.device_code)”; redirect_uri = “$redirectUri” }
Turns out I’m wrong. To actually make it work you need to do the following.
On the App registrations Authentication page the Default client type needs to be changed to Treat application as a public client = Yes
Thats really great, i was looking for this for quite sometime.
Cheers!!
Really helpful and massively appreciated!
Finally!!! This is the first explanation of access tokens that I could actually follow. Thank you for all the time you took to simplify this process so us mere mortals can understand.
Cheers!
Side note, I was getting poorly worded error:
Invoke-RestMethod : The underlying connection was closed: An unexpected error occurred on a send.
This is because of TLS1.0 restriction. To get around it, I used the following line in my Powershell script:
[Net.ServicePointManager]::SecurityProtocol = [Net.SecurityProtocolType]::Tls -bor [Net.SecurityProtocolType]::Tls11 -bor [Net.SecurityProtocolType]::Tls12
Really excellent piece of work. Thanks.
Thanks a lot for this article! Much appreciated!
Fantastic post and finally got me sending email successfully. Is there a way I can limit the “Mail.Send” to certain account only – an alert email address for instance.
I don’t want my script to be edited so that someone can send email as the CEO 🙂
Cheers again.
It will send using the account you specify, if you want to send as another account the credential user will need to have Send As rights otherwise it will not work
Thanks a lot for taking the time to post this. It was very informative and helpful.
What a thorough writeup! I really appreciate the different options you presented with the OAuth grant types.
Thank you for this! You are good for putting this out there!
This write up was absolutely amazing and went a long way to help understanding how to better use the Microsoft Graph API. Thanks for taking the time to share this will all of us.
Great article.
Awesome write-up! Time to get practicing with some of this stuff! Thanks a million!
How do u disable / Enable a user
Do u have a sample of that