Getting Started With the Office 365 CLI
Table of Contents
Using the Office 365 CLI, you can manage your Microsoft Office 365 tenant and SharePoint Framework projects on any platform. No matter if you are on Windows, macOS or Linux, using Bash, Cmder or PowerShell, using the Office 365 CLI you can configure Office 365, manage SharePoint Framework projects and build automation scripts. Office 365 CLI is an open-source project driven by the SharePoint Patterns and Practices initiative. The project is built and managed publicly on GitHub at https://github.com/pnp/office365-cli and accepts community contributions.
Getting Started
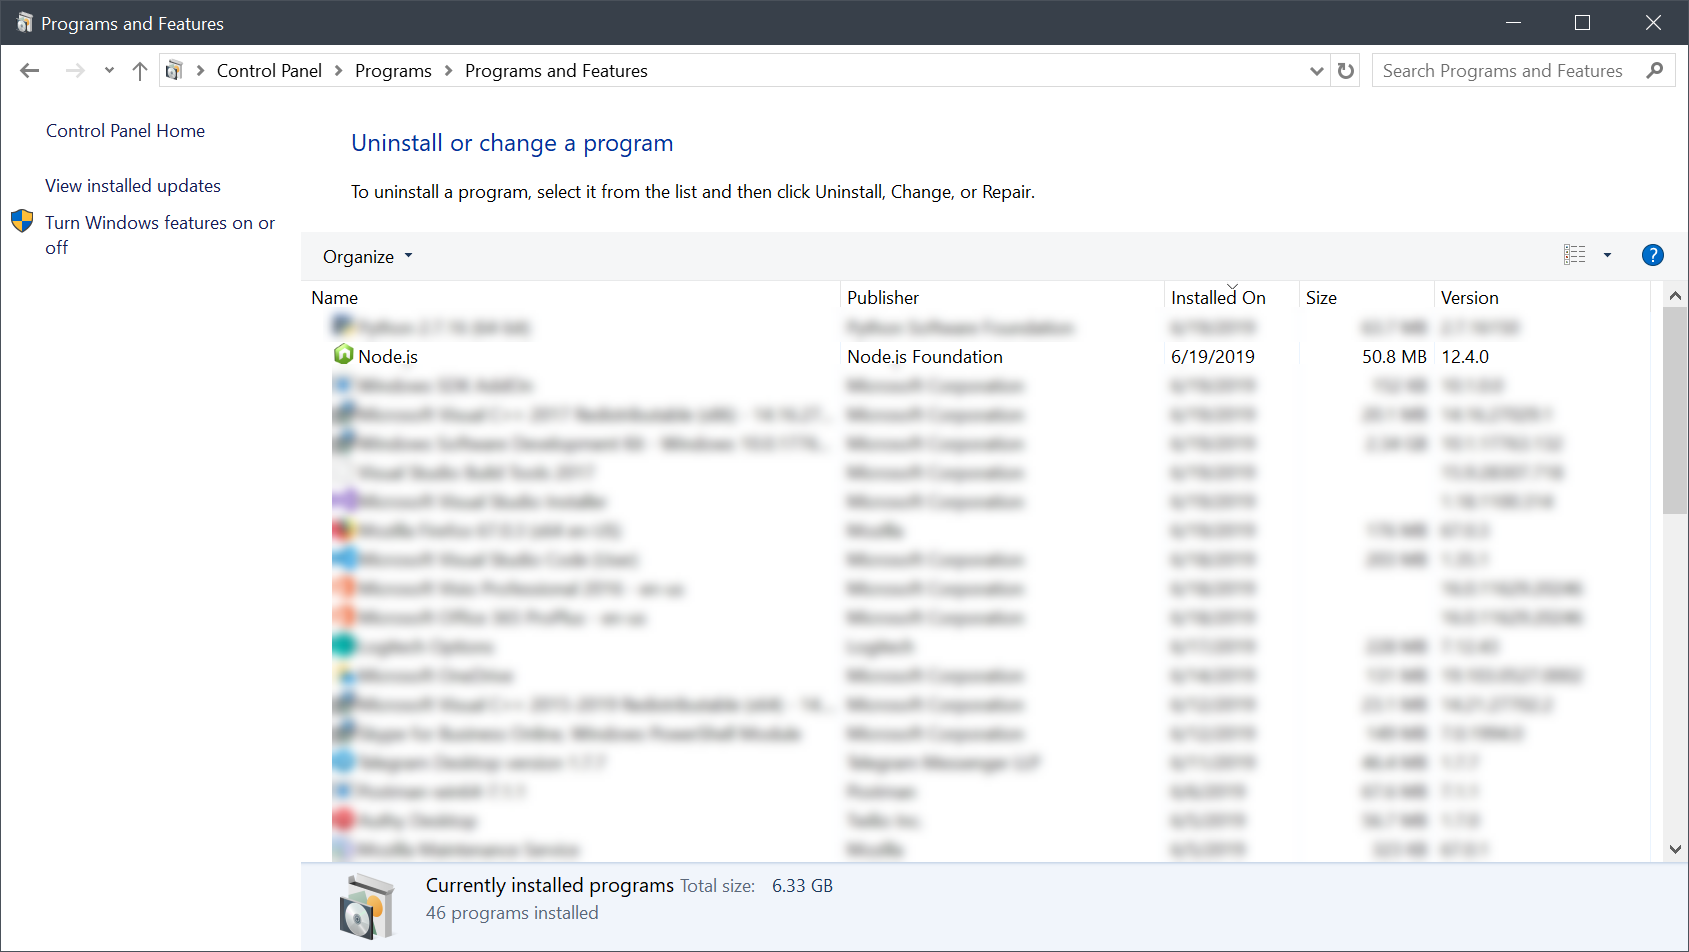
NodeJS
The Office 365 CLI is distributed as an NPM package, to install it on a Windows machine you will need to first download NodeJS. NPM (originally short for Node Package Manager)[3] is a package manager for the JavaScript programming language. It is the default package manager for the JavaScript runtime environment Node.js.
Installing Office 365 CLI
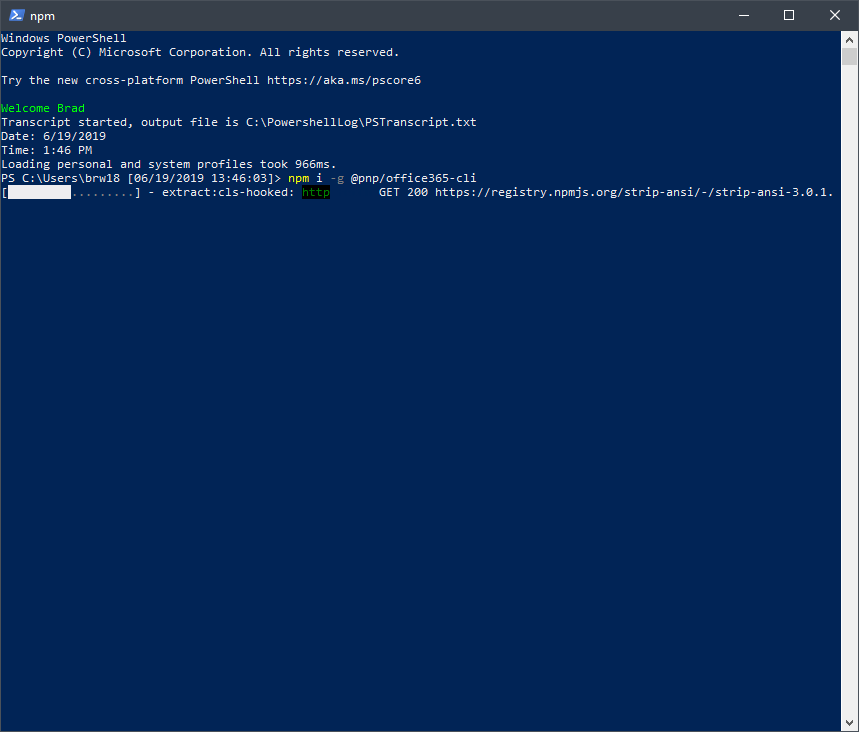
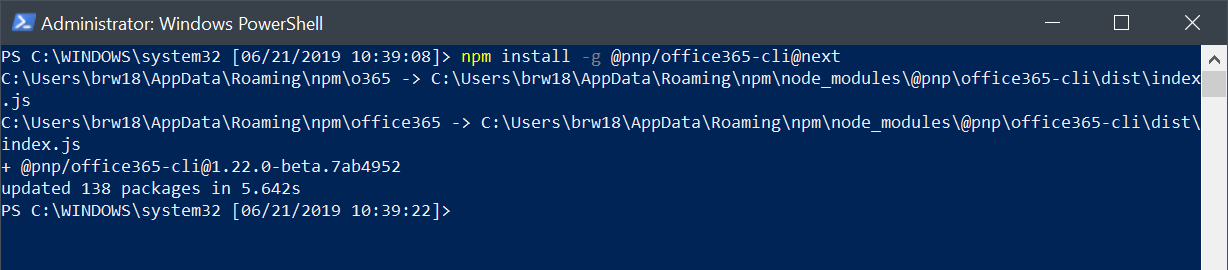
Once we have NodeJS installed, open PowerShell and run the following command to install the latest stable release of Office 365 CLI
npm i -g @pnp/office365-cli
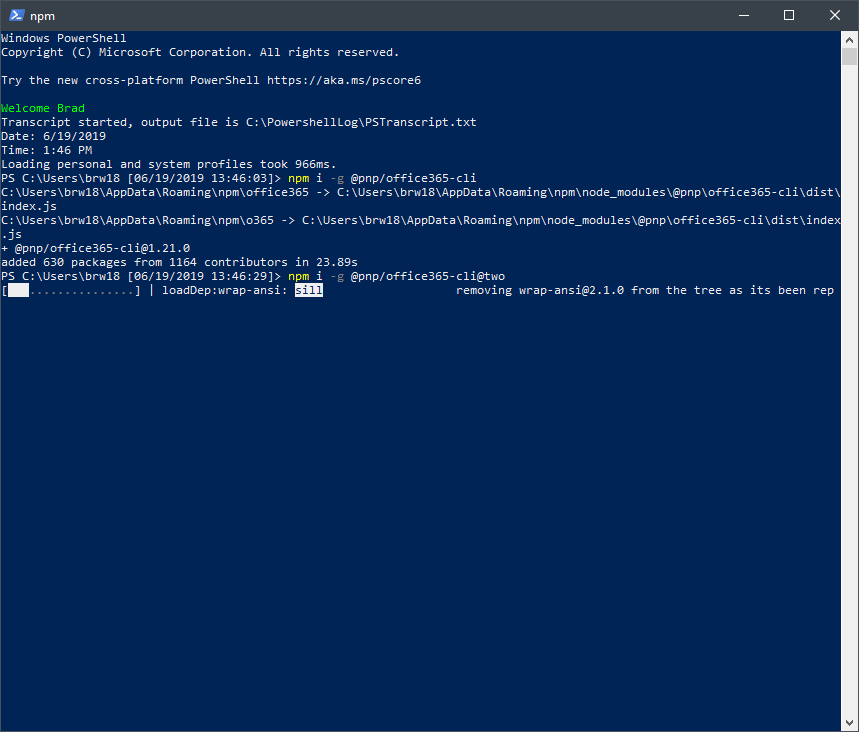
 As of June 19th, 2019 – CLI v2 was pushed into preview. If you would like to install Office 365 CLI v2 you can run the following command:
npm i -g @pnp/office365-cli@two
Version Check
After you install the Office 365 CLI you can check the version that is installed by running the following command in PowerShell:
o365 version

Check if a new version is available
To check, if a new version of the Office 365 CLI is available, execute in the command line:
npm outdated -g
For each package that you have installed globally, npm will show the version you have currently installed as well as the latest version available on npm.
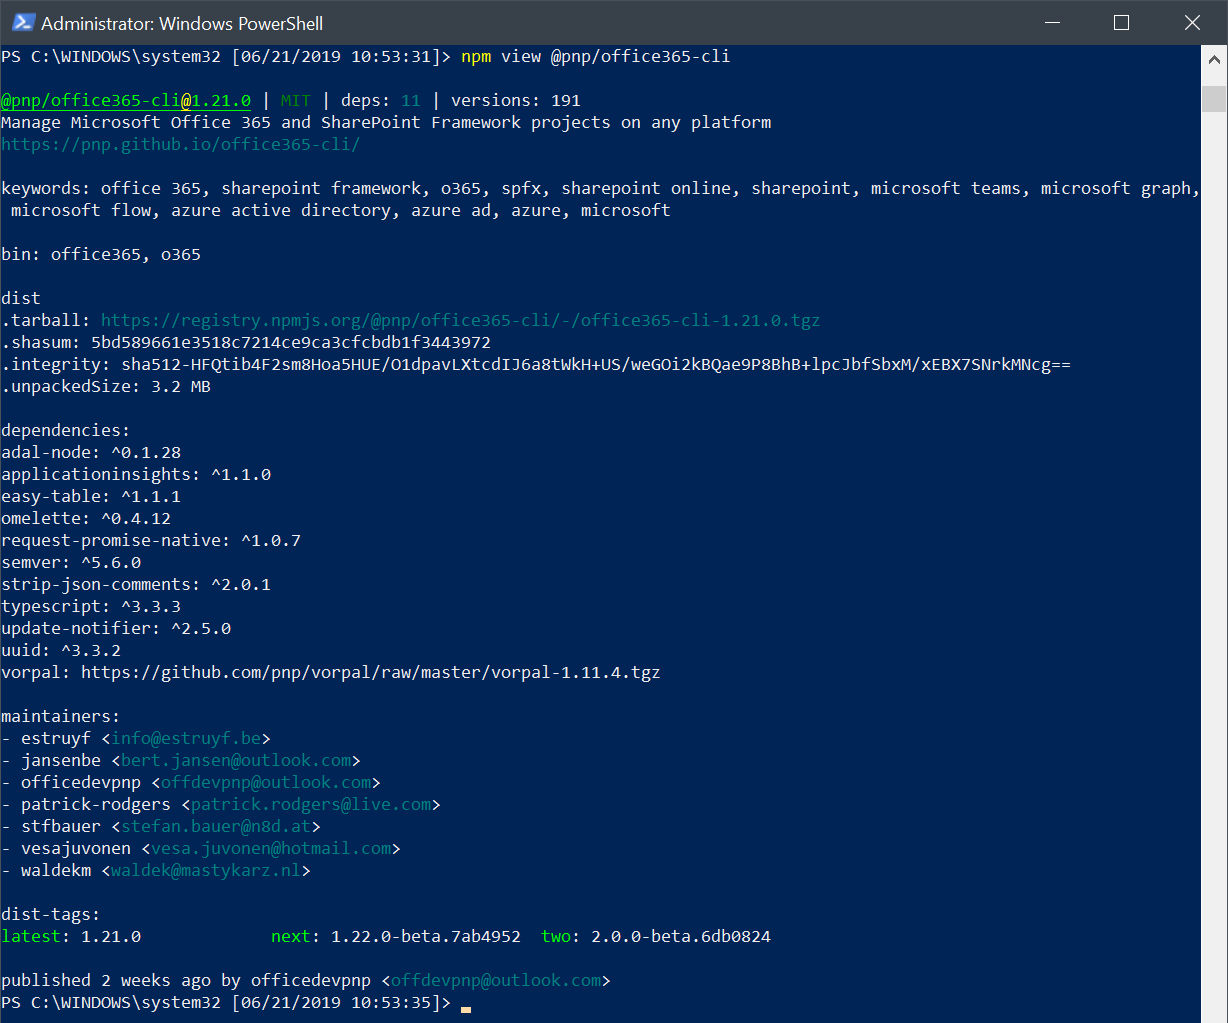
If you want to check if a new beta version of the Office 365 CLI is available, execute in the command line npm view @pnp/office365-cli. Next, compare the version listed as the @next tag with the version you have installed. Beta versions of the Office 365 CLI are tagged with source code commits so that it’s easy for the team to debug it in case of any issues.
$ npm view @pnp/office365-cli

{ name: '@pnp/office365-cli',
  description: 'CLI for managing Office 365 configuration',
  'dist-tags': { next: '0.5.0-beta.fe510b6', latest: '0.4.0' },
  versions:
  [ '0.1.0-beta.b35346a',
    '0.1.0-beta.b7db425',
    '0.1.0-beta.b85510d',
    '0.1.1-beta.25b1725',
    ...
Update
To update the CLI, run the following command:
npm install -g @pnp/office365-cli@latest
This will download and install the latest public version of the Office 365 CLI. If you want to update to the latest beta version of the CLI, replace @latest with @next.
 Office 365 CLI
Access the CLI
Access the Office 365 CLI by running the following command in PowerShell:
office365

We can exit the CLI by simply typing “exit”

Help
Typing the command “help” will display available commands as well as command groups.
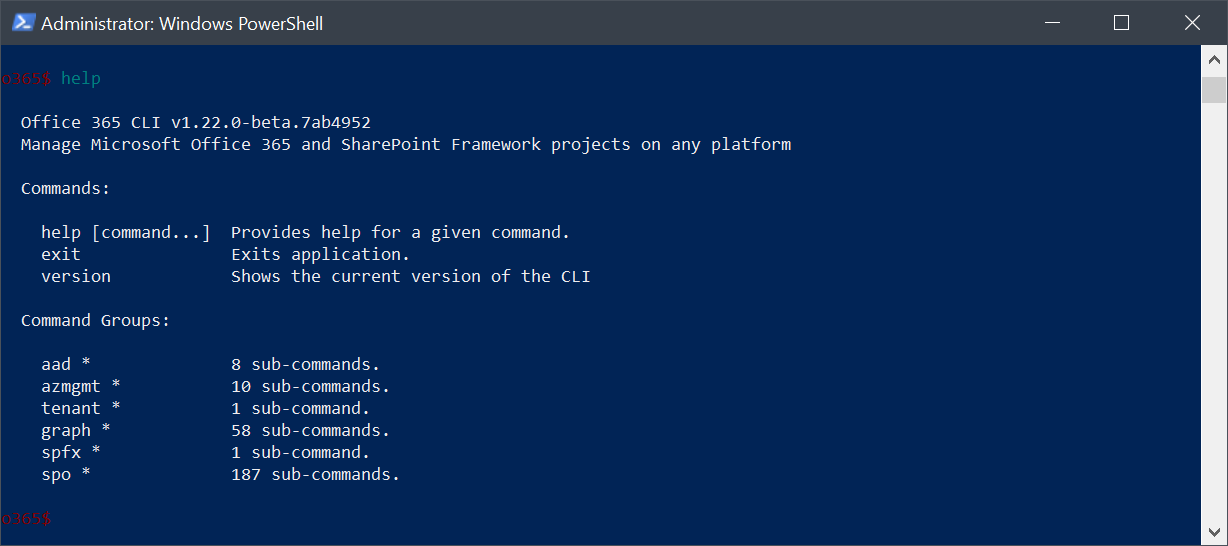 Commands in the Office 365 CLI are combined into groups called Command Groups. You can list the commands available in the particular group by typing
 help <group>, for example help aad to list all commands related to Azure Active Directory, or o365 help aad directly in your shell.
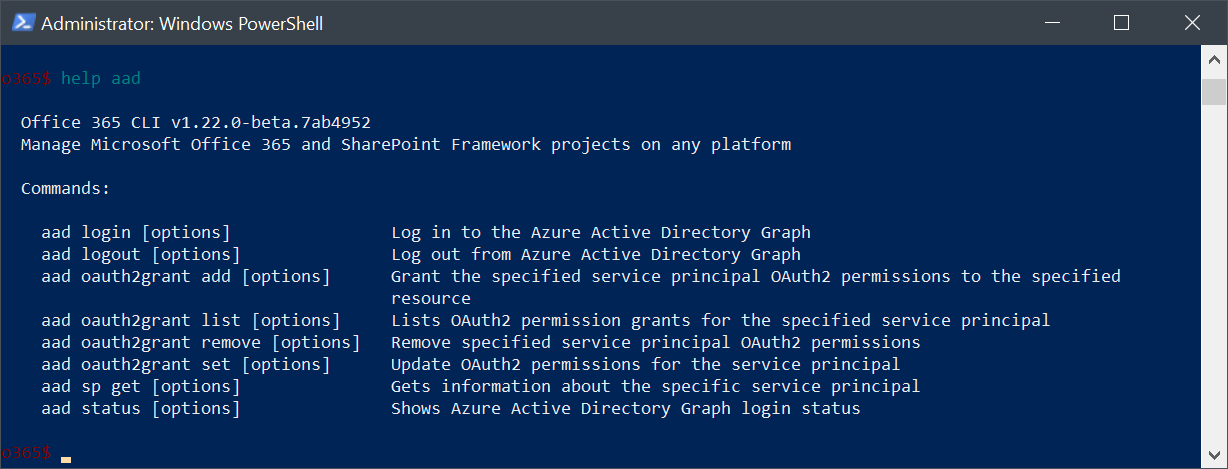
Here we can see all the available commands for Azure Active Directory. Similarly, if we wanted to view all the command available in the SPO (SharePoint Online) command group we could run
help spo
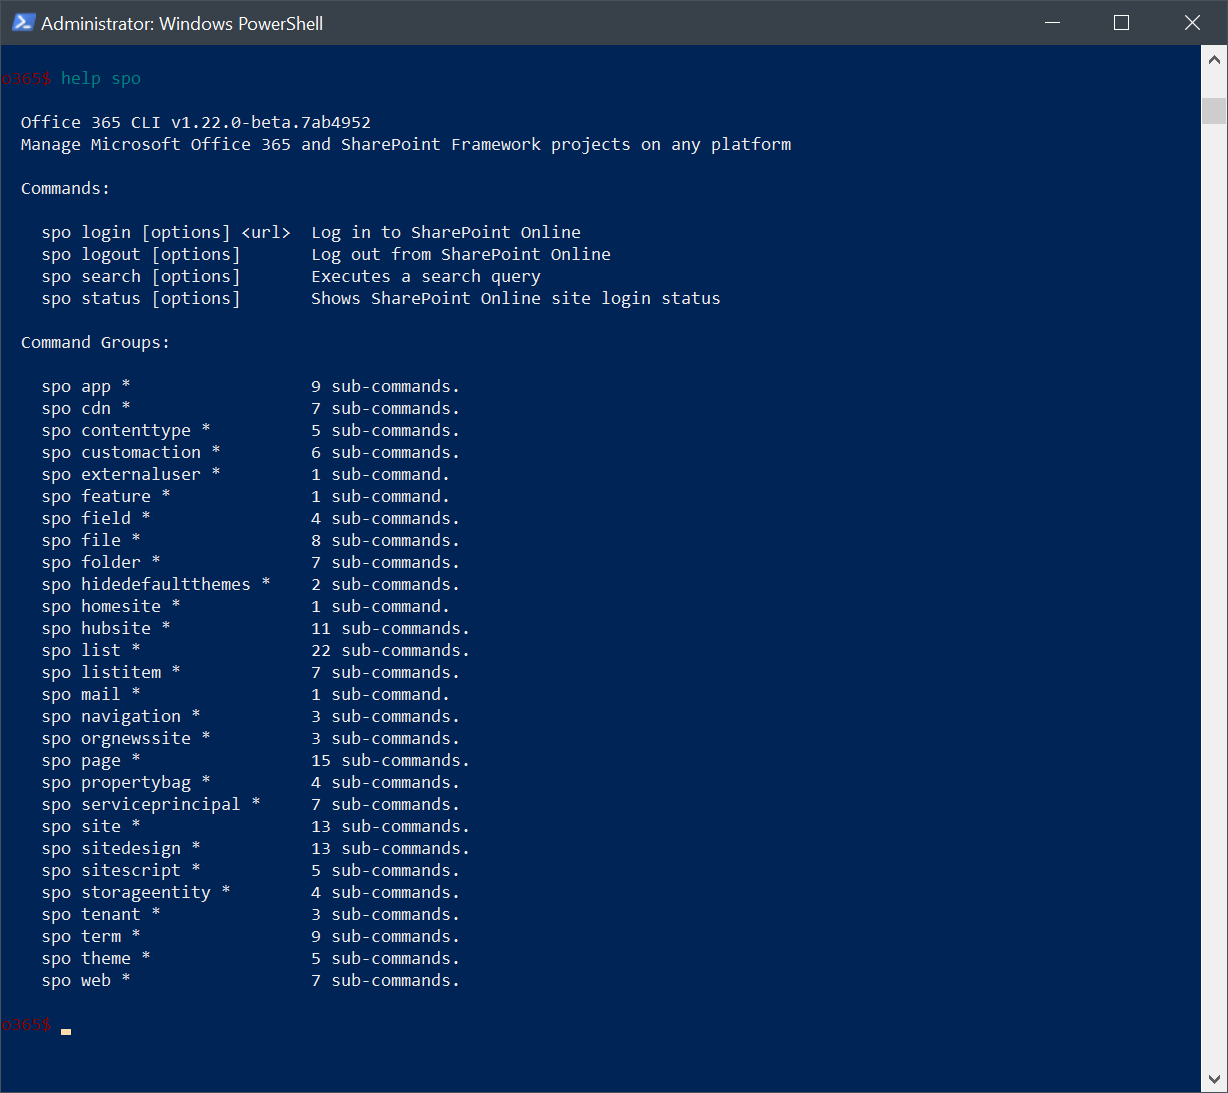
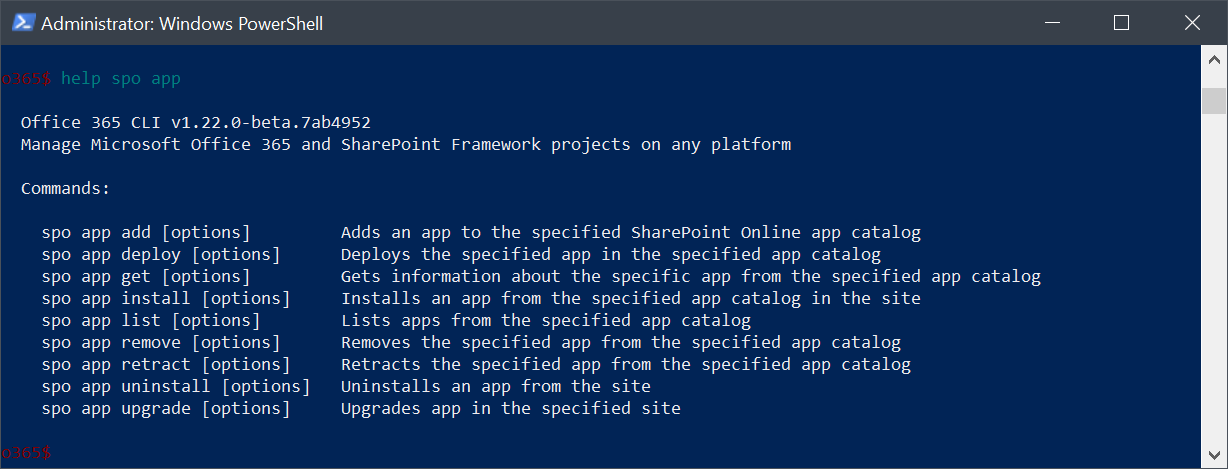
If we wanted to view more details regarding some of the Command Group’s subcommands we could run, “help spo app” which will return 9 subcommands as well as a description for each one.
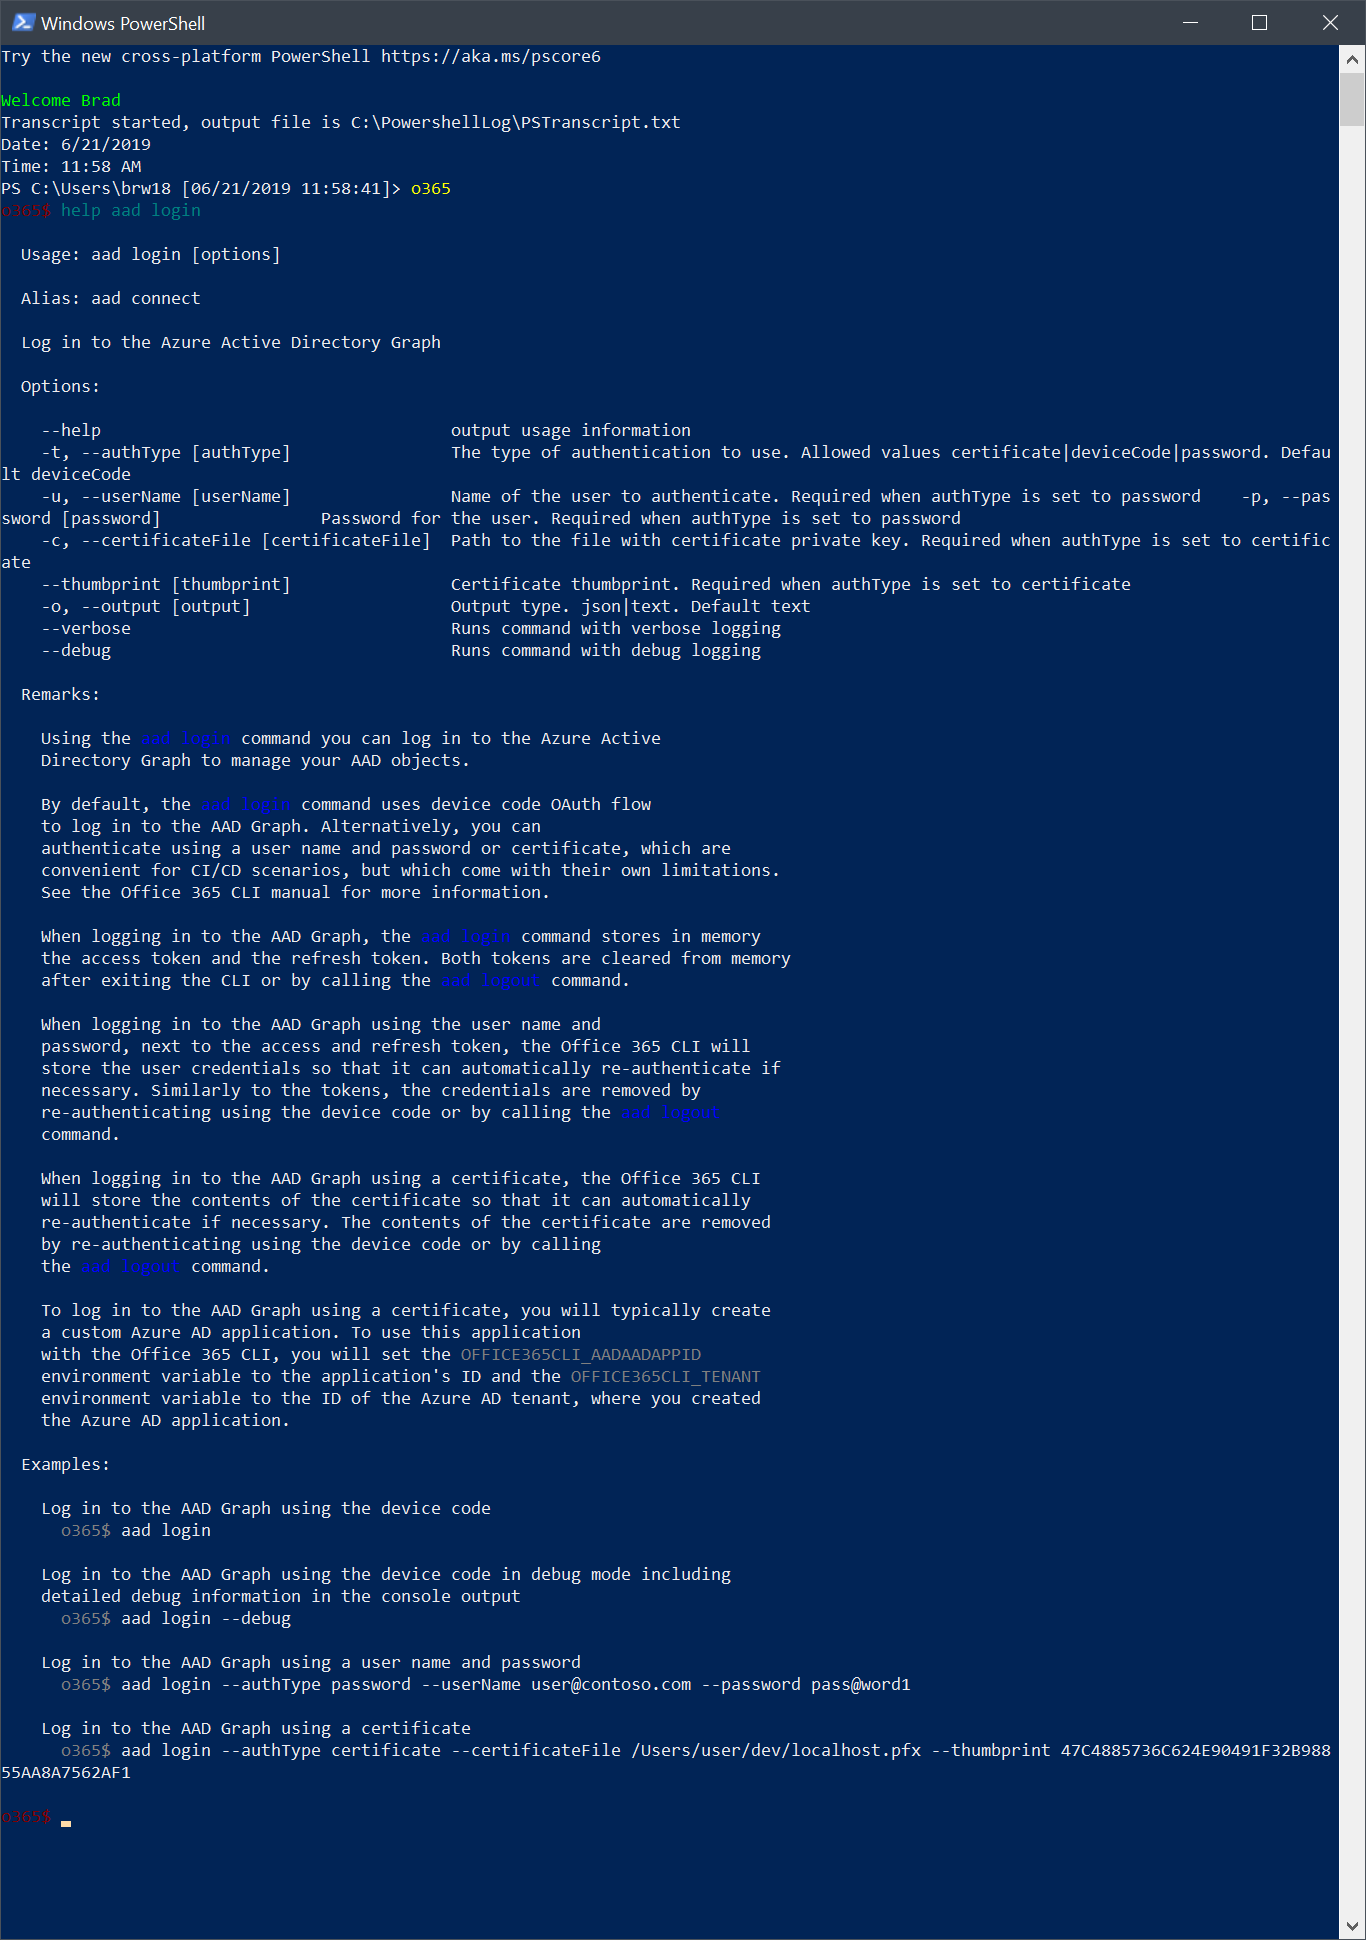
 We can also view a command’s full detailed help which shows us aliases, usage, options, remarks, examples and more. To view the full help for AAD Login we would run the following command:
help aad login
Log In
Currently, we can log into a SharePoint site, Azure Active Directory, and Graph using the CLI. By default login commands uses device code OAuth. Other options include using a username and password or certificate. For SharePoint, depending on the command you want to use, you might be required to log in to a SharePoint Online tenant admin site (suffixed with -admin, example: https://lazyadmin-admin.sharepoint.com) or a regular site.
Device ID OAuth (Default)
The device code flow is the recommended approach for command-line tools to authenticate with resources secured with Azure Active Directory because the authentication process is handled in the browser by Azure AD itself, it allows you to benefit of rich security features such as multi-factor authentication or conditional access. The device code flow is interactive and requires user interaction which might be limiting if you want to use the Office 365 CLI in your continuous deployment setup which is fully automated and doesn’t involve user interaction.
To log into AAD using the device ID OAuth, run the following command:
aad login

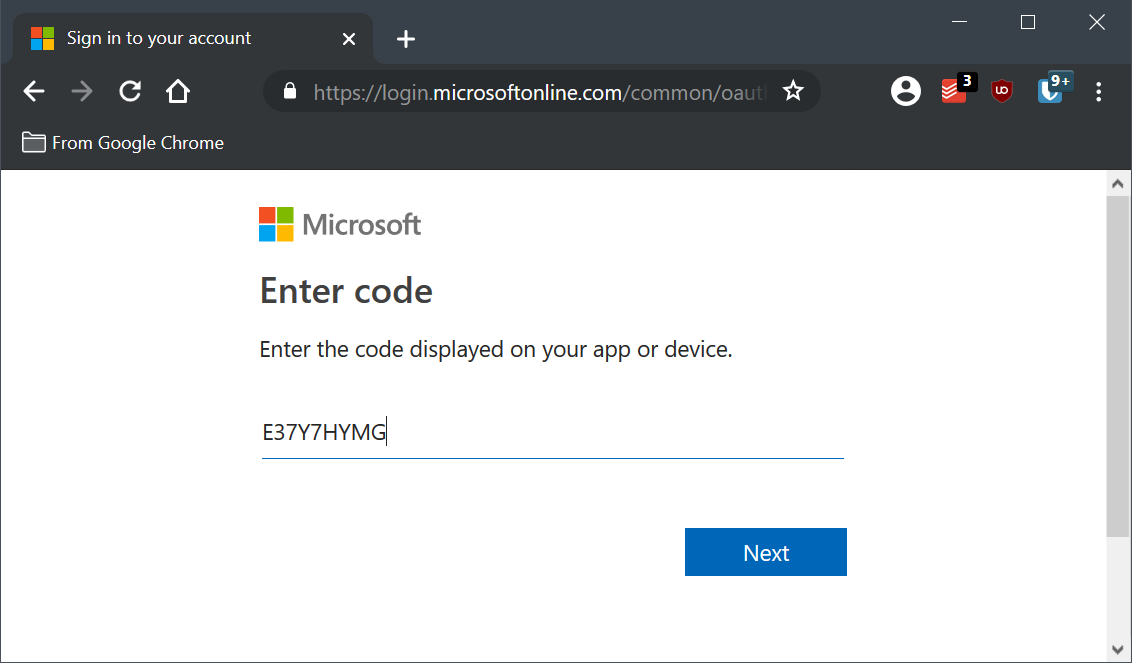
Proceed to enter your username and details for your enviornment:
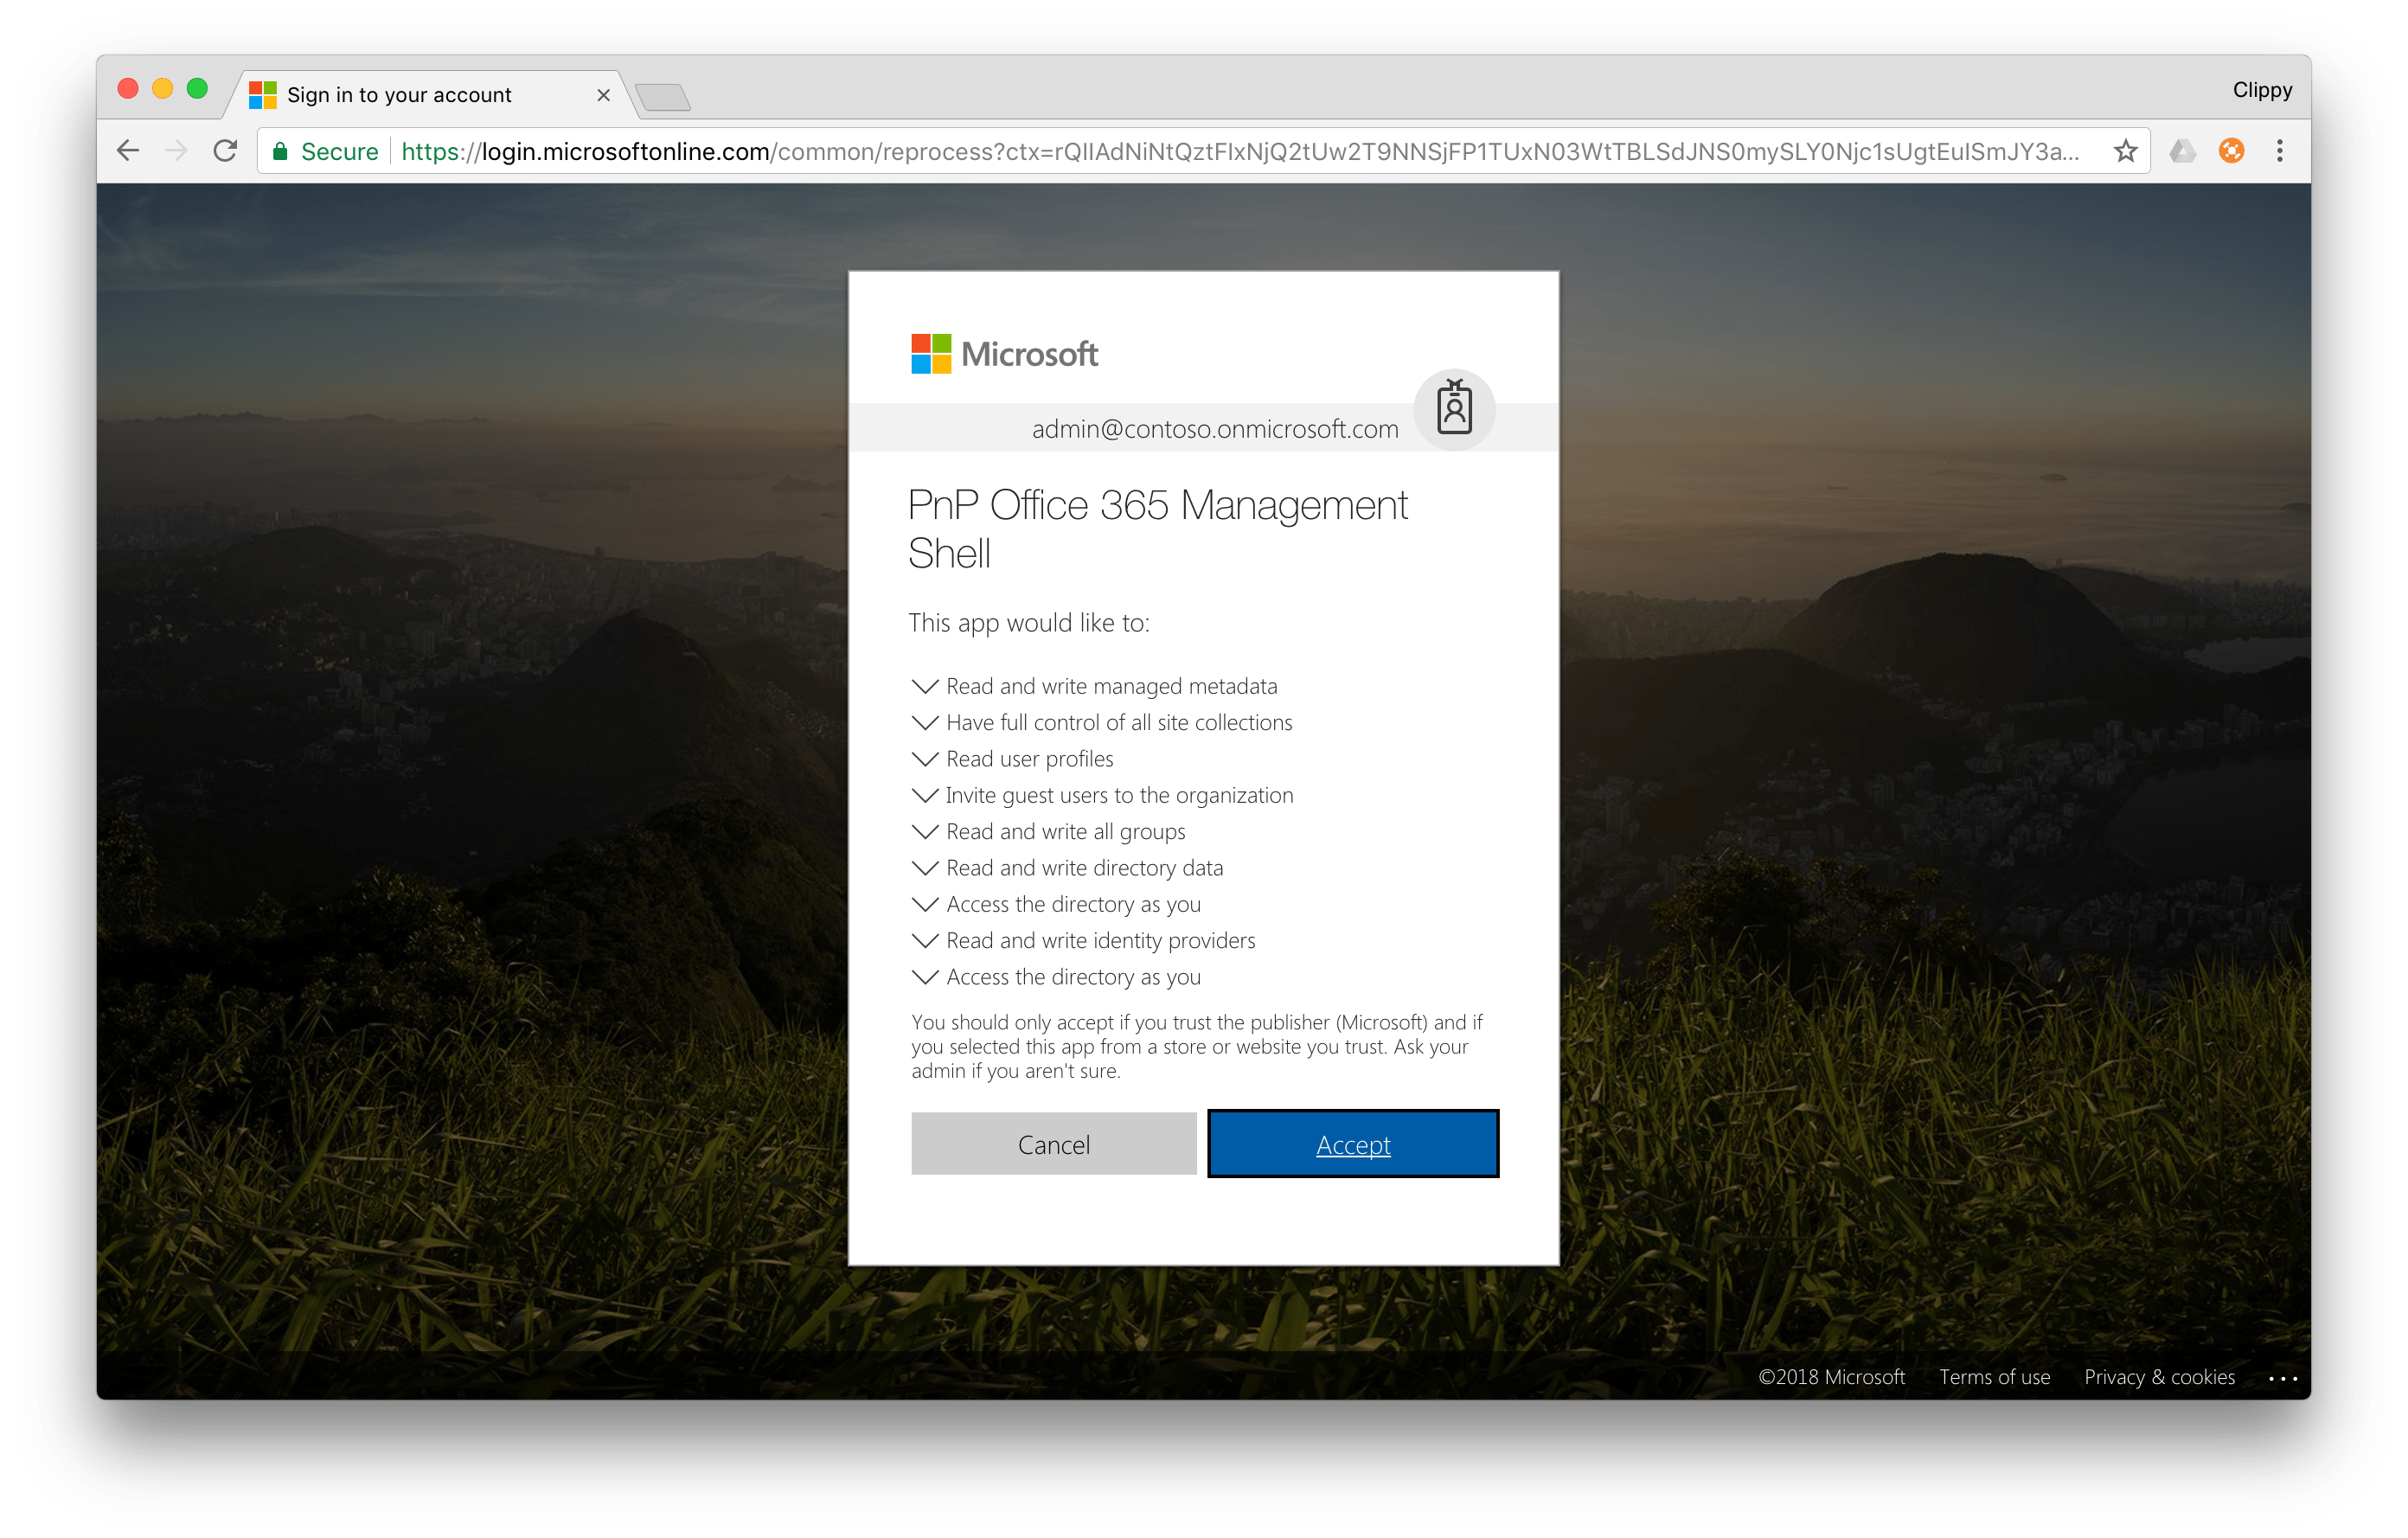
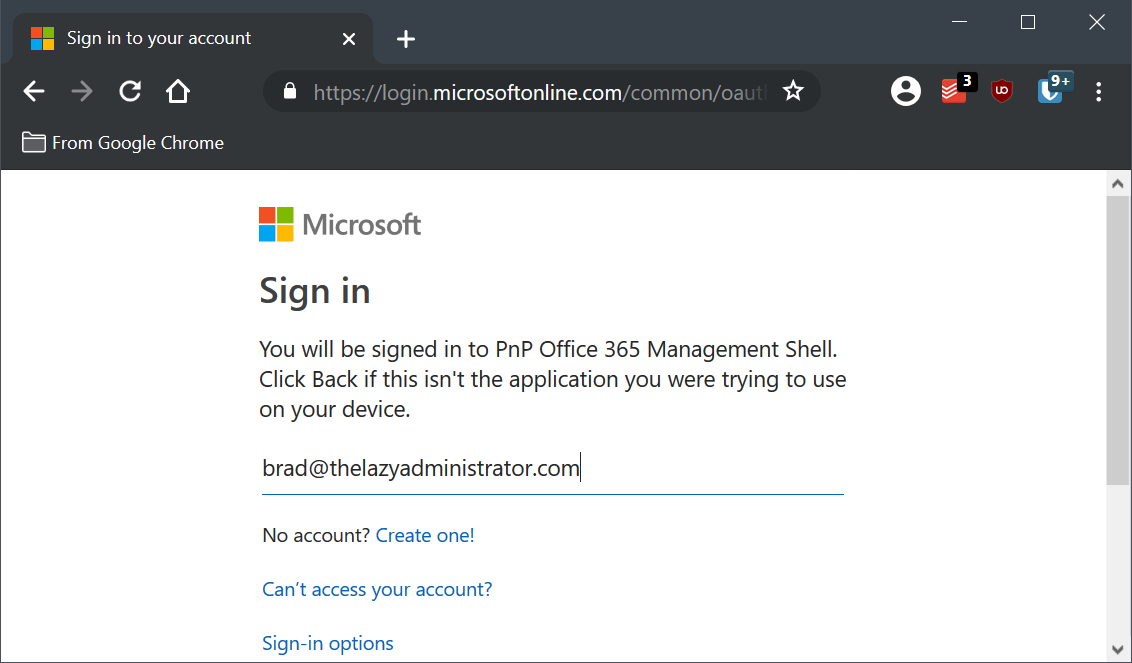 If you are using the Office 365 CLI for the first time, you will be also prompted to verify the permissions you are about to grant the Office 365 CLI. This is referred to as consent.
If we have correctly authenticated against the OAuth login we will see a success message

Username and Password
Another way to log in to Azure AD or SharePoint in the Office 365 CLI is by using a user name and password. To use this way of authenticating, set the authType option to password and specify your credentials using the userName and password options.
To log in to SharePoint Online using your user name and password, execute:
spo login https://contoso.sharepoint.com --authType password --userName [email protected] --password pass@word1
To log in to Azure AD using your user name and password, execute:
aad login --authType password --userName [email protected] --password pass@word1
Using credentials to log in to Office 365 is convenient in automation scenarios where you cannot authenticate interactively. The downside of this way of authenticating is, that it doesn’t allow you to use any of the advanced security features that Azure AD offers like multi-factor authentication or conditional based access. If your account for example uses multi-factor authentication, logging in to Office 365 using credentials will fail.
When logging in to Office 365 using credentials, Office 365 CLI will persist not only the retrieved access and refresh token, but also the credentials you specified when logging in. This is necessary for the CLI to be able to retrieve a new refresh token, in case the previously retrieved refresh token expired or has been invalidated.

Certificate
Another way to log in to Azure AD or SharePoint Online in the Office 365 CLI is by using a certificate. To use this authentication method, set the OFFICE365CLI_AADAADAPPID environment variable to the ID of the Azure AD application that you want to use to authenticate the Office 365 CLI and the OFFICE365CLI_TENANT environment variable to the ID of your Azure AD directory. When calling the login command, set the authType option to certificate, specify the path to the certificate private key using the certificateFile option and specify the certificate thumbprint using the thumbprint option.
To log in to SharePoint Online using a certificate, execute:
spo login https://contoso-admin.sharepoint.com --authType certificate --certificateFile /Users/user/dev/localhost.pfx --thumbprint 47C4885736C624E90491F32B98855AA8A7562AF1
To log in to Azure AD using a certificate, execute:
aad login --authType certificate --certificateFile /Users/user/dev/localhost.pfx --thumbprint 47C4885736C624E90491F32B98855AA8A7562AF1
Logging in to Office 365 using a certificate is convenient for automation scenarios where you cannot authenticate interactively but also don’t want to use credentials.1
Because there is no user context when logging in using a certificate, you will typically create a new Azure AD application, specific to your organization and grant it the required permissions.1
You should keep in mind, that because the Office 365 CLI will be accessing these APIs with app-only context, you need to grant the correct application permissions rather than delegated permissions that would be used in other authentication methods.1
Logging in using a certificate gives the Office 365 CLI app-only access to Office 365 services. Not all operations support app-only access so it is possible, that some CLI commands will fail when executed while logged in to Office 365 using a certificate.1
When logging in to Office 365 using a certificate, Office 365 CLI will persist not only the retrieved access token but also the contents of the certificate’s private key and its thumbprint. This is necessary for the CLI to be able to retrieve a new access token in case of the previously retrieved access token expired or has been invalidated.1
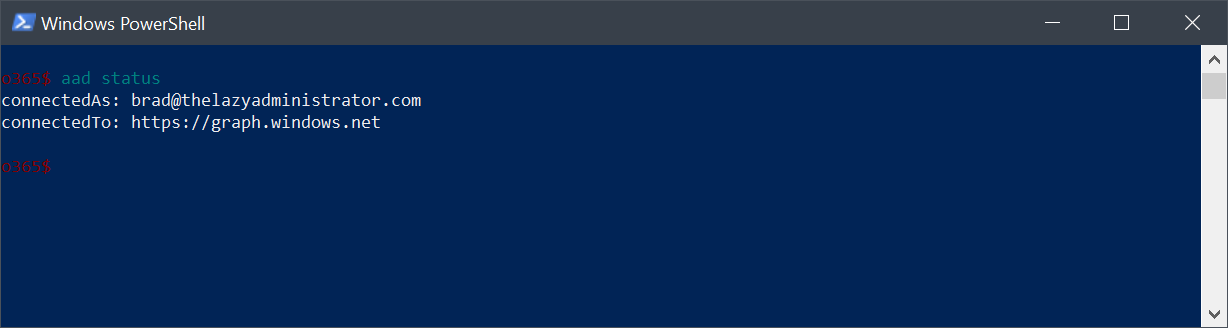
Check login status
To see if you’re logged in to the particular Office 365 service and if so, with which account, use the <service> status command, for example, to see if you’re logged in to Azure AD, run the following command:
aad status
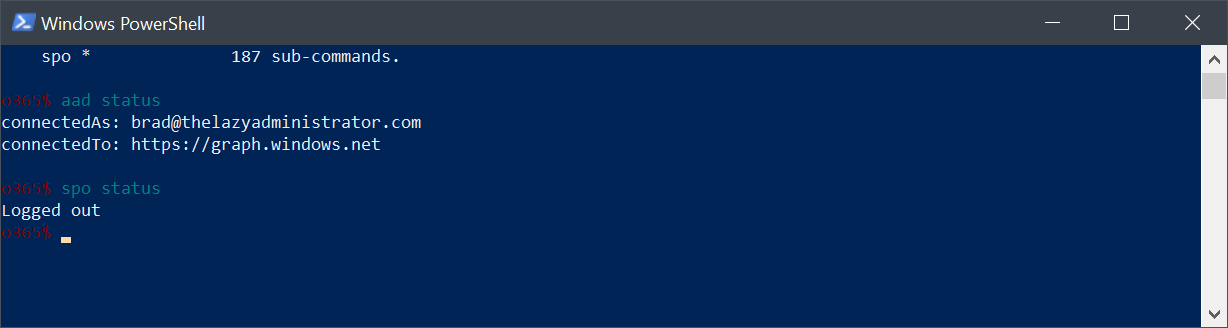
To check to see if you are logged into SharePoint Online, run the following command:
spo status
If you’re logged in to Office 365 using a certificate, the <service> status command will show the name of the Azure AD application used to log in.
Log Out
To log out from an Office 365 service, use the <service> logout command for that service. For example, to log out from Azure AD, run the following command:
aad logout
Each service in the Office 365 CLI manages its login information independently. This makes it possible for you to be logged in to different services with different accounts. Using the <service> status command you can see which account is currently logged in to the particular service.
Send an Email Using Office 365 CLI
In this example I will show you how you can leverage the CLI to send an email as the logged in user context. The first thing we need to do is authenticate against Graph. To do this run the following command:
graph login
by running graph status I can see that I am successfully connected to graph as [email protected]
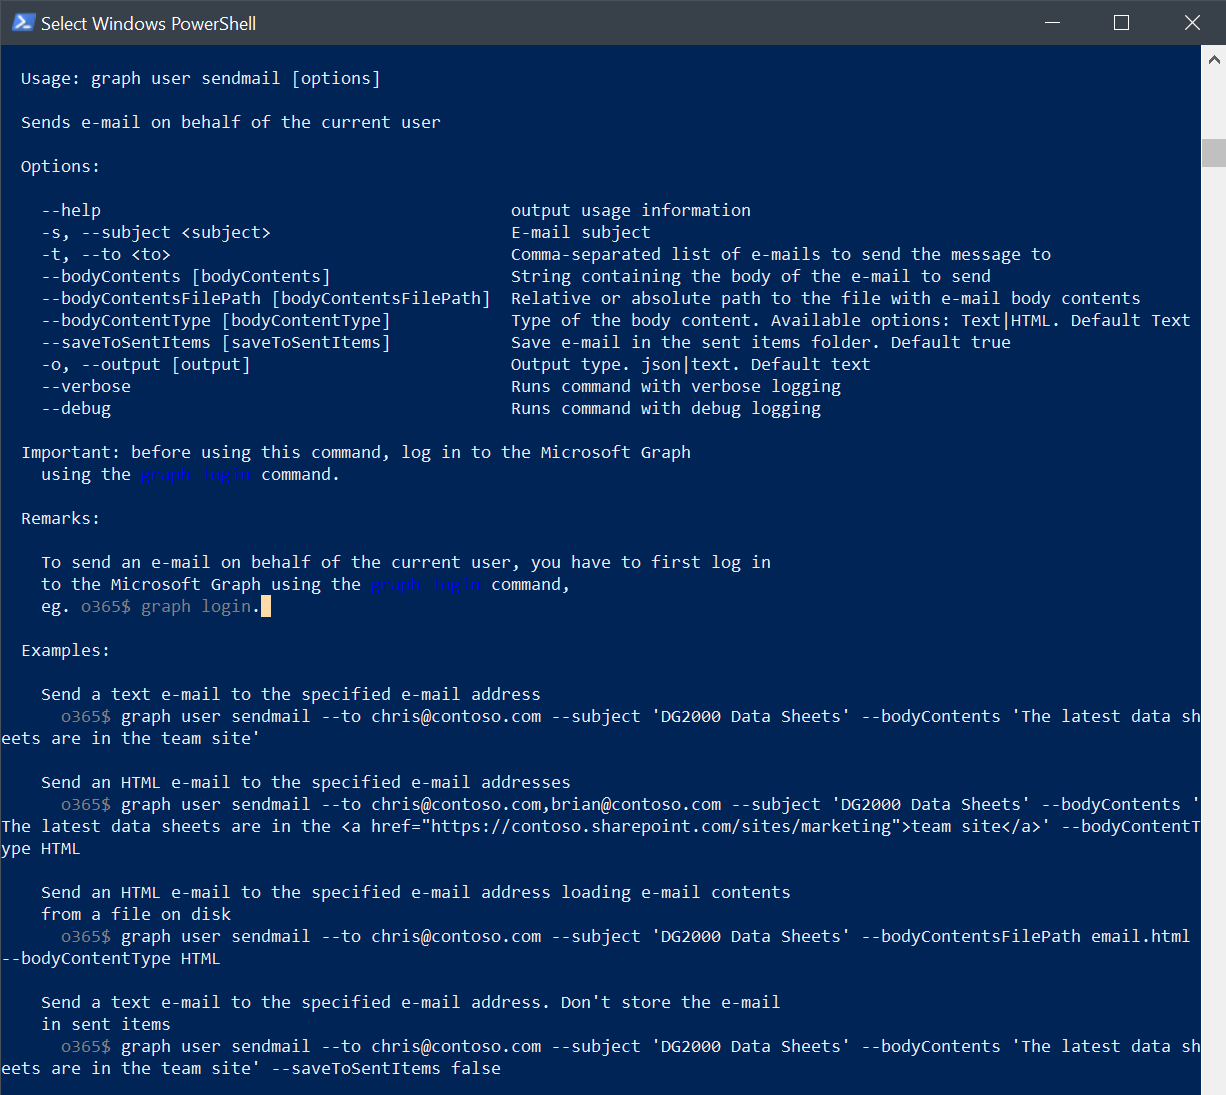
 By looking at the detailed help I can understand the syntax of the command and any parameters that I may need. The command to view it is help graph user sendmail
In this example I am going to be sending my work email a test message. Since this is going to be sent as the logged in user context it will be from [email protected]
graph user sendmail --to [email protected] --subject "Sending this from CLI!" --bodyContents "Hello, this is being sent to you from PowerShell using Office 365 CLI v2!" --verbose
By using the –verbose parameter I can see that it was successfully sent.

Going over to my Outlook I can see that the message has already been received and is sitting in my inbox

we could also use the –savetosentitems parameter to make it so the sent mail will not appear in the users sent items folder. To do this you will want to put –savetosentitems false. In the full detailed help we can also see how to send a rich HTML email body.
Get User Details
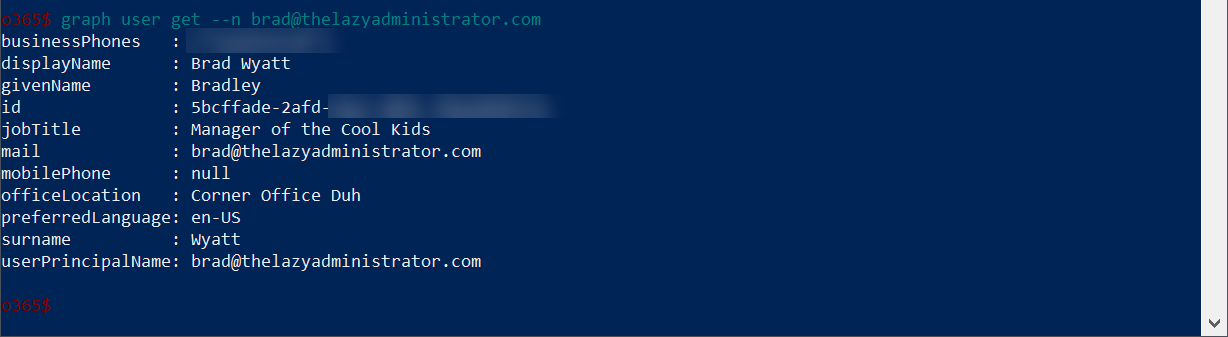
The Office 365 CLI also allows us to gather detailed information about our users and look up proeprties against Graph. In this example I will display detailed property information for my user. I will lookup my user by the UPN which I specify using the –n parameter.
graph user get --n [email protected]
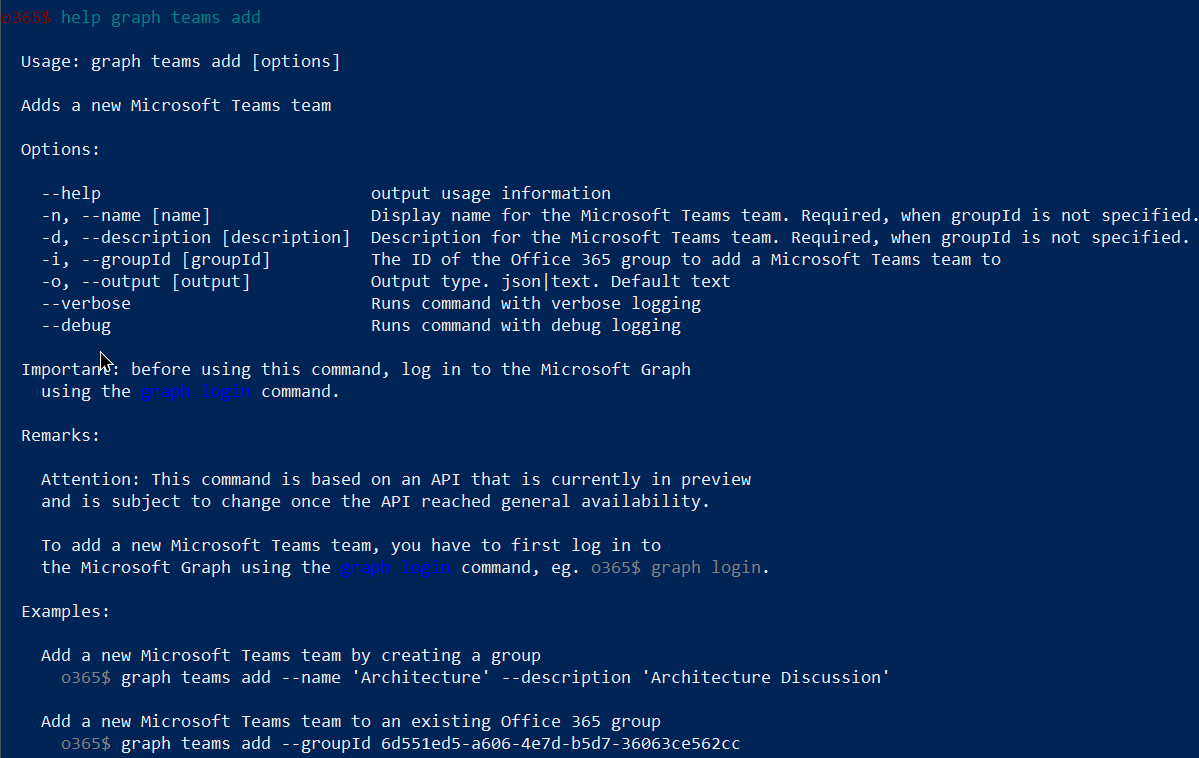
Create a new Microsoft Teams Team
To create a new Microsoft Teams Team using the CLI we can use the graph teams add command group and sub commands. We can view the full detailed help by running help graph teams add.
In this example I am going to create a new Teams called “Management” with a description of “Management and Leadership team”. To do this I will run the following command:
graph teams add --name "Management" --description "Management and Leadership team"

Clone a Micrsoft Team
The graph teams clone command group can be used to clone an exisiting Microsoft Team and create a new one with the same configuration and settings.
First, I will run the following command to get a list of my current Teams and their properties. The proprty I want to note is the ID as its required later.
graph teams list
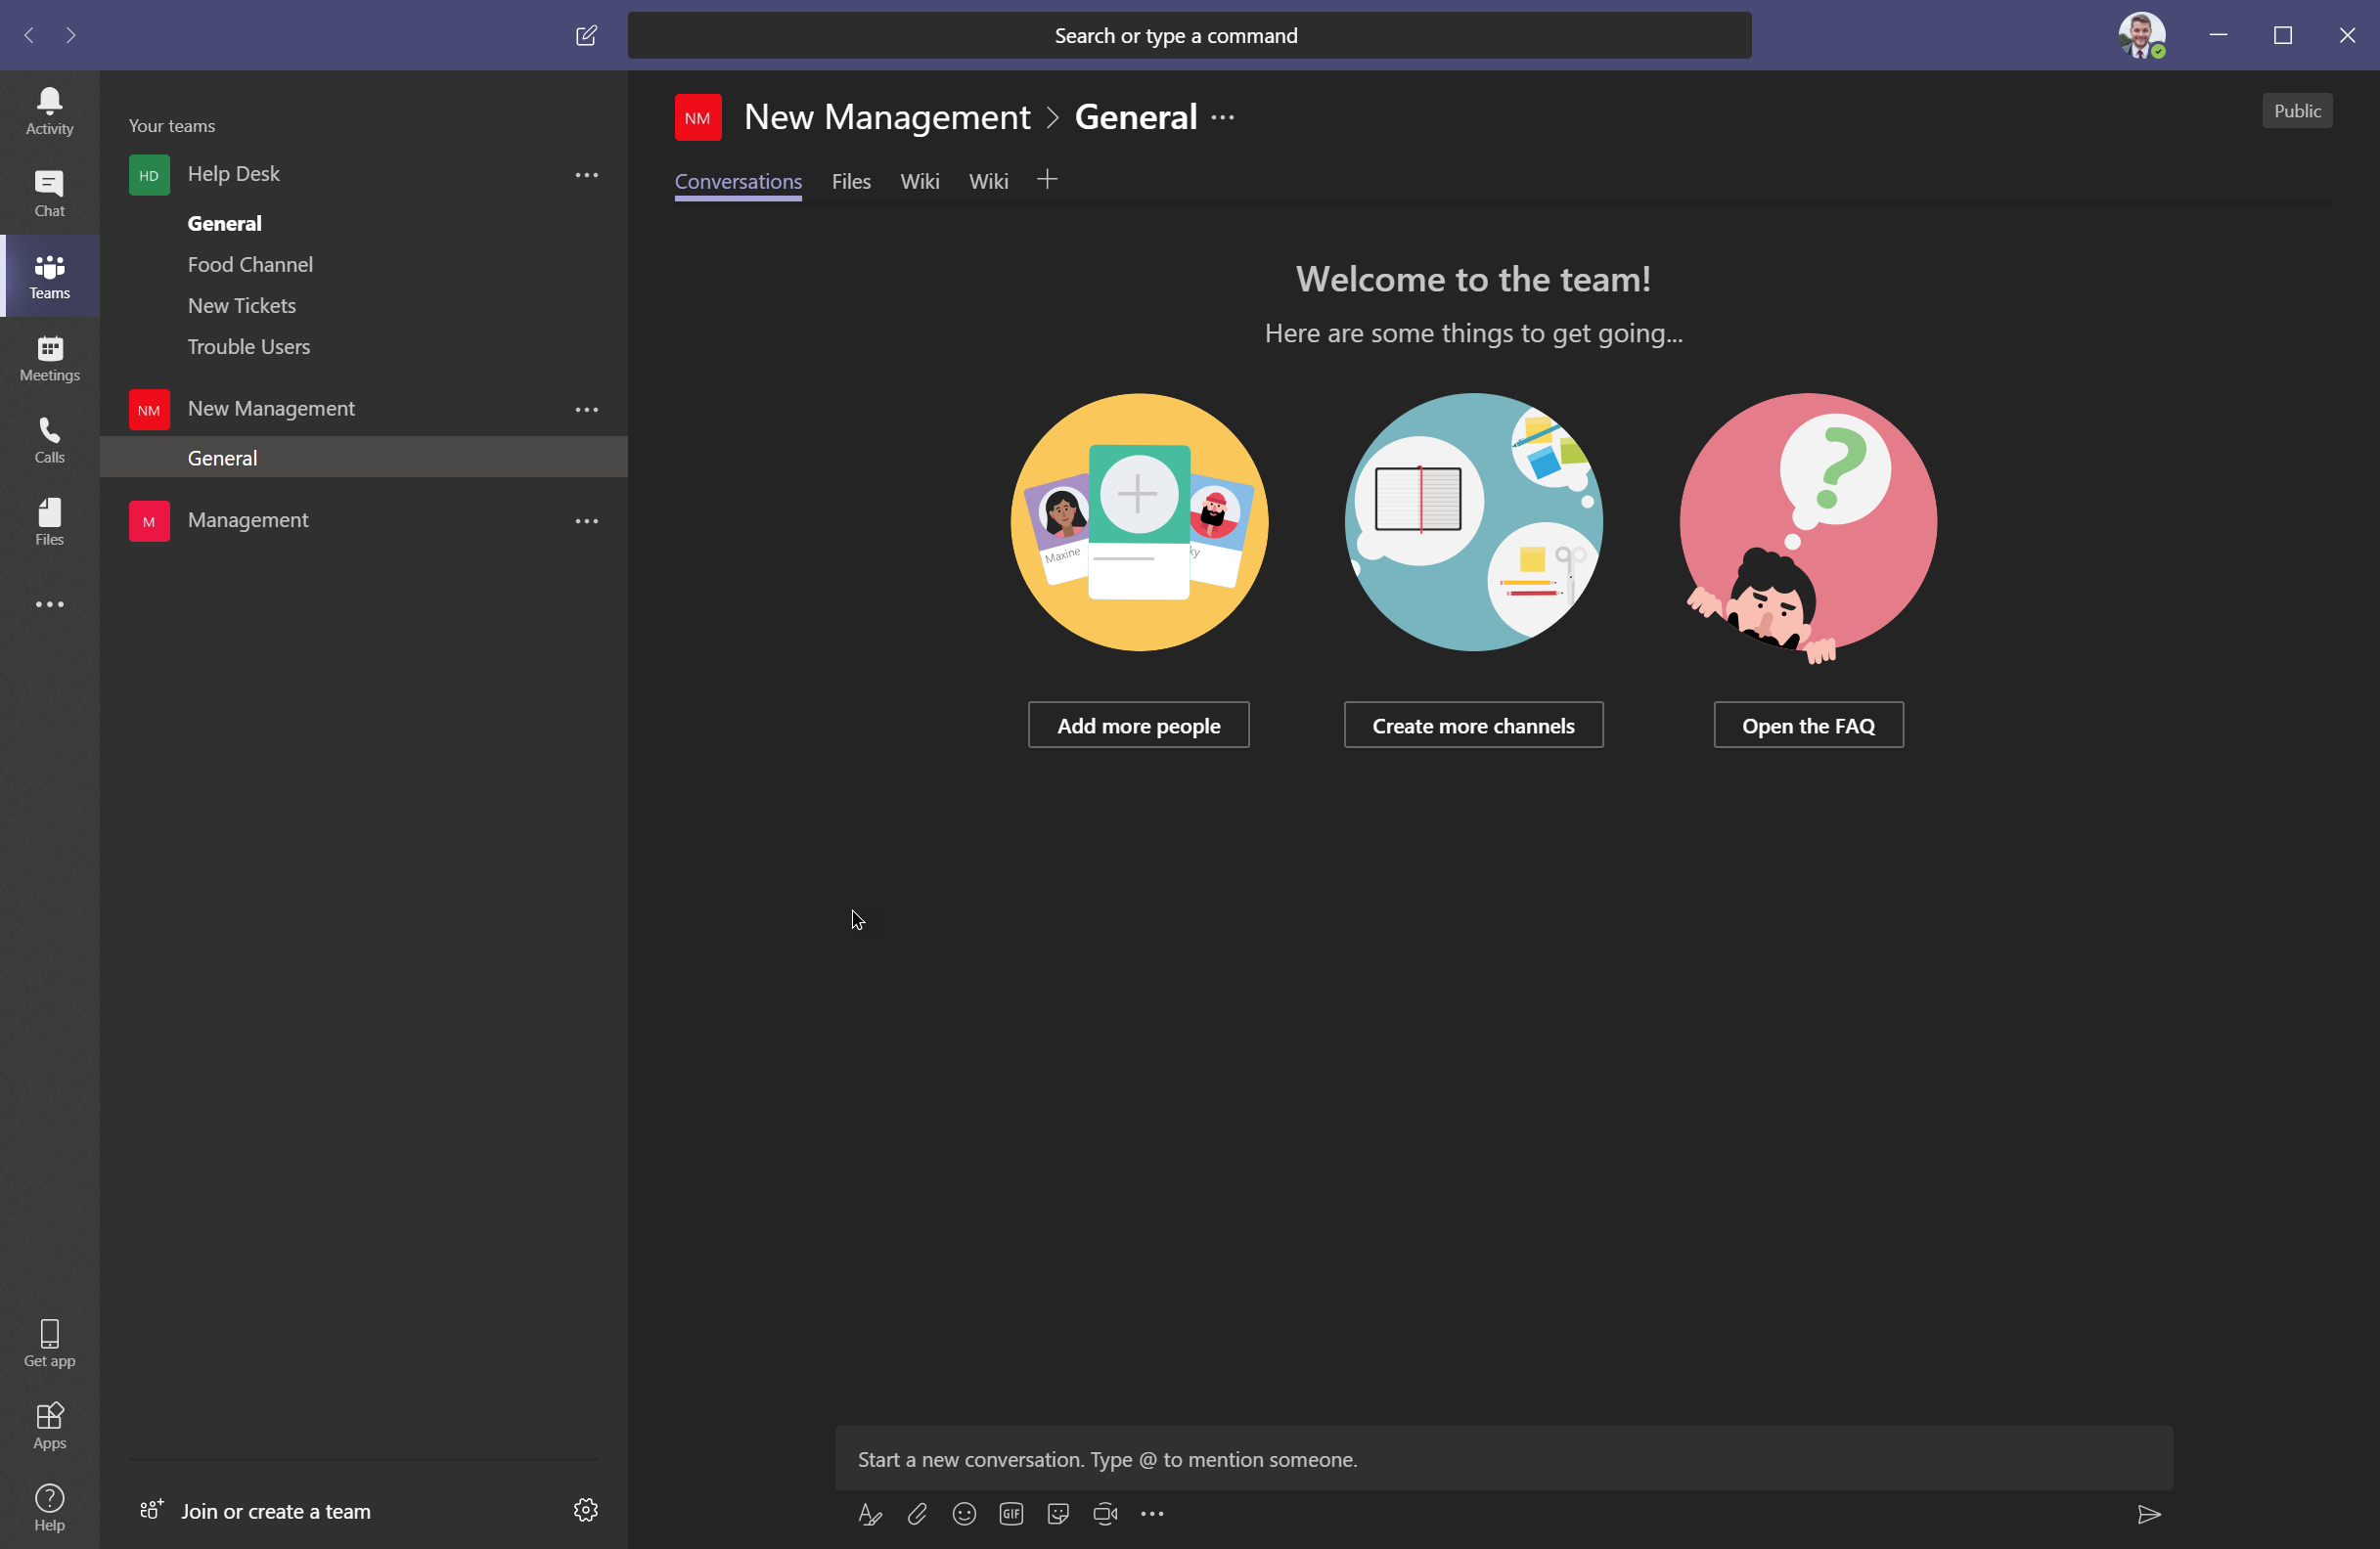
 Next, I will run the following command to clone my current “Management” team to a new “New Management” team. Note that I can specify the items that I want to clone by using –partsToClone
graph teams clone --teamId fa9c9332-a85d-4349-aa15-f287793bde8f --displayName "New Management" --partsToClone "apps,tabs,settings,channels,members" --description "New Teams for the new management team once we fire the old one" --visibility public

And now when I go into Teams I can already see the new cloned Team.
Create a New SharePoint Site
There are many different options when creating a new SharePoint site. By viewing the help we can see we can create a teams site, specify a site language, communication site and even spcify custom designs.
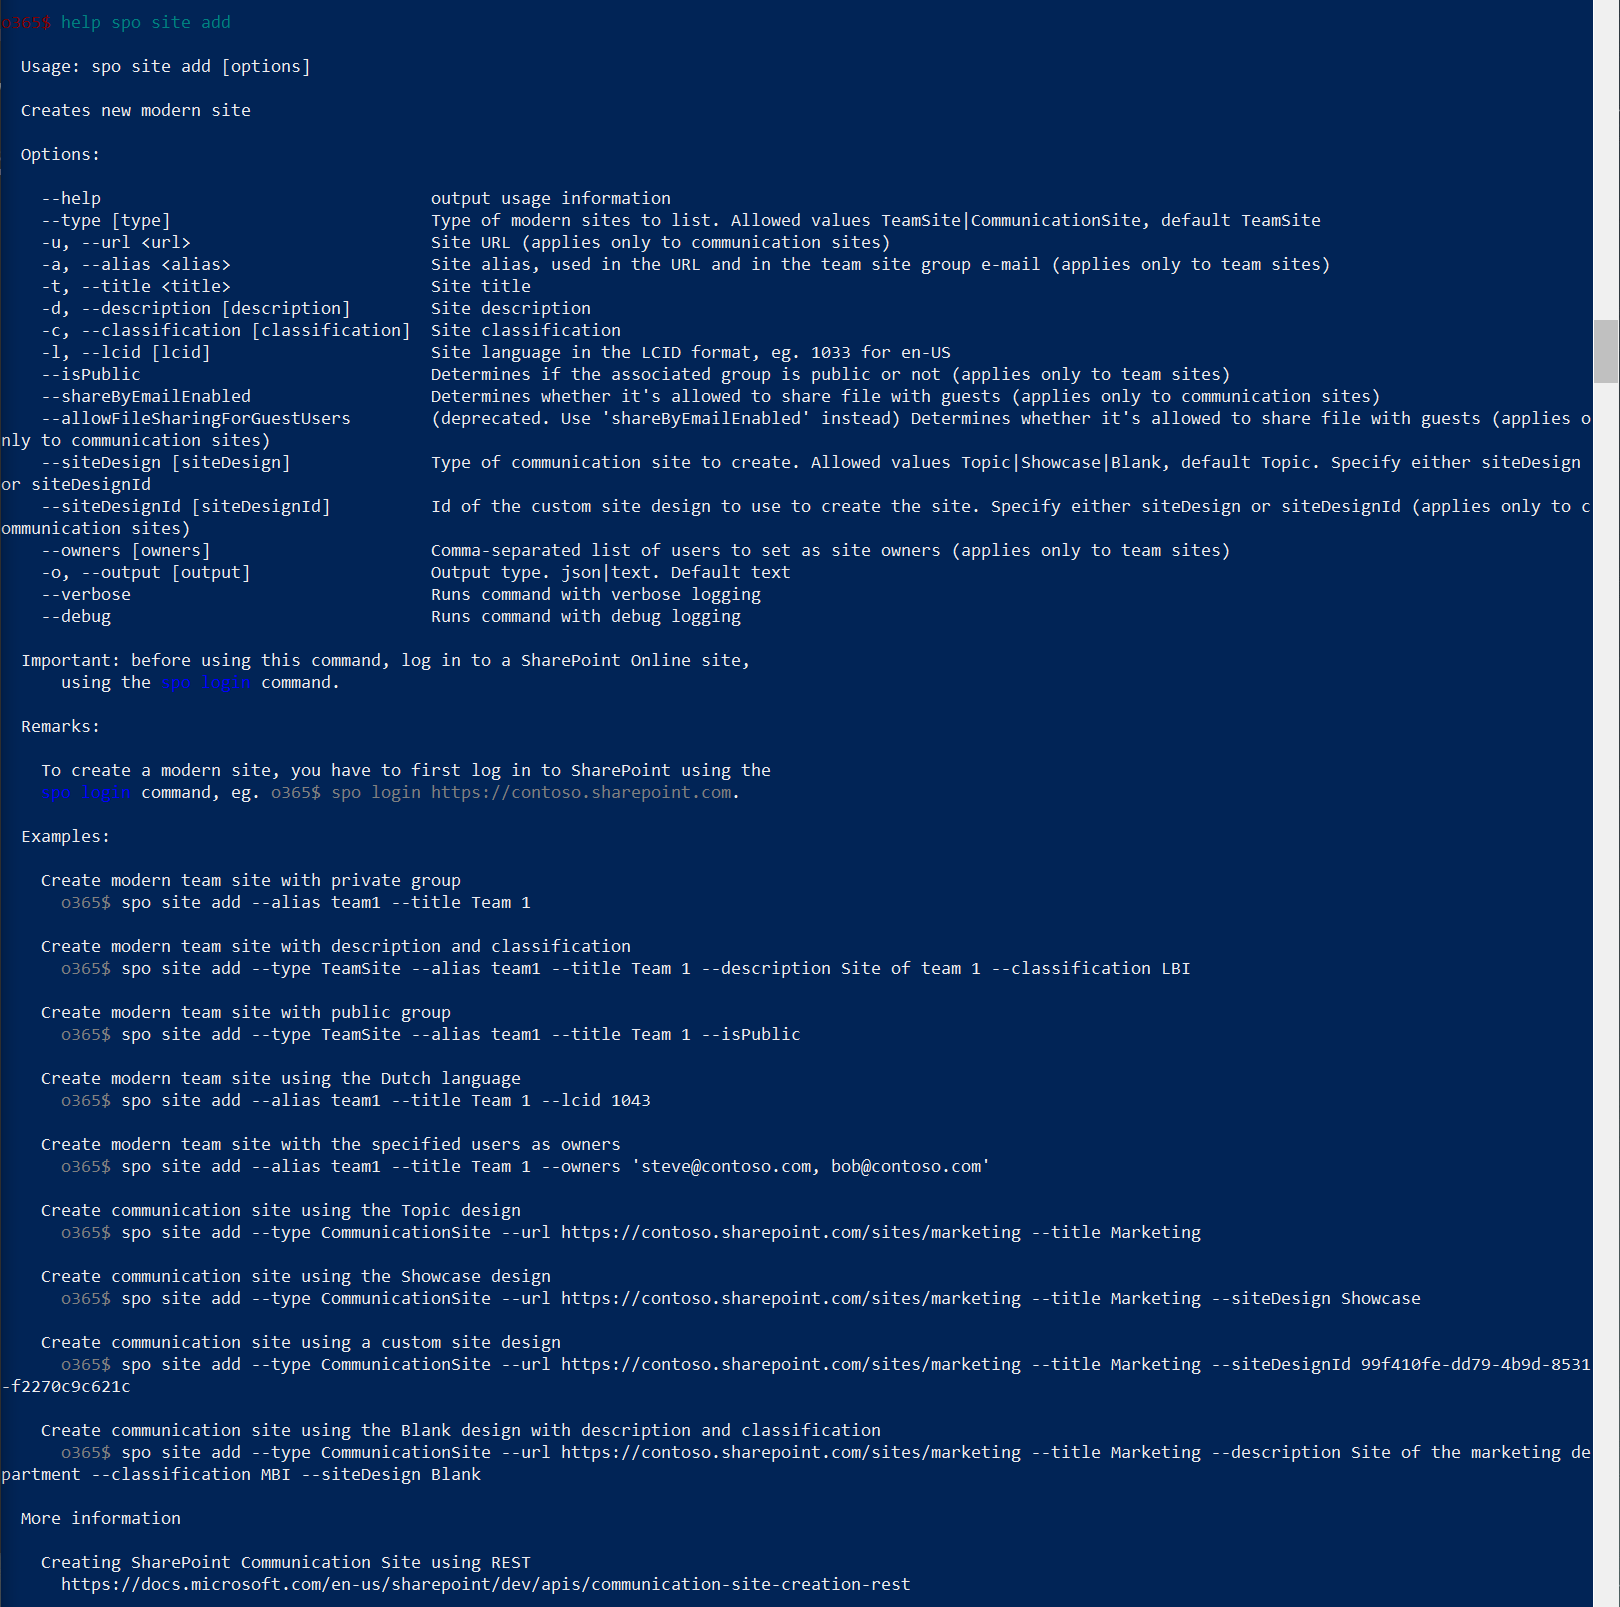
In my example I am going to create a new Teams site for my IT department. The following requirements must be met:
- TeamSite type
- Title of Information Technology
- URL of https://bwya77.sharepoint.com/InfoIT
- Description of “Information Technology dpt site”
To achieve all of the listed requirments I can run the following command:
spo site add --type TeamSite --alias "InfoIT" --title "Information Technology" --url "https://bwya77.sharepoint.com/InfoIT" --description "Information Technology dpt site"
Final Thoughts
Overall I would highly recommend getting familiar with the Office 365 CLI. The overall speed and performance is much better than some of the alternative methods, its constantly being improved with new commands and command groups. Currently the commands for SharePoint Online are amazing. The syntax and formatting are clear and easy to follow and even the help is consistent and detailed. The Office 365 CLI should be something all Office 365 administrators and even developers get accustomed to. Again, the project can be found here.
Sources
- https://github.com/pnp/office365-cli/blob/master/docs/manual/docs/user-guide/connecting-office-365.md
- https://en.wikipedia.org/wiki/Npm_(software)
- https://pnp.github.io/office365-cli/
- https://github.com/pnp/office365-cli

My name is Bradley Wyatt; I am a 6x Dual-Microsoft Most Valuable Professional (MVP) in Microsoft Azure and Microsoft 365. I have given talks at many different conferences, user groups, and companies throughout the United States, ranging from PowerShell to DevOps Security best practices, and I am the 2022 North American Outstanding Contribution to the Microsoft Community winner.
One thought on “Getting Started With the Office 365 CLI”